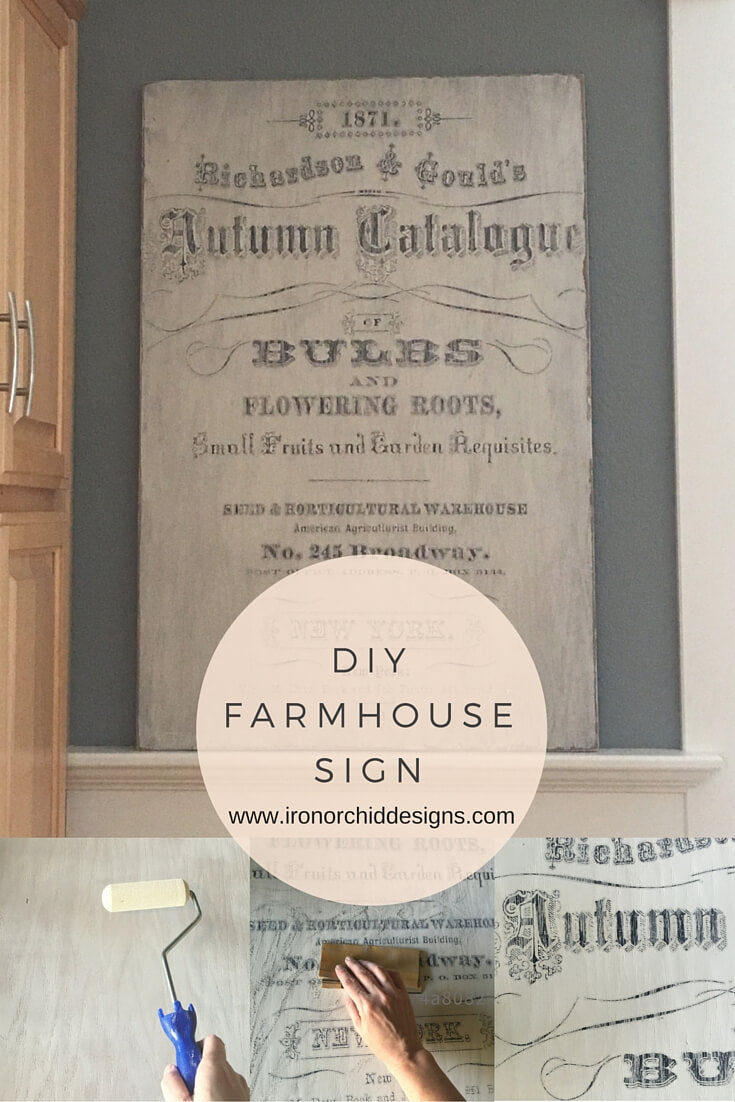
How to make a Vintage French Farmhouse Sign

Hello everyone! It’s Sally here to show you how I made my French Farmhouse sign for my kitchen! I just LOVE the way it turned out and the best part is it really is SO easy! Trust me, YOU CAN DO THIS!
Supplies:
1 Piece of 1/2 inch thick plywood cut to preferred size ( mine is about 2.5 ft x 3.5 ft ) Home Depot or Lowe’s will be happy to cut any size for you
Chalk Paint in white or off white ( I used Maison Blanche in Ivory)
Paint brush ( I know I show a roller, but I took that picture before realizing the sponge roller was a mistake, and then forgot to take another picture! lol)
Iron Orchid Designs Decor Transfer ( click on the text to go directly to the product!)
sand paper
glaze ( you can make your own with acrylic paint and water or buy a pre made glaze. you can also use distress wax such as Annie Sloan’s dark wax ) I used Kristi Kuehl Pure Home Glaze finish in Ebony (this was a glaze and protectant in one, so I didn’t wax after)
Did you gather your supplies?? Ok, then the hard part is behind you!

As you can see, I found my plywood laying around. It was stained and ugly. We’re about to take care of that!

I actually didn’t like the way the roller worked, so on my second coat I used a paint brush. I painted two coats of Ivory by Maison Blanche.

Try your best to ignore my messy garage ( I do!) The next step ( after your paint is dry of course ) is to place your transfer onto your painted plywood. Keep the protective backing on until you’ve played around and have a good idea of where you want the transfer to go. Some of the image might not fit onto your board, and that’s ok, our transfer designs are created to be flexible and you can cut out parts and the design integrity remains! Trim off any parts of the image you won’t be using so you can Be sure to save it for another project!
Ok, now take off the protective backing and carefully lay your image down and tape into place using any kind of painters tape, washi tape… something that won’t pull up your paint when you remove. Here is a video of me adhering my transfer

All that powder is sanded residue. Watch the final sanding and glazing of my French Farmhouse Sign on video here:
I’m so proud of the way it came out and now you know how easy it is! Go make yourself one or two! I’m going to make another one real soon for above my piano.

 ×
×
14 FAVORITE VALENTINE CRAFTS & DIY GIFTS W...
Whether you have a Valentine, a Galentine, a Palentine, or just someone who needs a little extra love in your life, here’s all the inspiration you need for Valentine crafts and DIY gifts this year!...

2024 Chosen to Create: Spiritual Retreat f...
Looking for a place to reconnect with your faith, to reignite your creativity, and to form meaningful relationships with like-minded women? We have the perfect opportunity for you: the Chosen to Create Spiritual Retreat. This...