Create A Stunning Statement Necklace!
Creating this romantic statement necklace was an enjoyable and satisfying process…
I’ll share my secrets for getting great results, without a lot of fuss!
Hello Iron Orchid Designs friends – it’s Heather from Thicketworks. Today, join me as we use the incredibly versatile IOD Vintage Decor Moulds to
, or as a special treat just for you…

– This post contains affiliate links –
Ever since I first discovered these amazing tools I’ve been on a quest to find ways to bring their beauty into my work.
Whether you’re up-scaling a curbside furniture find, indulging in mixed media madness, or creating just for fun, these classic designs can enhance almost any type of project.
I’ve been itching to incorporate them into a fashion accessory project.
When I had a few moments to ponder, it just became crystal clear: NECKLACE!
Yep, I saw it in my mind’s eye, and couldn’t rest until I had experimented with whether or not this could actually work.
The answer is “Oh, yeah – it works, alright!”
As you might imagine, a project like this requires a few ingredients…
Supplies:
- IOD Vintage Decor Mould: Baroque 4
- IOD Vintage Decor Mould: Baroque 3
- IOD “Friffery” Clear Stamp
- Kato Black Polymer Clay
- Glazed Ceramic Tiles, or baking sheet and parchment paper
- Perfect Medium
- Perfect Pearls: Copper
- Krylon Matte Spray Sealer
- Copper Jump rings
- 18 gauge Copper Wire
- Needle Nose Pliers
- Copper Jewelry Chain
- Blades for cutting the clay
- Corn Starch
Optional:
- Mini Food Processor (dedicated to polymer clay only)
- An Acrylic Brayer
- A pasta machine (dedicated to polymer clay only)
To begin the process, it’s important to condition the polymer clay.
Start by chopping it into small chunks.

If you have strong hands, you can simply knead the clay over and over until it becomes warm and pliable.

If, like me, you need a bit of assistance, a Mini Prep, (dedicated to polymer clay only) will create a mass of tiny nuggets that are very easy to combine and knead:

Once the clay is fully conditioned, begin packing it firmly into the mould – an acrylic brayer makes it easy to press the clay into every nook and cranny:

Shave any excess from the top with a tissue blade:

Smooth the surface with your fingers:

Flip the mould upside down, and deposit the casting onto your baking surface:

Gently coax the casting into the proper silhouette, and trim off the extremely fragile tips of the design with a blade.
Gently wrap the upper edge of the Acanthus Leaf over a pencil, to create a ‘tube’ for the jewelry chain to run through. Leave the pencil in place while baking.

Bake the clay for the recommended time. Kato cures at 300 degrees in 10 minutes or so.
Allow the castings to cool completely.
Playfully arrange the cured castings, trying different combinations and designs, until you find yourself smiling:

Roll out a thin sheet of polymer clay with a pasta machine or acrylic roller, and place the Acanthus Leaf casting on top of this sheet of raw clay.
Press the baked clay firmly into the sheet of raw clay to create a solid bond.

Trim the excess away with a blade, slice the ‘sandwich’ off of the tile with a blade, then use your fingers to blend the raw clay along all of the contours:

Using one of the gorgeous flourish stamps from the “Friffery” IOD Stamp Set, create texture on the raw clay.

Tap a thin coating of Corn Starch on the raw clay to ensure that the stamp doesn’t stick:

Then press the stamp into the clay:

When you peel the stamp away, you’re left with a gorgeous texture that enhances the back of your castings.

Create wire loops, with several twists at the end. 7 were used in this project.

Sandwich the wire loops between the baked casting and a sheet of raw clay:

Trim the excess, and texture the back:

Repeat this process for the longer flourish castings, placing a loop at each end, embedded between a sheet of raw clay, and the baked casting:

Trim the excess, and texture the back.
Bake the pieces again, bonding the wire loops between the casting and the raw sheet clay.

Allow the castings to cool completely.
Swipe Perfect Medium across the high points of the design:


Use a soft brush to swirl Perfect Pearls over the surface:

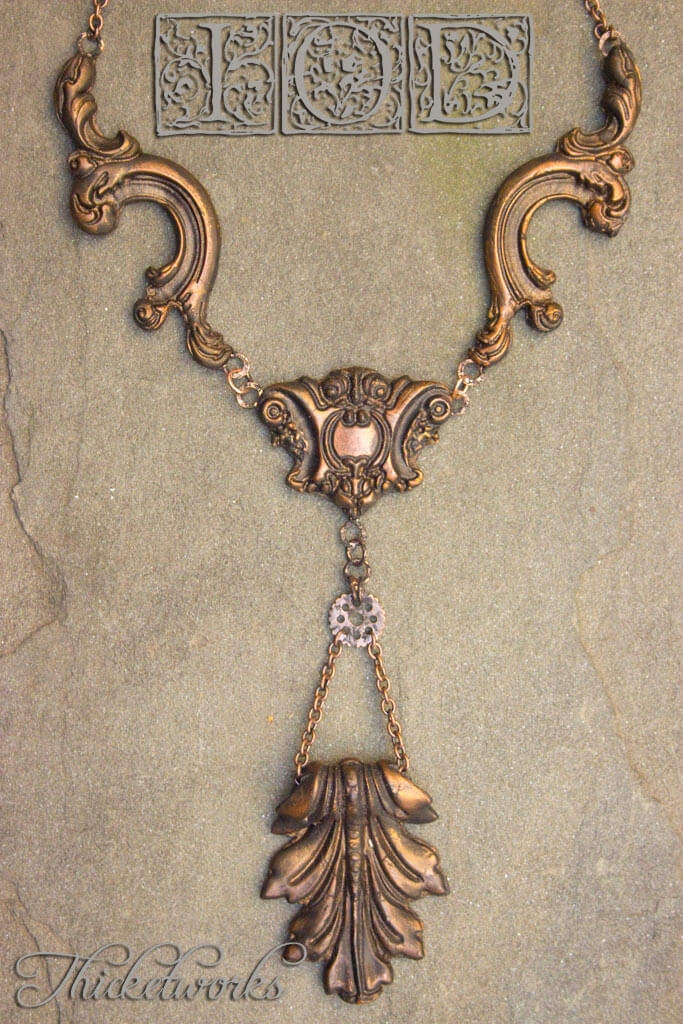
Seal the pieces with spray sealer, and assemble with jump rings and jewelry chain.

For this look, allow the chain to run through the cylinder at the top of the Acanthus Leaf, and join it to a small metal gear:

The end result is rich, bold and romantic.
The completed piece is surprisingly light, in spite of the substantial look.

The elegant curves drape across the body beautifully – it’s a very comfortable piece to wear!
I hope you’ve enjoyed this adventure in accessorizing! You can use these methods to create your own variations of this stunning statement necklace…
Stop by Thicketworks for a visit sometime – we’re always up to something fun!
Heather
 ×
×