Easy Peasy Farmhouse Dresser Makeover With a Paintable Furniture Transfer
Have you fallen in love with the idea of using a paintable furniture transfer for your next DIY Farmhouse decor project?
With the IOD Catalogue of Roses transfer, it’s impossible not to! Especially if you have a sad old dresser that’s just begging for a transformation like this one.

Truth-be-told, maybe tackling a dresser makeover seems a bit overwhelming. Where do you start? What products do you need and how do you use them?
If only there was a short, easy-to-follow guide or video showing how to use paintable image transfers, though, you might be able to conquer the world… (Without putting on your cape and tiara!)
Surprise! We have the perfect, short video tutorial, with clear simple steps, showing you how to transform a dresser into a beautiful, vintage-y treasure using our very own IOD Paintable Transfers.
No time to watch now? Pin it for later.
Now let’s break down the project step by step with a list of the supplies needed.
Say Goodbye to Your Boring Old Dresser
It won’t take long to breathe new life into your old dresser. At the end of this project, you’ll have a beautiful Farmhouse dresser, freshly coated with chalk paint, with a paintable image transfer and added color. A true furniture facelift!
Here’s what you’ll need to complete the project (B.Y.O.O.D. — bring your own old dresser 😆):
(Disclosure: This post contains affiliate links.)
- IOD Catalog of Roses Paintable Transfer – Find your nearest IOD stockist here
- Your favorite chalk or other mineral-type paint in a neutral color
- Low tack tape
- Clean shop cloths
- Water color paintbrushes
- Paint brush for chalk paint and sealer (clean in between use) – Ask your local IOD stockist to recommend a brush that works well with your favorite paint brand
- Fine grit sandpaper block
- General Finishes Flat 450 Topcoat or other flat water-based polyurethane topcoat
Say Hello to Your Beautiful Vintage Farmhouse Dresser
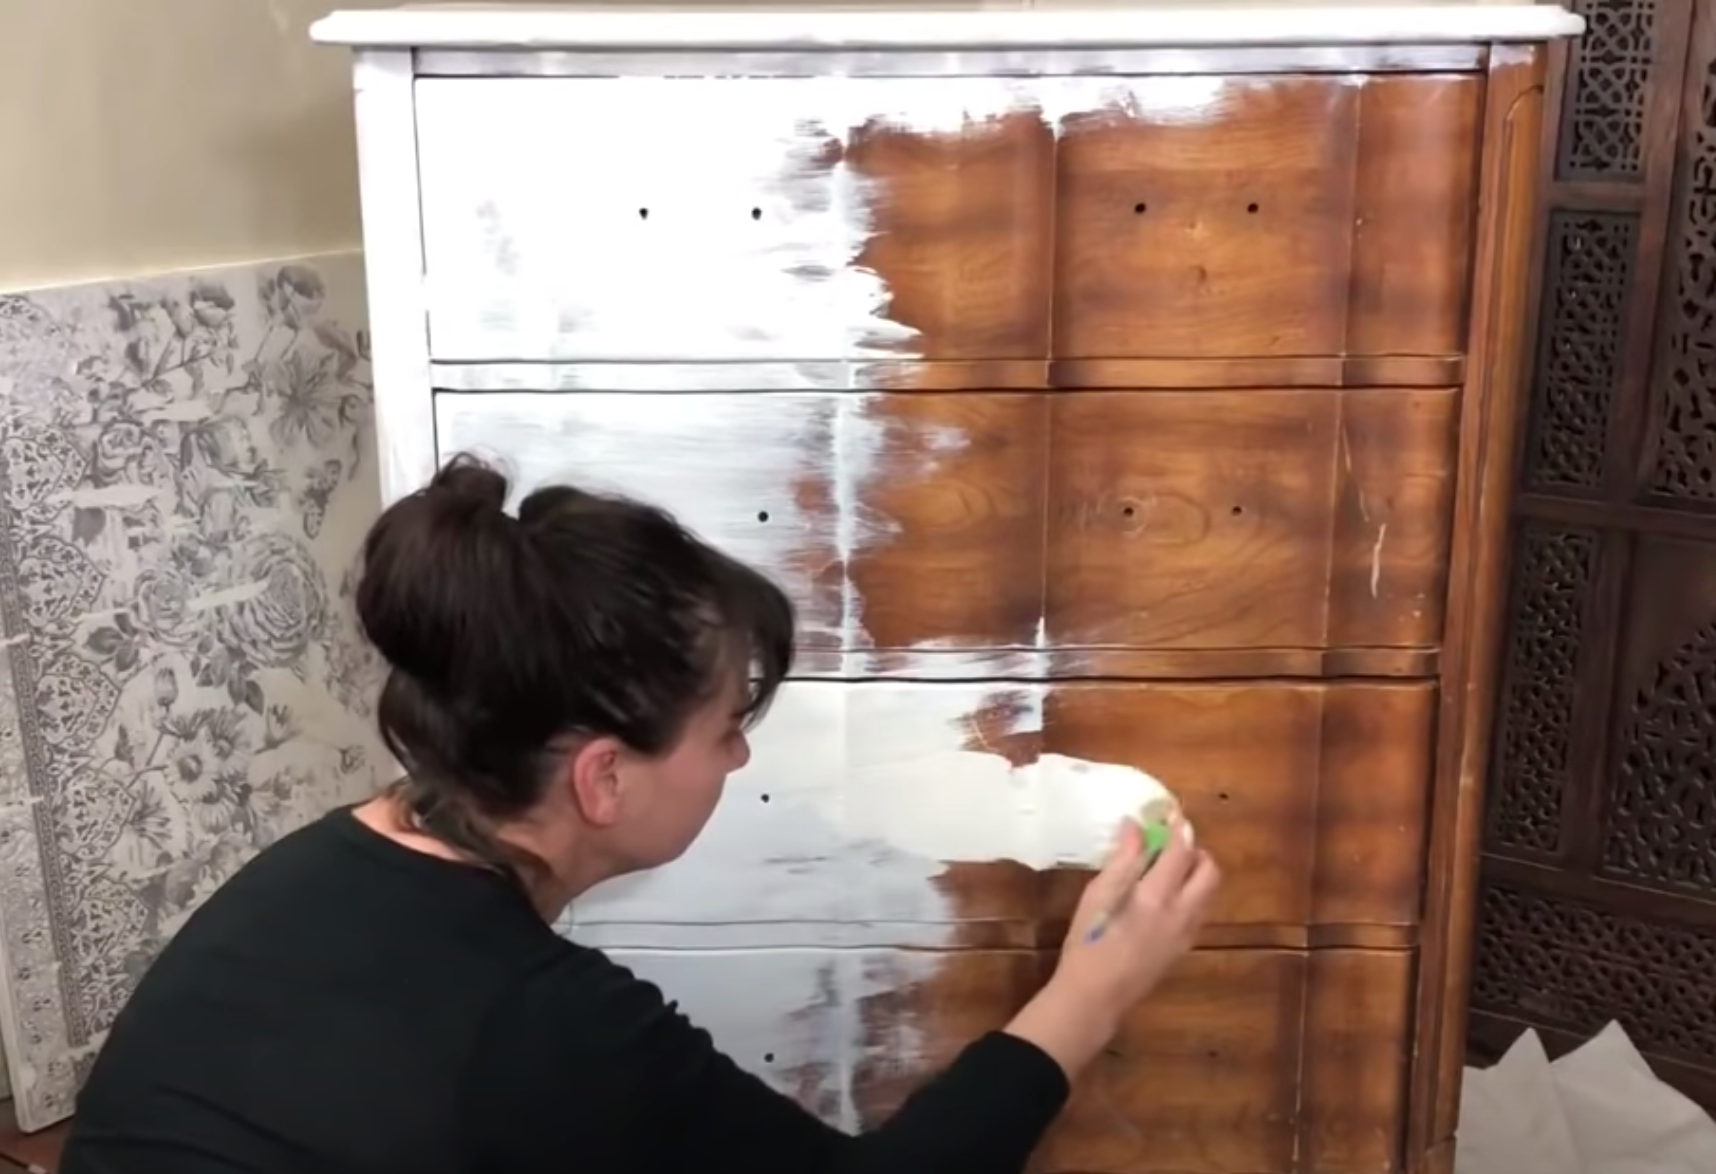
Step 1: Start by cleaning the dresser and prepping it per the instructions that come with the paint brand you choose.
Step 2: Choose a high quality chalk paint or other mineral type paint in a light, neutral color like antique white. Image transfers work best when they’re applied to a clean, dry matte finish – and the chalk or mineral type paints work great.
Step 3: Once the surface is cleaned and prepped, brush on two coats of paint to the surface. Use long smooth strokes for a more refined finish, or use a cross hatch or ‘X’ brushing pattern to create more texture.
Check out Josie’s cool little trick for pulling out the dresser drawers without touching the freshly painted surface in the video by fast forwarding to timestamp 0:24 seconds. She shows you a brilliant way to paint the top edge of the drawers without smudging the front.
After painting, it’s really important to let the dresser completely dry. We recommend waiting 24 to 48 hours before adding the paintable image transfer.
After the paint is thoroughly dry, apply a coat of water based topcoat. Allow that to dry thoroughly, according to manufacturer’s instructions. Now you’re ready to start rubbing your image on to the dresser!
Let’s Get Ready to Transfer!
Step 4: Time to grab the IOD paintable transfer tube and get ready to place the Farmhouse furniture transfer on the dresser. Now’s the time to figure out just where you want it.

Keep the non-stick paper backing attached to the IOD transfer until the moment you’re ready to apply it to your project surface. Dust and debris interfere with adhesion and you don’t want it to accidentally end up somewhere you don’t want it.
Step 5: Tear off several pieces of low tack tape. You’ll be using them to secure the paintable transfer image to the front of the dresser. Store them close-by so they’re ready to apply when you get the image in place.
Step 6: Using the grid lines to make sure the transfer is level and just where you want it. Then remove the non-stick backing and tack the transfer securely to the dresser surface with the tape pieces. (Cue to timestamp 1:09 if you want to see this in the video.)

Step 7: Each IOD Paintable Transfer comes with an application tool that you’ll use to rub on the transfer sheet. This both releases the image and also helps adhere it to your dresser.

Go over the rub on image with the tool thoroughly making sure all the transfer details are released from the backing. You’ll see the color of the transfer appear to change from deep black to an opaque gray. (To see this in more detail, forward the video to the 2:00 timestamp.)
Step 8: When you’ve completely rubbed the image onto the dresser, take a peek and check your work. Unstick the tacking tape to slowly and gently pull back the sheeting. Check for any bits of transfer left on it. If you find some, lay the sheet back against the dresser and rub that spot again with the tool until the bit is adhered to your dresser.

Step 9: With a clean, dry hand, go over the surface of the transfer to make sure all the edges are down and there are no fly-away spots. Pay special attention to the gaps where the drawers close by giving those seams an extra rub along the edges.

Step 10: Grab a clean dry shop cloth and burnish the entire image down to make sure your transfer image has excellent contact with the dresser surface.

Step 11: The transfer will span the drawers on the dresser, going across the cracks when it’s applied. Take a straight edge blade and gently sever any of the transfer at the drawer seams.

Step 12: Lightly go over the entire image with a block of fine sandpaper to create a distressed look. Then wipe over the surface with a clean cloth to remove the dust.
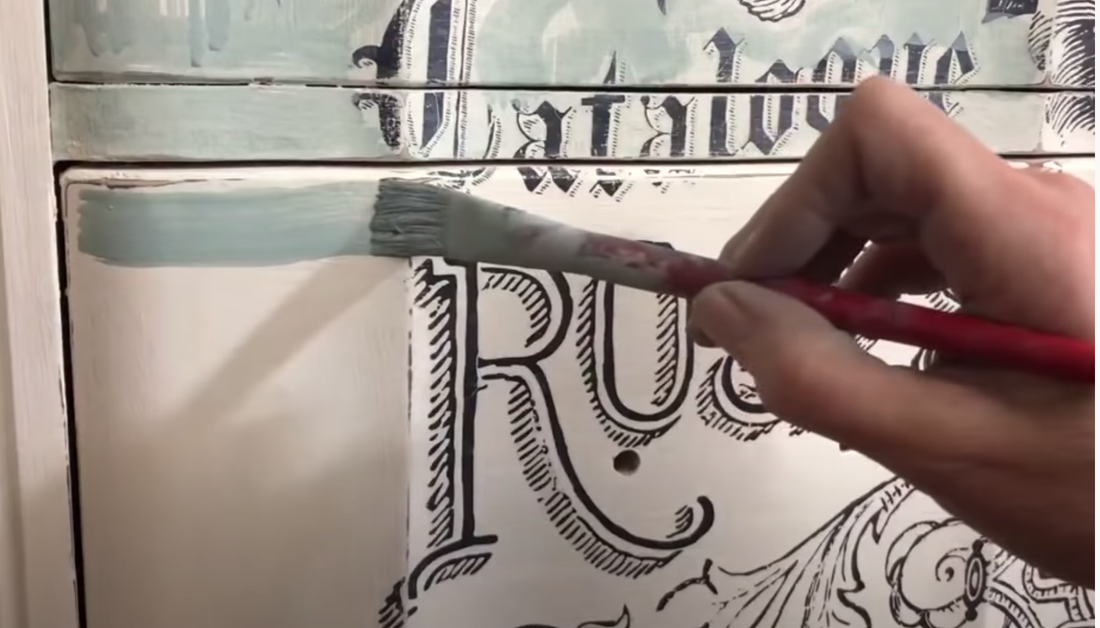
Step 13: Mix-up a solution of 50% chalk paint in your desired color and 50% water. Josie used a soft green for her dresser transformation but you can be as creative as you like in your color choice.
Then, loosely brush the chalk paint mixture over the dresser surface focusing on the negative space around the image outline.

Gently dab away any excess drips and any that gets on the rub on furniture image.
Step 14: When you’re satisfied with how it looks, let the project dry thoroughly again. Seal the image and the dresser with a water-based sealer appropriate for your base paint. Then do a little happy dance because your dresser makeover is complete!

Wouldn’t you know it? Josie just couldn’t resist painting in the roses after the video was done.

Keep Creating with Paintable Black and White Furniture Transfers
After you’ve completed a project using one of IOD’s paintable furniture transfers, you know all the basics to keep playing and creating with all our black and white transfers.
But if you really want to run wild and experiment with paintable image transfers, click here to go to an in-depth tutorial. You can see all the different mediums you can color with (hello, India Inks and liquid watercolors!).
If you still have questions or are looking for more project inspiration, reach out to an IOD stockist (you can find the one nearest you by clicking here). They’re trained specialists who are experts on all things IOD and they’re always happy to help you.
More IOD Paintable Furniture Transfer Inspiration…
Check out this snack-sized video (less than 3 minutes) where Josie paints the Classic Bouquet Transfer.
Ikea Dresser Makeover with Paintable Furniture Transfers
And if you have a wooden Ikea dresser that needs some personality then you need to check out this two part video tutorial. The IOD Sisters get a little wild with the colorful blossoms in their paintable furniture transfer.
Part 1 – Ikea Wooden Dresser Makeover
Part 2 – Ikea Wooden Dresser Makeover
Now, go color your own beautiful paintable transfer and share it with us on social media. We’d love to see!
 ×
×
popular
- How to Apply IOD Athenaeum Gilded Transfer to Colored Glass Bottles
- From Ugly Duckling to Gorgeous | Black Dresser Makeover with IOD Marché des Fleurs
- 5 Creative Ways to Use One Decorative Stamp
- Turn Thrifted Finds into Charming Garden-Inspired Decor with a DIY Jadeite Finish
- Little Lark Paint Inlay Projects: Vintage Teapot & Canvas Wall Art with IOD