Easy Handmade Jewelry: DIY Wrist Cuff with IOD Moulds
Do you love the look of vintage jewelry or antique bangles and bracelets?
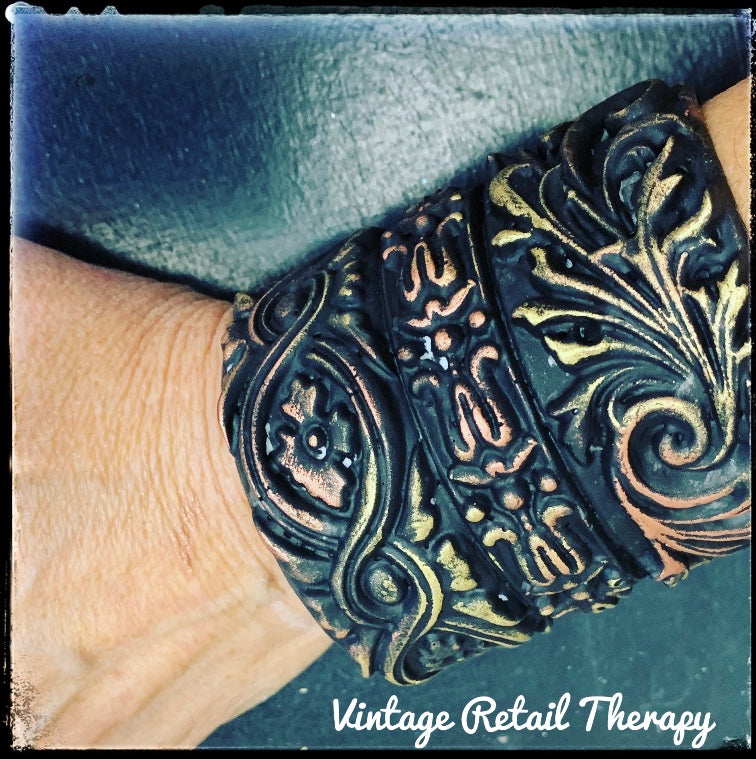
We do too, so let’s show you how to make a DIY wrist cuff with IOD moulds.

You’re going to LOVE this project because you can make it without specialty jewelry-making supplies. In fact the base of this project is just a cut up cardboard transfer tube!
Don’t have a cardboard tube? No problem. You can also use a rolling pin wrapped in foil or empty tape roll.
No time now? Pin this for later.
Now get ready to learn how to make a DIY wrist cuffs and more with Mara whose shop Vintage Retail Therapy is located in Fallbrook, CA. Watch the video below or keep reading for a supply list and instructions.
Supplies Needed to make a DIY Wrist Cuff with IOD Moulds
(Disclosure: This post contains affiliate links.)
- Empty cardboard transfer tube
- IOD Trimmings 2 Mould – Find your nearest stockist here
- Two-part resin
- Plastic cup
- Craft stick
- Titebond Quick and Thick glue
- Painters tape
- Sandpaper (optional)
- Paint brush
- Stiff bristle brush for wax
- Gloves that protect against chemicals (Mara doesn’t wear gloves, but you should per package instructions)
- Wax of your choice (metallic gilding, dark or white)
- Clay-based paint color of your choice
- Water-based polyurethane sealer or top coat
- Spray adhesive (optional)
- Scrap of cloth cut to fit the inside of the cuff (optional)
11 Steps to a DIY Wrist Cuff with IOD Moulds
Step 1: Cut an empty cardboard IOD transfer tube to the desired width of your wrist cuff.
If you want to be precise, you can measure the width of each of the trimmings you plan to use. Then measure on the cardboard an eighth of an inch narrower and make your cut there.

Make sure to cut straight down so the dimensions are even.
Tip: Using a longer knife, like a bread knife, makes it easier to get a straight cut. Be careful not to cut yourself!
Set the cardboard cuff aside and get ready to make the resin you’ll use to create the wrist cuff.
Step 2: Pour equal amounts of each liquid from the two-part resin kit in the two clear plastic cups provided in the package.
Then grab a larger plastic cup and combine the two liquids together. Mix with a craft stick. (In this tutorial, Mara uses Amazing Clear Cast, which you can find on Amazon. You can also refer to the instructions on the resin package – they’re super easy.)

Tip: Mark the resin kit plastic cups with the type of liquid you poured into it to keep from cross contaminating when you reuse them.
Step 3: Make sure the mould you’re going to use is cleaned and clear of powders from any previous projects.
Unlike when you use air dry clay, you DON’T need to put cornstarch in the mould cavity.
Step 4: Pour the resin into three of the mould cavities in Trimmings 2 mould and set it aside while the resin cures.

Tip: The resin will begin to thicken quickly, so best practice is to make a small batch. Use all the resin in the cup by filling other moulds so you don’t waste any and save these castings for future projects.
Step 5: Once the resin cures, remove the casting from the mould.
The resin will turn an opaque white as it thickens and hardens. Make sure to wait until the edges aren’t gummy before removing it from the mould – BUT DON’T WAIT TOO LONG either because you still want the casting to be flexible.
To remove the casting, fold the mould back away from the cavity. You’ll hear the casting crack away from the mould. Once an edge is lifted, gently peel the casting away from the mould completely.

Step 6: Apply an even layer of glue on the cut transfer tube and attached the castings.
While the Trimmings castings are still pliable, wrap each one around the tube so they are lined up in a row.

Tip: Remember how you cut the cardboard tube an eighth of an inch shorter than what you needed? This allows you to lay the edge of the trimming casting so that it overhangs the edge of the cardboard cuff.
This gives you a clean, finished edge to your cuff when it’s on your wrist. Who wants cardboard peeking out from behind their jewelry, right?!?
Step 7: Gently press the entire casting down so that it has good contact with the glue and cardboard tube.
Tape all three castings in place to secure them on the cardboard while they harden. Take extra care to also tape along the endpoints of the cuff.

Step 8: Let your DIY wrist cuff completely overnight and then remove the tape.
If you notice any sharp or rough edges, you can sand with a medium grit sandpaper.
Step 9: Paint your cuff whatever color you like using your favorite clay-based paint.
Make sure to get in all the nooks and crannies of the design. Allow your piece to fully dry after this step.

Tip: Take the time to also paint the inside of your cuff for a more finished look. Additionally, once the paint is dry, you can spray the painted cardboard with adhesive and glue your scrap of cloth on to make the cuff more comfortable to wear.
Step 10: Apply a contrasting or complementary wax to your painted wrist cuff.
For a dark or white wax, you’ll want to use a stiff bristled brush to work it into all the details of the design. Then firmly wipe off the excess with a clean, dry cloth so that it has an aged look.
If you want to glam your DIY wrist cuff up, apply a metallic gilding wax (think rose gold, silver or bronze!) with your finger. You only want to wipe it on the high points of the design to show them off.
Allow the wax to set overnight.
Step 11: Seal your beautiful cuff with a water-based polyurethane sealer.
Make sure to choose your favorite finish – flat, semi-gloss or glossy – depending on how much shine you want on your finished wrist cuff.
Once you feel comfortable with using resin in your IOD moulds, you’ll be amazed at all the projects you can create using this basic technique.
You can make bangle bracelets, hair clips or a matching headband! Or maybe you’re inspired to create a beautiful set of napkin rings. Check out the necklace Mara made below with the Classic Elements mould. The sky’s the limit when you DIY jewelry with IOD!

If you’re new to using IOD moulds, check out this post for all the basics.
But, if you want to learn how to make more jewelry, check out how Lynne of Ellen J. Goods makes faux verdigris bracelets with the Trimmings moulds.
You can also watch how Debi from Debi’s Design Diaries uses the IOD Monarch Mould to make beautiful butterfly bracelets.
Did this post inspire you to make jewelry using your IOD moulds? We’d love to see. Please show us what you made by sharing a picture on social media and tagging us.
 ×
×
popular
- How to Apply IOD Athenaeum Gilded Transfer to Colored Glass Bottles
- From Ugly Duckling to Gorgeous | Black Dresser Makeover with IOD Marché des Fleurs
- 5 Creative Ways to Use One Decorative Stamp
- Turn Thrifted Finds into Charming Garden-Inspired Decor with a DIY Jadeite Finish
- Little Lark Paint Inlay Projects: Vintage Teapot & Canvas Wall Art with IOD