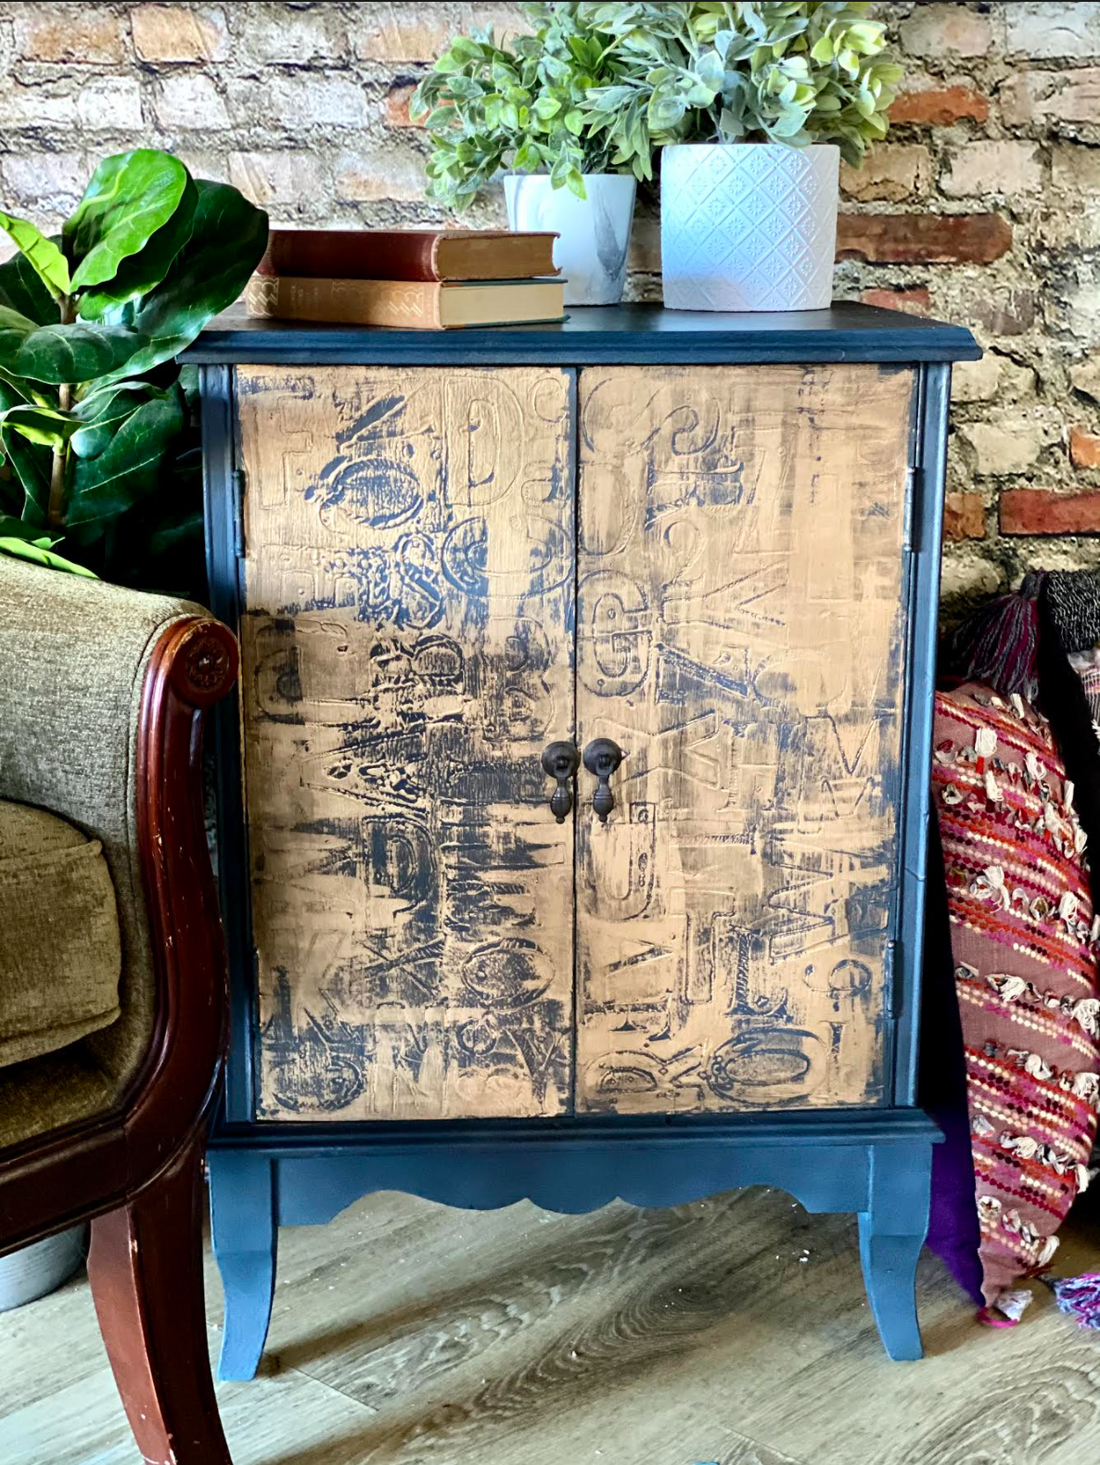
Industrial Chic Living Room Cabinet with IOD Letter Stamps
Looking to pull off an industrial-chic decor vibe without the price tag? Here’s a fabulous thrift flip tutorial of an old cabinet that accents an industrial living room design style.
What’s industrial chic?
It’s an interior design style that features an old-time factory feel. The gold elements in this piece give it an elegant, patina look while the font brings in a printing press vibe.
No time now? Pin this post for later.

DIY Industrial Decorating Idea: Get G-L-A-M-O-R-O-U-S
Watch the video tutorial below. Or, if you prefer to read, keep scrolling for a supply list and how to steps for this technique.
HERE’S EVERYTHING YOU NEED TO GET YOUR INDUSTRIAL CHIC ON:
All IOD products can be purchased from an approved stockist. To find a shop local to you, click here. To find an online store, click here.
This post contains affiliate links.
- Thrifted furniture piece
- Silicone Paint Blade
- Retro Stamps by IOD
- Typesetting Stamp by IOD
- High-quality decor paint in dark blue (your stockist can recommend a favorite brand)
- Liquid gold leaf paint (aka “stinky gold paint”)
- Clear Wax
- Optional: Dark Wax (to diminish the sheen of the gold paint)
Note: If this is your first time using IOD stamps please check out this stamping 101 tutorial. It will give you all the basics including how to condition your stamps before first use. If you’re trying this technique with a different brand of stamps (not IOD), it may not work as the quality, durability, and depth of design might not be to the same standard.
DIY Industrial Decorating Idea: IOD Stamp Impressed Letters in Troweled Paint
STEP 1: APPLY A THIN BASE COAT OF PAINT AND LET IT DRY
First, it’s “thin for the win” – paint your piece with a thin base coat and let it completely dry. This thin base coat will help with paint adhesion. Then it’s time for “thick for the KICK” in the next step!
STEP 2: APPLY A THICK COAT OF PAINT AND TROWEL IT AROUND USING THE IOD SILICONE BLADE
For all you bakers out there, it should feel like spreading CHOCOLATE GANACHE! Your silicone blade should be roughly a 20% angle- use a light touch to move the paint. The paint will start to set up a little as you work it around your surface.

You want to create a smooth, even coat of paint with enough depth for the impressions.
STEP 3: STAMP WITH THE RETRO ALPHABET AND TYPESETTING STAMPS TO CREATE IMPRESSIONS
You’ll need to work fairly quickly so the paint stays wet enough to accept the stamped image. Some areas may start to dry faster than others, and that is OK! The variability in impressions works well for this technique and gives the piece a more industrial glam character.

Sally worked from the edges toward the middle and had enough letter variety to use each stamp once. She kept the letters right next to each other for a nice tight design.
In this project, all the letters went on the right side up and sideways- none were backward. After she was done with each stamp, it went in a bowl of water for easy clean-up later.
Because the paint is thick, the stamp might have a tendency to slip and slide - so just be careful of that as you are applying the stamp. Once you are done stamping, let the paint dry completely.

STEP 4: APPLY THE GOLD PAINT
Don’t forget to do this step in an area with good ventilation or consider wearing a mask AND follow all safety precautions listed on the container.
First, give your gold paint a good shake because it tends to separate and you want it to have an even consistency and pigmentation.
Pour some of the gold paint onto a plate, then scooped it up with the silicone trowel.

Then scrape it over the stamp impressed furniture surface it in a vertical and then horizontal motion.

Step 5: FINISH WITH WAX
If you want your gold to stay bright, finish with a layer of clear wax. If you want a darker, more muted look, add some black wax. A little black wax goes a long way! You can see the difference in the images below (dark wax used on the right door and clear wax used on the left sid).

Experiment with different paint color combos – try some high contrast colors for a dramatic look or go with something a little more subtle. The DIY industrial decor style is so forgiving – so don’t be afraid to push the boundaries.
Get experimenting and share what you come up with!


 ×
×
popular
- How to Apply IOD Athenaeum Gilded Transfer to Colored Glass Bottles
- From Ugly Duckling to Gorgeous | Black Dresser Makeover with IOD Marché des Fleurs
- 5 Creative Ways to Use One Decorative Stamp
- Turn Thrifted Finds into Charming Garden-Inspired Decor with a DIY Jadeite Finish
- Little Lark Paint Inlay Projects: Vintage Teapot & Canvas Wall Art with IOD