Handmade Holiday Gift Ideas: DIY Polymer Clay Earrings
This holiday season, we’re kicking off our handmade gift series with these gorgeous polymer clay earrings. We’ll show you two different designs, but you can make jewelry with any of our moulds. (Snowflakes pendants, butterfly earrings, peacock feather bracelets… whatever strikes your fancy!)
No time now? Pin this post for later.

How to make polymer clay earrings with IOD Moulds
Watch the video below to see all the steps in action, or if you want to read through the supply list and instructions, keep scrolling down.
Here’s everything you need to DIY Polymer Clay Earrings
All IOD products can be purchased from an approved stockist. To find a shop local to you, click here. To find an online store, click here.
(This post contains affiliate links.)
- Trimming 1 or Trimmings 2 Moulds by IOD
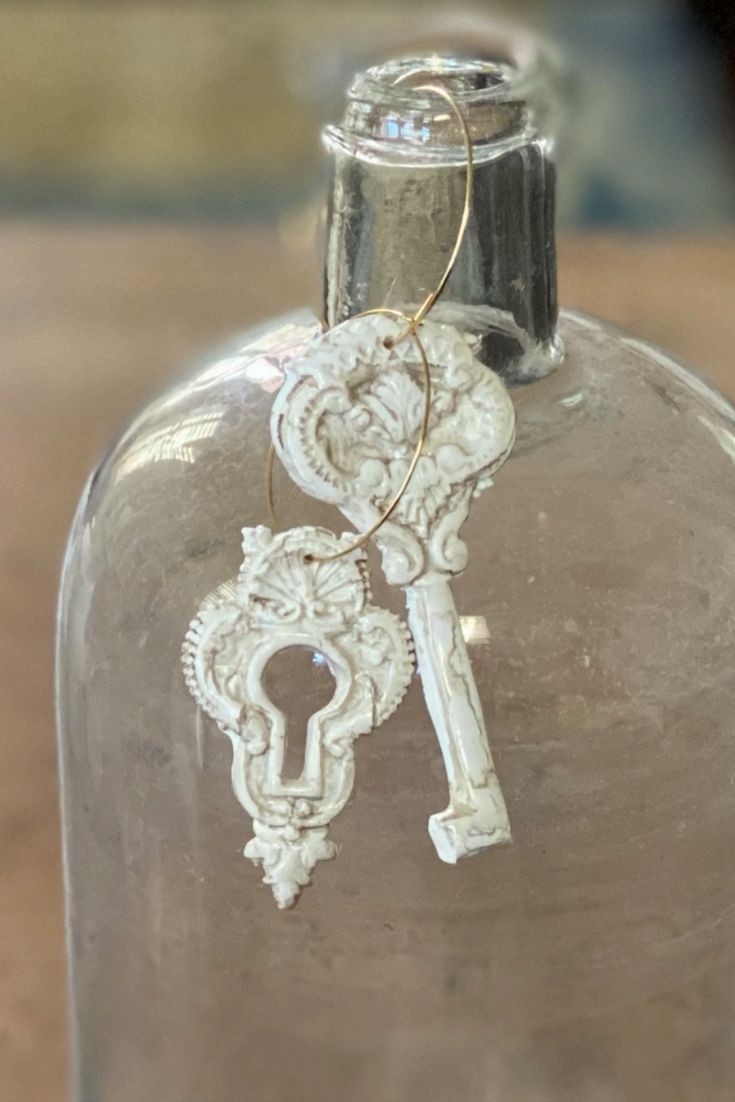
- Lock & Key Mould by IOD
- Earring hooks, jump rings, pliers
- Earring hoops
- Clay press or clay conditioning machine
- White polymer clay
- Knife for cutting chunk of clay
- Acrylic rolling pin (optional, if you want a smooth backside on your earrings)
- Clay shaping tools or toothpick to poke earring hanger
- Silicone craft mat or heat press transfer sheet
- Baking sheet
- Craft oven – Ideally polymer clay is best baked in a dedicated craft oven that’s not used for food
- Small paint brush
- Acrylic-water glaze mix: 1 tsp raw umber, 1 tsp ivory black and 3/4 cup water mixed together
- Sculpey gloss glaze
Step 1: Condition your polymer clay.
Carefully slice about a 1/4 inch off the block of polymer using a knife or sharp tool. (Sally used a straight razor without handles but we recommend using something safer – we had ‘technical difficulties’ attaching the blade to the handles.)
Using a clay conditioning machine, wind a chunk of clay through a few times.

Start with the thickest, or widest setting and, each time you put it through, adjust the opening progressively smaller using the knobs on the ends. This will make the sheet of polymer clay get thinner which softens it and makes it easier to work with.
Fold the clay over on itself each time before cranking it through the conditioning press.
For our polymer clay earrings, we used Sculpty brand Premo clay, which we love. Just make sure to choose a high quality polymer clay as some brands are harder to work with and may require extra conditioning.
As you’ll quickly realize, we’re NOT polymer clay experts, but we’ve learned a ton from Ginger over at The Blue Bottle Tree. Check out her site for lots of great beginner polymer clay tutorials.
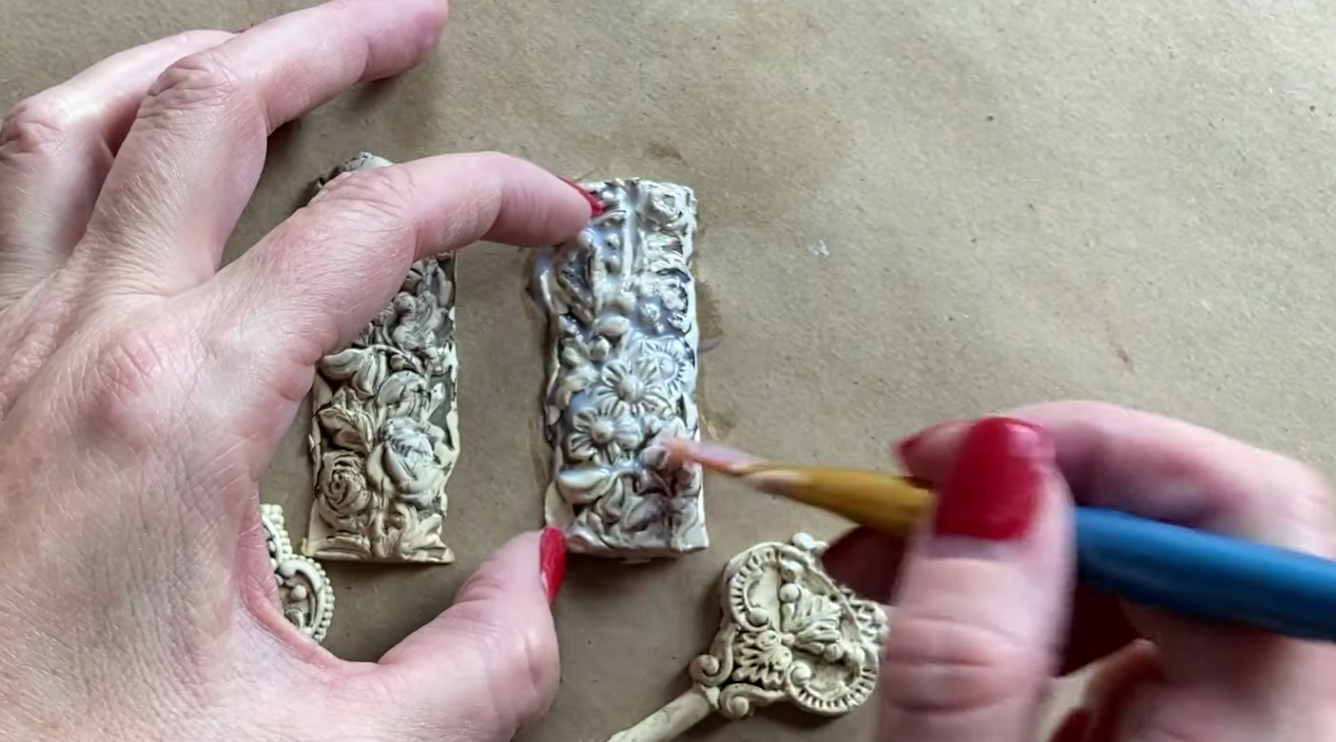
Step 2: Press the polymer clay into the IOD moulds to make the earring castings.
For the boho floral earrings, roll the clay into a rope with your hands. Push it into all the delicate details of your favorite Trimmings mould design. Using your thumbs to pull off any excess.

Sally likes a rough look to the edge to give an organic, natural vibe. But if you prefer a more tucked-in look, rub your finger along the micro rim to clean up the edge.

Just cut the casting in half to make a matching set of earrings.
For the Lock and Key hoop earrings, roll a ball of polymer clay estimating the amount you need. Push the ball into the cavity, again using your thumbs to grab all the nook and cranny details (but waaaaay better than an English muffin 😉).

For this design, you’ll want a clean edge because it makes the vintage details the star of the show. The micro rim will be your best friend here – use it as your guide to wipe away any excess clay and get a smooth line.
After getting rid of the excess clay, you can use an acrylic rolling pin to smooth out the back if you like. Go slowly so you don’t accidentally pull the casting out of the mould.
To remove the castings, flip the mould over onto your work surface and fold back the silcone mould to release the casting. Try not to tug or pull as this will distort the design.

Note: Josie likes to use cornstarch to improve the release of the clay… Sally doesn’t. Because polymer clay is stiffer than IOD air dry clay, you can really decide whatever works for you.
Step 3: Poke a hole in polymer clay castings where you want the earring hooks or hoops to go.
Using a pointy clay tool or toothpick, poke a hole clean through the casting. Super important to remember to do this step BEFORE baking.

Step 4: Bake the polymer clay earrings on a silpat mat and baking sheet.
Follow the package directions for the temperature and timing. We baked ours for 15 minutes at 275 F degrees.
(Unfortunately the oven timer didn’t go off, so our earring got a *little* bit crispy — like toasted marshmallows!)
Step 5: Paint the earrings.
This will give you that ‘wow’ factor and really pop the design details. You can make your wash darker or lighter by using less or more water. By using a wash, the earrings get a natural carved stone look.

You can also choose to paint with an opaque color if you prefer.
Allow everything to dry and then apply three coats of Sculpey Gloss Glaze according to the package directions. Make sure you push the glaze into all the details of the earrings. This will seal the earrings and also give them a gorgeous sheen.
Step 6: Attached the earring hangers.
Using a pair of pliers, open the jump ring so that you can thread it through the hole on your earrings. You may find it easier to use two pair of pliers (like Josie) — one to stabilize the jump ring and the other to bend the metal.
Once it’s open, thread the ring through the earring and then slip on the earring hanger. Then use the pliers to close the jump ring, securing the both earring and the earring hanger together.

Now you’re ready to wrap these beauties up and put them under the Christmas tree for a special someone.
Prefer to give a bracelet, check out this post to learn how to make this faux turquoise bracelet with polymer clay.

Who do you plan on making handmade gifts for this holiday season?
Let us know in the comments below. And don’t forget to check back here next week for another handmade holiday gift tutorial.
 ×
×
popular
- How to Apply IOD Athenaeum Gilded Transfer to Colored Glass Bottles
- From Ugly Duckling to Gorgeous | Black Dresser Makeover with IOD Marché des Fleurs
- 5 Creative Ways to Use One Decorative Stamp
- Turn Thrifted Finds into Charming Garden-Inspired Decor with a DIY Jadeite Finish
- Little Lark Paint Inlay Projects: Vintage Teapot & Canvas Wall Art with IOD