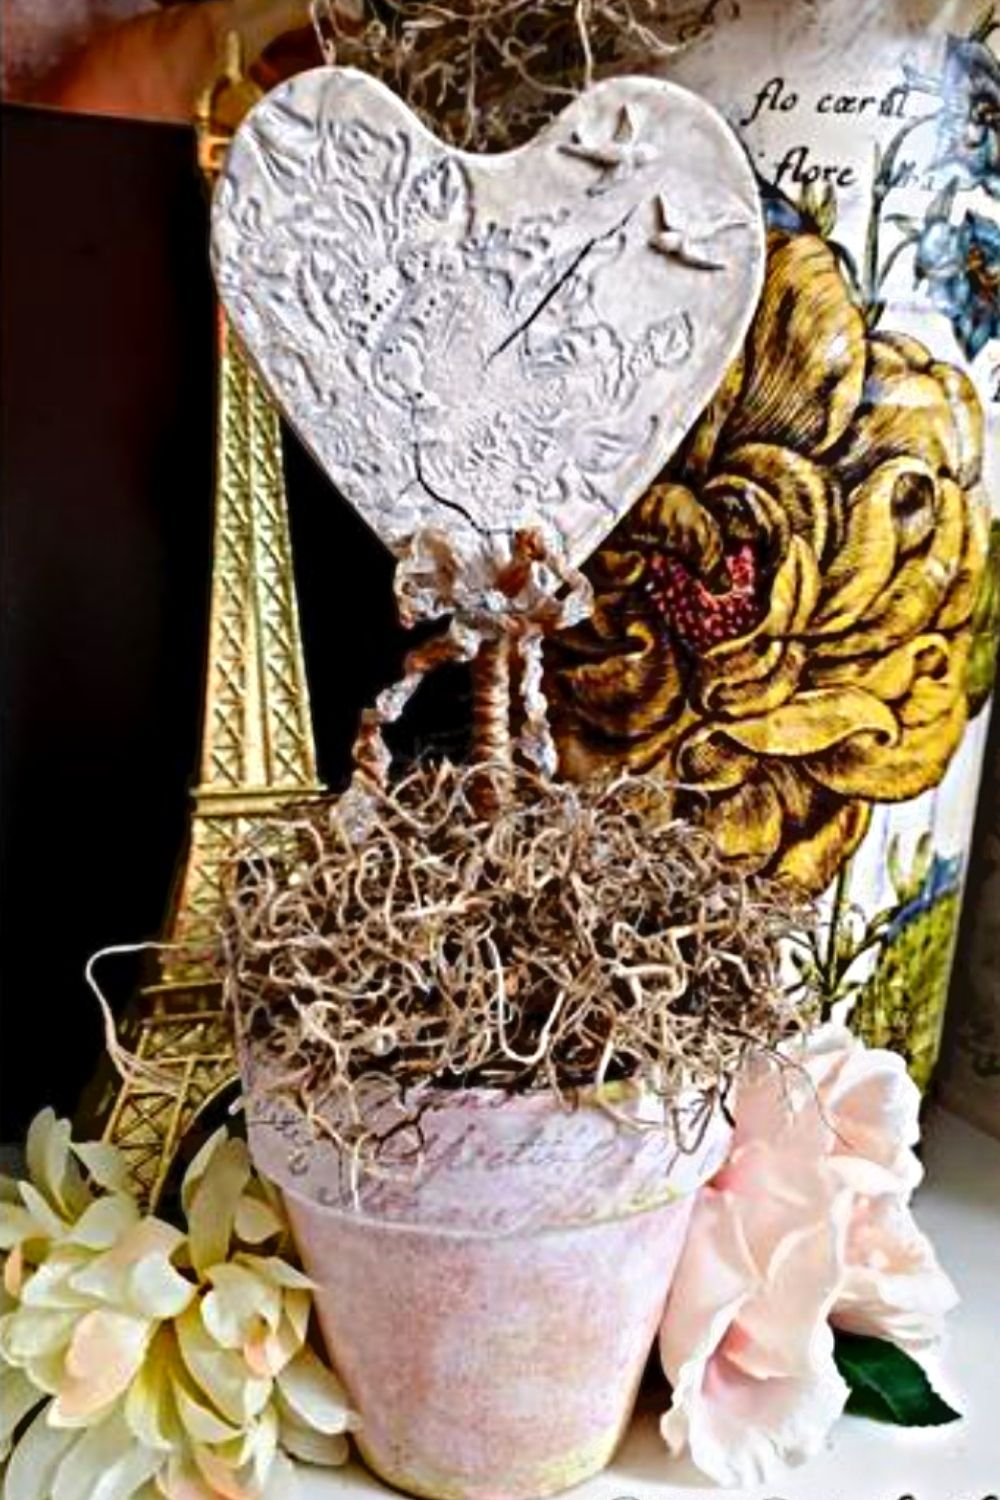
Unique Valentine's Craft Idea: Shabby Chic Potted Heart
We totally ❤️ this unique Valentine’s craft idea by IOD Stockist, Victoria of Old to Ooh La La in Las Vegas, NV. She’s planting a little love this February with a romantic potted heart!
Watch her tutorial below, or keep scrolling for a supply list and written instructions.
No time now? Pin this for later.
Here’s what you need to make this unique Valentine’s craft idea
This post contains some affiliate links. All Iron Orchid Design products can be purchased from approved retailers. Find one near you by using our store locator.
- Rose Toile Stamp by IOD
- Kindest Regards Stamp by IOD
- Our Fall 2021 Cameos Mould by IOD
- Stone Gray Decor Ink by IOD with blank IOD Ink Pad
- IOD Air Dry Clay
- Small clay pot (about 4 inch diameter)
- Wooden heart shape (You can get them from the Dollar Tree or make one)
- Antiquing gel (optional)
- Your favorite brand of decor paint in white, cream, gray and moss green
- Lint-free shop cloth
- Fine grit sand paper
- Cornstarch
- Plastic wrap
- Glue (we love Titebond Quick & Thick but other craft glues will also work)
- Rolling pin or IOD Brayer
- Paintbrushes
- Cutting blade
- Water mist bottle (optional)
- Tweezers (optional)
- Hot glue gun
- Sponge
- Dried Spanish moss (you can get this at Dollar Tree)
- Floral foam (you can get this at Dollar Tree)
- “Hug Snug” seam binder in white (found on Etsy or you could also use sari silk ribbon to get a similar effect) + walnut colored ink or watered-down paint
- Strip of white tissue paper
- Decoupage medium (e.g. Mod Podge)
- Wood skewer stick
- Jute twine
Step-by-Step Instructions for a Shabby Chic Potted Valentine
Step 1: Whitewash a clay pot.
Don’t overthink this or go for perfect with the whitewash. You want uneven coverage and lots of juicy drips for a rustic effect. You can use a water mister to encourage more drippy goodness if you like.
Periodically blot the whitewash with a shop cloth to create more texture (don’t wipe – dab, dab). Once you’re happy with the look, set the pot aside to dry.


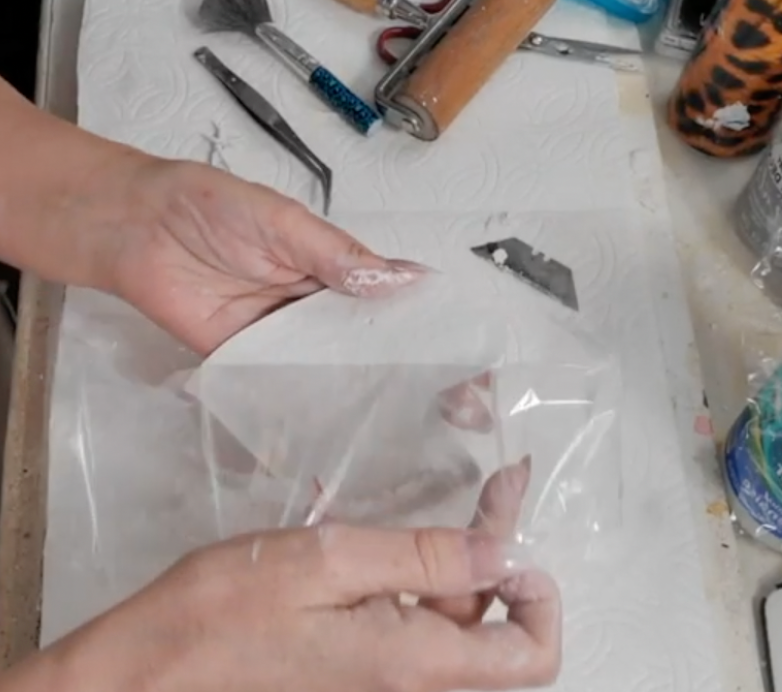
Step 2: Stamp impress the clay.
Layout a sheet of plastic wrap on your work surface and dust it with cornstarch. Pull off a chunk of air-dry clay and work it in your hands to warm it up. After forming a ball, roll out the clay with a rolling pin to about a 1/4 inch thickness.


Lightly press the wooden heart into the clay to create an outline impression. Then dust the IOD Rose Toile Stamp with cornstarch and press it into the clay, overlapping into the heart outline. Take your time and make sure you press in every glorious detail.


Step 3: Make your bird castings.
Dust the little birds in your IOD Cameos Mould. Push the air-dry clay into the two cavities and pull off any extra, revealing the micro rim. Then use your roller (or you can use an IOD Brayer) to smooth out the back of the casting and push the clay into all the details.
Flip the Cameo Mould over and fold it back to release the castings.


If this is your first time using IOD Moulds, you LOVE this post covering all the basics.
Step 4: Cut out the clay heart.
Using a sharp blade, carefully trace the heart outline in the clay. You can use your wooden template again if needed as a guide. Pull away the excess clay and put it back in an air-tight bag for storage.
Glue the two little birds with the craft glue to the heart. Next, glue the entire clay heart onto the wooden heart and let it fully dry.


Step 5: Paint the Valentine’s heart.
Dry brush cream paint on the front and back of the hearth. Let it dry. Then make a gray wash by mixing gray paint with water and loosely brush it on, pushing the paint down into the nooks and crannies of the Rose Toile impression. Gently wipe the gray wash back with a damp shop cloth to lighten the high points.


Step 6: Lightly sand the pot to reveal some of the terracotta color.
Allow your project to dry before doing this step. Sand with a fine-grit sandpaper where the pot would naturally distress and be sure to wipe away any dust with a shop cloth.
Step 7: Decoupage the brim of the pot.
Using the Stone Gray Ink, stamp a strip of white tissue paper with the Kindest Regards Stamp. Use a decoupage medium to attach the tissue paper to the pot. Using a ball of plastic wrap, rub down and smooth out the decoupaged tissue paper.
Don’t worry about wrinkles as they’ll enhance the aged look. Apply a top coat of the decoupage medium to seal.


If this is your first time using IOD Stamps, you’ll LOVE this post covering all the basics.
Step 8: Make a pick for the heart.
Coat a wooden skewer with craft glue and wrap (or “twirl” as Victoria says 😀) the jute around it. Then, using hot glue, attach the pick you just made to the back of the clay heart.


Step 9: Create an aged moss effect on the pot.
Dip a sponge in some moss green paint and then offload most of it onto a paper towel (remember you can always add more later). Dab it where moss would naturally grow – typically the bottom of the pot and the top of the brim (less is more).


Step 10: Age the edge of the heart and put a bow on it!
Using a wet shop cloth with a bit of antiquing gel (don’t forget to offload), wipe along the edges of the clay heart.


Then make a vintage looking bow by distress “Snug Hug” seam binder or another cream-colored ribbon by spritzing it with water and a watered-down walnut-colored paint or ink. Crumple it and let it dry to make it look old and wrinkled.
Tie a little bow with it and hot glue the bow to the bottom tip of the heart. Cut the streamers to a length where they’ll “kiss” the brim of the pot.


Step 11: Secure the pick in the pot and add moss.
Cut a piece of floral foam and wedge it into the bottom of the pot. Add a tuft of dried Spanish moss to the pot, stick the pick in and Voila!


If you love this IOD project, here are some other DIY Valentine’s decor ideas you might enjoy
Make a gorgeous this Valentine’s Wreath by IOD Stockist Jayne of Chalk Mercantile in Deep River, CT.
Valentine’s ideas with “all the things” by IOD Stockist Renee of Harvest Hill Cottage in King George, VA
Do you have a unique Valentine’s craft idea? Let us know in the comments below.
 ×
×
popular
- Thrifted Stool + Lamp Makeover with the IOD Fern Fables Transfer
- How to Apply IOD Athenaeum Gilded Transfer to Colored Glass Bottles
- From Ugly Duckling to Gorgeous | Black Dresser Makeover with IOD Marché des Fleurs
- 5 Creative Ways to Use One Decorative Stamp
- Turn Thrifted Finds into Charming Garden-Inspired Decor with a DIY Jadeite Finish