DIY Vintage Flow Blue Pot from Plain Terra Cotta!
Wondering what to do with that cheap terra cotta flower pot? Transform it with this flow blue technique using IOD stamps.
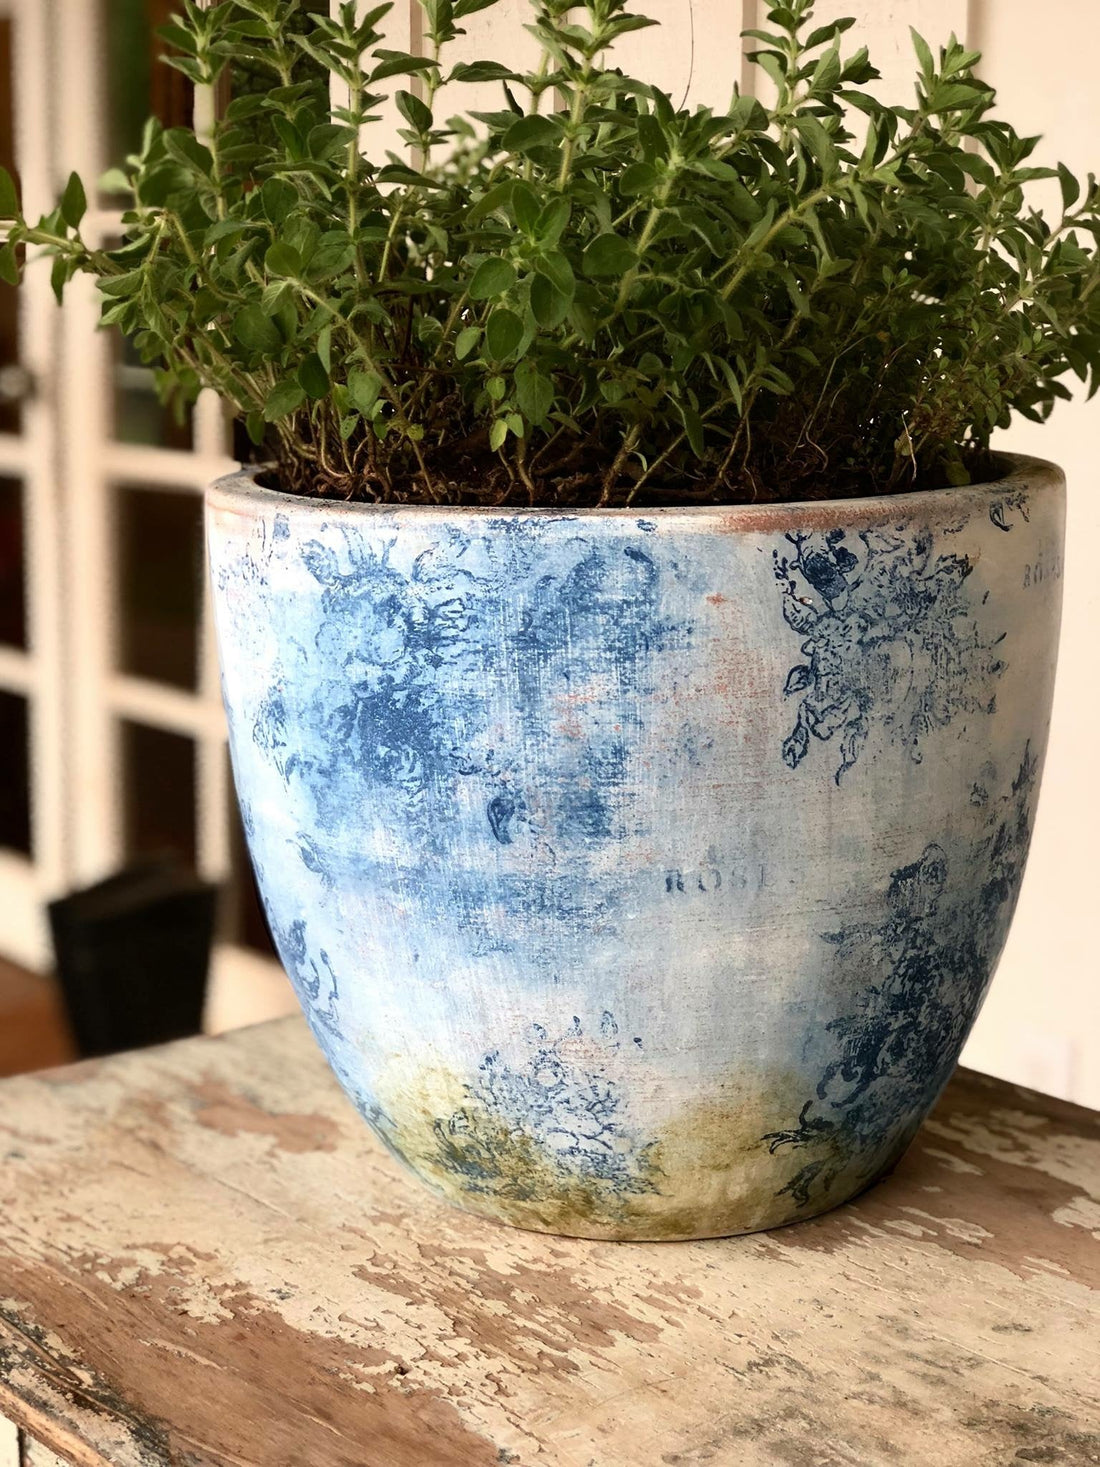
We are going to show you how to create a flower pot in the Flow Blue tradition. You’ve probably heard of Flow Blue, it was created around the 1820’s by Staffordshire Potters and has a beautiful, blue willow appearance. It is soft and ethereal because of the glazing process which blurs slightly during firing, but we are going to show you how to achieve this look at home!
No time now? Pin this post for later.
Let’s get started!
Materials:
All IOD products can be purchased from an approved stockist. To find a shop local to you, click here. To find an online store, click here.
- Terra cotta pot
- Rose Toile Stamp by IOD
- IOD Brayer Tool
- Spray or spritzer bottle
- Sanding block
- Your favorite brand of white chalk or mineral-based paint in white
- Your favorite brand decor paint in bright blue
- Your favorite brand of decor paint in olive green(for ‘moss’ action)
- Lint-free shop cloth
- High-quality water-based sealer designed for outdoor use
-
-
-
1.
You want to add a couple of layers of whitewash on your pot with your watered-down chalk paint. You can use one part water and one part paint, then dilute as needed to get the consistency you want.
-
-

-
-
-
2.
Once the whitewash has dried, lay your pot on its side. I have mine in a box to help stabilize it so that it doesn’t roll around while I am working. For more tips on stamping a curved surface, check out this post.
-
-

-
-
-
3.
Using your brayer tool, add a nice even coat of your bright blue paint directly to the stamp surface.
-
-

-
-
-
4.
Wet the surface of the pot just a bit with your spritzer. This will help the first application of the stamp have the blurred look we are going for. You are also using the stamp ‘bare’ for this application, so you will not be using anything to mount it. Many times you will mount your stamp, you can find all of that information in our 101 video.
-
-

-
-
-
5.
Lay your stamp down, without shifting. Now press it down onto the pot (again without shifting). Since this application will be the blurry one, it doesn’t have to be perfect.
-
-

-
-
-
6.
Take a moist shop towel and tap down over the top of the area that you have stamped. This will make it blurred. You can use your spritzer to spray a little more water onto the pot to continue the blurring process. Continue until you have the stamp completely blurred out and you don’t see any form at all. This is an important step, you will need it blurred out before going back in with the stamp or you will get a double vision effect. Since terracotta and chalk paint are both porous it will set up really quickly, you will want to do just one section at a time.
-
-


-
-
-
7.
Load up your stamp again for the second impression and give it a little spritz with your spray bottle. Place the stamp, again being careful not to shift. Apply pressure to all the areas of the stamp. Now we have a nice impression over the top of the blur.
-
-

-
-
-
8.
Repeat this process over the entire pot.
-
-
-
-
-
9.
I am going to add another technique on this pot, which is kind of fun and has a different effect. I am going to spritz my pot liberally and I am going to apply paint onto a different stamp and hold that directly onto the area I spritzed. This gives a nice soft stamp without the blur. Having the detailed and the soft together gives a great look. If you want an even softer look, you can spritz again on top of the section you just completed.
-
-


-
-
-
10.
After you have completed your stamping and it has had time to dry completely, you can hit several areas with the sanding block. This lets the terracotta peek through a bit and gives it a more aged look.
-
-

-
-
-
11.
Once you have sanded to achieve the look you want, use a soft cloth and wipe away all the dust. Don’t apply too much pressure during this step or you will take off more of the finish.
-
-

-
-
-
12.
Using a damp shop cloth, apply a small amount of the olive green paint, and then spritz the cloth and the pot where you want to apply. Dab the cloth onto the pot for a ‘mossy’ look. You can add as much or as little as you want. Make sure to stay fluid with this step to avoid harsh lines. To have a good mossy look you want it to be soft and blended.
-
-

And that’s it! You are done with your masterpiece.
If you loved this IOD project, here’s another idea for DIY flower pots you might like:
Spring Decor Ideas Just for You

 ×
×
popular
- How to Apply IOD Athenaeum Gilded Transfer to Colored Glass Bottles
- From Ugly Duckling to Gorgeous | Black Dresser Makeover with IOD Marché des Fleurs
- 5 Creative Ways to Use One Decorative Stamp
- Turn Thrifted Finds into Charming Garden-Inspired Decor with a DIY Jadeite Finish
- Little Lark Paint Inlay Projects: Vintage Teapot & Canvas Wall Art with IOD