12 Days Of Christmas Countdown
Did you know that the 12 days of Christmas is traditionally known as the period in between the birth of Christ and the coming of the three wise men? It begins on Christmas Day, December 25, and runs through January 6 (the Epiphany, sometimes also called Three Kings’ Day). However, my (Sally) husband, who was a pastor of our small church for over 20 years, used to remind our congregants that the three wise men were not only not part of the postpartum scene known as the nativity, but Jesus was probably approaching 2 years old when they finally met him and brought him their fine gifts. It really is a special part of scripture and I’d encourage you to study the journey they made in order to meet their King!
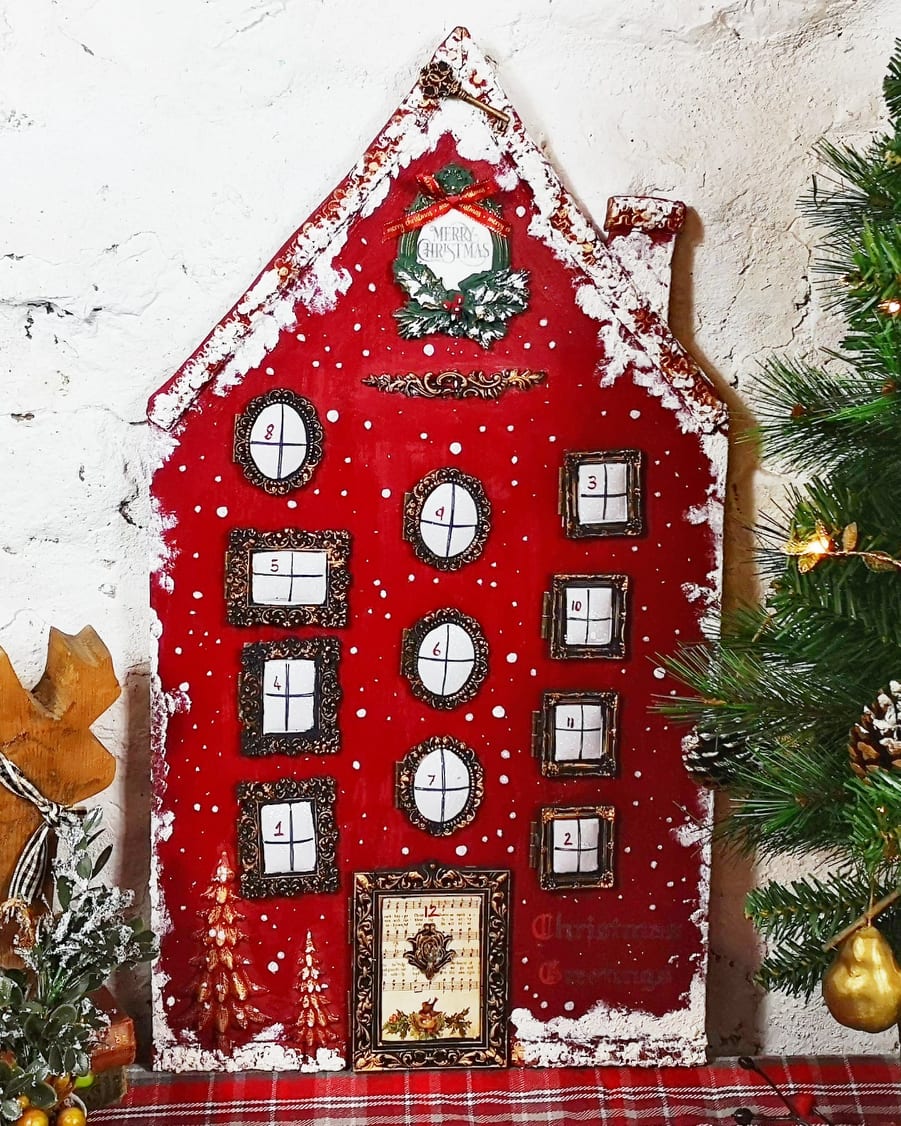
Maybe that is why I so love that Lel & Martyn at Made by Marley crafted this adorable Victorian-style townhouse to count down the 12 Days of Christmas using lots of IOD moulds! If we do say so ourselves, the star of the show is the Frames mould which they used for their windows and the door.
They made a video tutorial below, but we’ve given you written instructions here too.
The 12 Days Of Christmas Countdown is relatively easy to make. To create vintage, old-fashioned, Christmas nostalgia, they used traditional colors, but it would be great to use any holiday color scheme to match your Christmas decor. Lel hid vintage Christmas ephemera behind her doors, but you could use old Christmas cards, cute family photos, or other mementos special to your family.
Supplies:
- Cardboard for a template
- MDF or thick poster board (cut to the house shape you want)
- Chalk-style paint
- Gold embossing paste, gold paint or gold wax
- Christmas ephemera
- Hot glue gun
- Piece of ribbon
- Thick bonding glue
- Paintbrushes
- Hinges
- White, acrylic paint pens
- Baking soda
- Decoupage medium
IOD Supplies:
- Merry & Bright stamp
- The Seasons’ Greetings portion of the Figgy Pudding transfer
- IOD Moulds- Trimmings 2, Lock & Key, Boughs of Holly, and of course, Frames

Directions:
1. Cast moulds of your 12 openings and any decorations and trim you’d like. Lel used the largest frame for the door and a variety of the smaller frames for windows. She cast one extra window to use as a wreath at the top center of her townhouse. Pro Tip – Gently tape down your clay castings so that they don’t warp as they dry.
2. Create a cardboard template of your townhouse to lay out your castings to determine the size of your project.
3. Trace your template onto your MDF or thick cardboard/posterboard and cut out final board.
4. Lay out trim and decoration castings on your MDF and glue them down
5. Paint entire piece with your red paint or your background color of choice.

6. Paint the frames of the windows and the door black.
7. Paint the inside of the window frames white.
8. Paint a cross inside each of the window frames to create panes of glass in each window.
9. Make dots with the acrylic paint marker to look like snow.
10. Rub the frames with a bit of gold paint, embossing paste, or wax.
11. Number each window and the door 1 through 12.
12. The largest frame on the Frames mould (our door) is open so Lel used Christmas sheet music glued to cardboard cut to size to fill the opening and create the door. She glued the cardboard to the inside of the frame.

13. Lay out your windows and the door where you want them. Cut your inside images to size and then glue down each image behind it’s assigned window or door.
14. Use your gold paint, embossing paste or wax to highlight the decorations and trim on your townhouse.
15. Hot glue the hinge to the piece (check your placement to make sure your window will cover your image). Then, hot glue your window to the other side of the hinge.
16. Seal your project and apply any transfers you’d like to include.
17. Create wreath or decor piece for top center of the townhouse.
18. Take white paint mixed with baking soda and stipple it onto the project to create snow texture on the roofline and walkways.
19. Use your acrylic paint pin to create snowflakes on the face of the townhouse.


 ×
×
popular
- How to Apply IOD Athenaeum Gilded Transfer to Colored Glass Bottles
- From Ugly Duckling to Gorgeous | Black Dresser Makeover with IOD Marché des Fleurs
- 5 Creative Ways to Use One Decorative Stamp
- Turn Thrifted Finds into Charming Garden-Inspired Decor with a DIY Jadeite Finish
- Little Lark Paint Inlay Projects: Vintage Teapot & Canvas Wall Art with IOD