Clay Jewelry DIY: How to Make Faux Intaglios
Did you know you can use the just-released IOD Cameos Mould to make your very own unique, hand-crafted clay jewelry DIY? (To see all the new Fall 2021 IOD products, go here.)


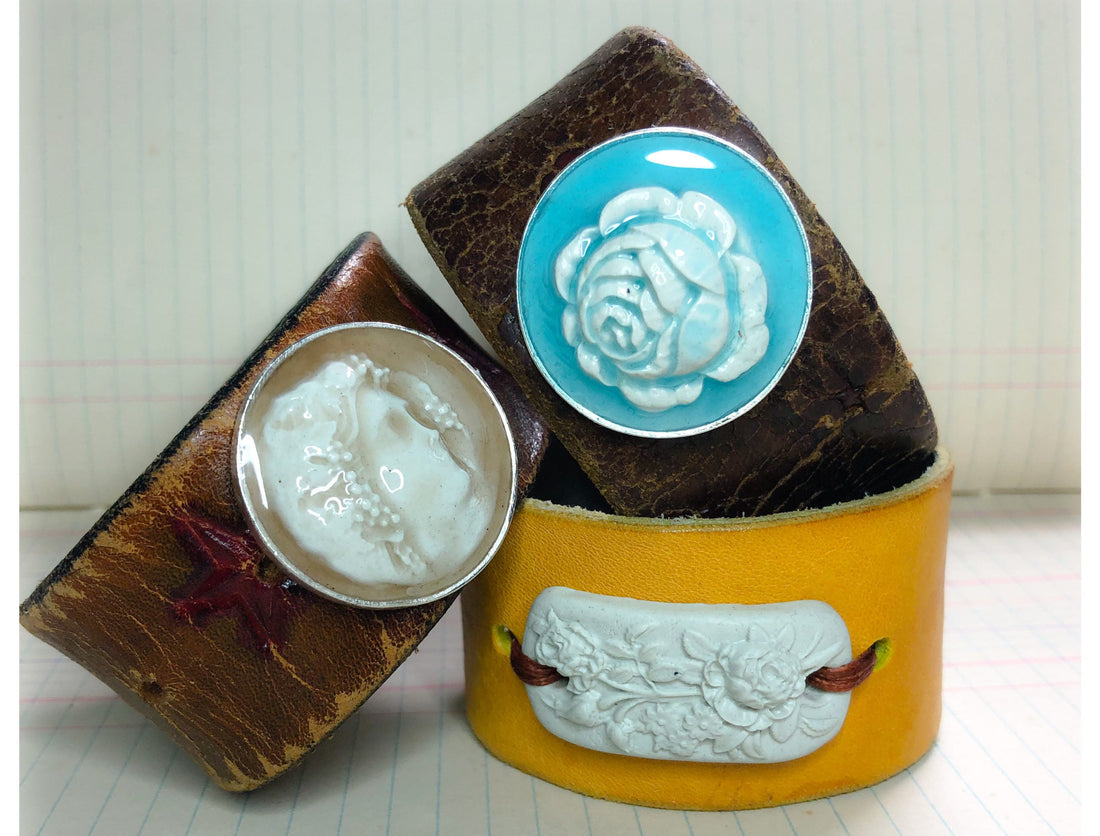
Lexi of Lexie Grenzer Art, is a fabulous teacher! She gives clear step-by-step instructions to make Faux Intaglio jewelry. In our written instructions, we’re going to focus on the gorgeous glazed rose on the distressed leather cuff, but Lexi covers some other techniques during her tutorial video.
Watch the video below or keep scrolling for a supply list and step-by-step instructions for this clay jewelry DIY.
No time now? Pin this post for later.
Clay Jewelry DIY Supply List
(This post contains affiliate links.)
- IOD Cameos Mould – Find your local IOD retailer here
- IOD Thin Mount (cut down)
- Aves Apoxie Sculpt
- Nitrile Gloves
- Olive Oil & Brush
- Coffee Stir Straw (those tiny red straws)
- Nunn Design Post Back Bezela
- Brooch/Pendant Bezel
- Clear Casting Resin
- Mixing Cups
- Acrylic paint (Lexi used Golden high flow in ultramarine blue and burnt sienna and Golden fluid acrylic in Phthalo Turquoise)
- Toothpicks
- Rice & Container
Leather Cuff Supply List
- Old Leather Belt
- Leather Snaps
- Setting Tools
- Leather Hole Punch
- Steel Bench Block
- Leather Cutting Punch (round edge for belts and straps)
- Or you can just buy ready made cuffs
Let’s Make Apoxie Clay Jewelry!
- Apoxie clay (yes, Apoxie with an “A” not an “E”, we did a double take too) comes in two jars. Take an equal amount of clay from both jars. Roll them into little balls and then eyeball them to make sure they’re the same size. Very close is good enough, but if you’re a stickler for details, the new IOD moulds have measurements and you can weigh the clay to get the perfect amount.

2. We use cornstarch as a release for our Air Dry Clay, but the Apoxy clay sticks more and Lexi recommends painting your mould with just a bit of olive oil as a release.
3. Press the mixed clay into the silicone mold. You can use the micro-rim to help you get rid of excess clay.
Pro Tip – Use a stamp thin mount to help you flatten the back of the casting evenly.


4. Set your casted piece aside and let it dry. It can be left the putty color it dries to or it can be painted.
5. Fill the bezel (the metal piece that holds the casting) to the top with clay so that the rose sits above the edge of the bezel.
6. Place the rose onto the clay-filled bezel and use a tool to blend the edges. This could be the end of your paintbrush, a sculpting tool, or anything you have laying around that will get the job done. No glue is necessary. The clay will stick to itself as it cures.

7. Once cured, use mild dish soap and a soft toothbrush to remove any remaining olive oil.

Creating A Glazed Look With Liquid Resin.
1. Use a container of rice to hold your jewelry flat for pouring resin. This rice can be used over and over, just keep it well labeled as a craft supply and not a potential snack.

2. Mix your liquid resin according to the manufacturer’s instructions. You can add a teeny tiny tiny bit of acrylic paint to tint your resin and apply it to your piece a teeny tiny bit at a time with a toothpick. Start with the highest points on your castings and then slowly apply to the other areas. You don’t want it to go over the edge of your bezel so go slowly.

The Leather Cuff
1. You can buy pre-made leather cuffs, but Lexi shows you how to make your own. She likes old belts because they make for really interesting cuffs. The wear on the leather makes it softer on your wrist and brings well-loved character to the piece. Measure the length you want on your own wrist allowing enough overlap for your snap. You can use a leather cutting tool to make easy clean edges, but you can create a similar look with a strong pair of scissors.

2. Find the center of your leather strip and punch a hole for your cameo. You can use a leather punch tool or a nail will work too. You’ll need to make slightly bigger holes on each end of the cuff for your snap parts. The snaps will come with instructions that will help you make sure you have each of the pieces of the snap facing the correct direction.
3. Put the bezel post through the center hole in the leather and screw the nut down onto the post. Although not necessary, you can use superglue in the threads of the bezel’s post to hold the nut in place. Trim the post with a cutting tool and then sand the post smooth so it won’t irritate your wrist.

4. Finally, take pictures of your new cuff and share them with us in the IOD Creative Tribe on Facebook.
If you love this tutorial by Lexi, you might also like:
 ×
×
popular
- How to Apply IOD Athenaeum Gilded Transfer to Colored Glass Bottles
- From Ugly Duckling to Gorgeous | Black Dresser Makeover with IOD Marché des Fleurs
- 5 Creative Ways to Use One Decorative Stamp
- Turn Thrifted Finds into Charming Garden-Inspired Decor with a DIY Jadeite Finish
- Little Lark Paint Inlay Projects: Vintage Teapot & Canvas Wall Art with IOD