Create Glossy Cloches with Clear Resin, Moulds, and Transfers

Create Glossy Cloches with Clear Resin, Moulds, and Transfers
Pin this article to save for later

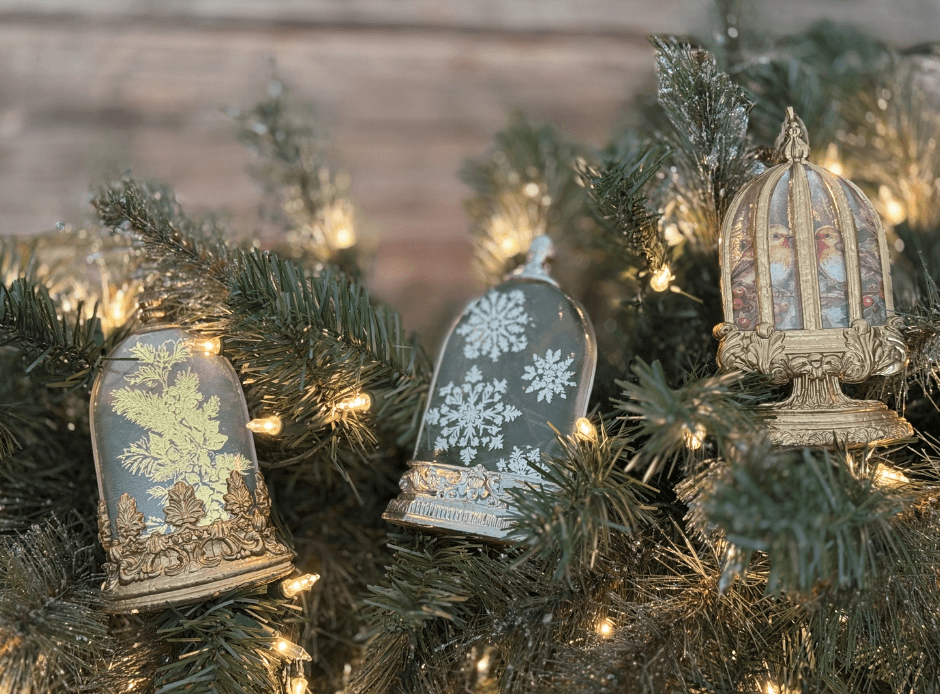
Looking for the perfect touch of vintage sophistication to adorn your Christmas decor or a heartfelt handcrafted gift this season? We’ve got just the thing! Imagine this, the fire is crackling, you're sipping on your fave holiday beverage, and admiring the lovely cloche ornaments hanging from your tree. Can you picture it?😍 These darling ornaments made with our Les Cloches Mould, Tinsel Gilded Transfer, and Yuletide Transfer are a nod to the stunning details in vintage Christmas snowglobes. ❄️✨


In this tutorial, we’ll show you how to create double-sided castings, apply transfers, and achieve that glossy finish on your castings. Plus, we’re sharing handy tips and tricks for working with clear cast resin and IOD Moulds that you’ll definitely want to add to your repertoire for future projects.


The best part? By layering our Tinsel Gilded Transfer between clear resin castings, you’ll create ornaments with a gold motif on one side and a shimmery silver on the other—how cool is that?!


Ok, it’s time to leave you to the tutorial! Are you keeping these beauties for yourself or gifting them to someone special? Let us know in the Facebook Creative Tribe! Either way, we can’t wait to see your creations! ❤️


Grab your IOD products and supplies by using the store locator and finding a stockist near you.

IOD Products Needed: 

Other Supplies: 

  • Alumilite Clear Cast Plus Resin
  • Silicone Casting Resin Tools
  • Alumalite Resin Release Spray
  • Gloss Spray Sealer
  • UV Resin Glue
  • UV Resin Light (optional: the glue comes with a pen that cures it just fine)
  • Gold Gilding Paint
  • Silver Gilding Paint
  • Jewelry Bail

Step-by-Step Guide

STEP ONE: PREP YOUR RESIN & MOULDS

This time we used Alumilite Clear Cast Plus Resin. We had very few bubbles and poured a 1 to 1 ratio and stirred thoroughly, but gently for two minutes before our pours. Allow to set completely. This can be affected by several factors, most importantly temperature. So if you have a cold workspace, expect it to take a little longer. 

STEP TWO: APPLY GLOSS SEALER

Once fully cured, de-mould your castings, then move to a well-ventilated area. We took ours on a little field trip outside where we sprayed once with a gloss spray sealer. Ours recommended two coats, three minutes apart. Then we took it back inside to dry. 

STEP THREE: APPLY YOUR TRANSFERS

Once dry, take the backs of your castings to apply your transfers. Trust us, it’ll make sense! For a wintery, snowy look, we did one with snowflakes from the Tinsel Gilded Transfer, one with mistletoe, and one with our sweet birds from the Yuletide Transfer. For our birds, we wanted their faces to peep out from behind the cage bars, so we cut them in half and spread them apart so the elements we wanted most would be fully visible. We used a variety of sizes for our snowflakes. These would also be darling with some of the trees from the same set along the bottom.


Pro Tip: Keep your transfers with their backings. If they fall off the backings, make sure you put them back on the waxed side of the transfer paper. We had a very pretty golden tree piece of paper because of this. 

Configure Your Stamping Tools
STEP FOUR: GLUE YOUR CASTINGS TOGETHER

Once you’re satisfied with your transfers, it’s time to glue them together. There are probably other glues that would work just fine, but we went with a UV Resin glue for speedy adhesion. To avoid any glue obscuring your transfers, we placed the glue solely on the parts we intended to paint, leaving the “clear glass” parts free of glue. Don’t worry, they aren’t going anywhere once the resin cures. Line the castings up carefully and either use the light that came with your UV resin kit or if you have a UV lamp handy, you can use that as well for a hands-free cure time. We only needed 60 seconds of cure time.


NOTE: If you’re making your cloches into ornaments, this would be the time to add your hangers. We used jewelry bails for this as they are flat and allow the cloches to still meet up evenly. 

Seal the Design
STEP FIVE: PAINT YOUR CLOCHE

Now for painting! We loved the warm gold with our birds, so we painted gold paint on both sides of that cloche. When you’re doing a regular transfer, you can expect it to be one-sided. What’s great about our gilded transfers is that the backs are silver. To really highlight that, we added gold paint to one side, and silver on the other, making a two-for-one decor item. Allow the paints to dry fully before moving on to the other side, using a small art brush to get into all the little details, avoiding your “glass” portions.


Once dry, you’re all set! We hope this tutorial fills you with plenty of inspiration for your handmade holiday projects. ♥️

Seal the Design

If you're just kicking off your creative journey, have no fear — our Product 101 pages are packed with straightforward techniques to set you up for success. We're thrilled to accompany you as you explore and create. For more how-tos and creative inspo, make sure to browse through the rest of our blog.


Once you've crafted your final piece, share it with our Facebook Creative Tribe! This community is not just a showcase but also a supportive hub for when you hit those creative roadblocks. And remember, your local stockist is always ready to assist with IOD supplies and expert advice. We're excited to see what you'll bring to life!

Project Image

Create Glossy Cloches with Clear Resin, Moulds, and Transfers

Create Glossy Cloches with Clear Resin, Moulds, and Transfers
Pin this article to save for later

Looking for the perfect touch of vintage sophistication to adorn your Christmas decor or a heartfelt handcrafted gift this season? We’ve got just the thing! Imagine this, the fire is crackling, you're sipping on your fave holiday beverage, and admiring the lovely cloche ornaments hanging from your tree. Can you picture it?😍 These darling ornaments made with our Les Cloches Mould, Tinsel Gilded Transfer, and Yuletide Transfer are a nod to the stunning details in vintage Christmas snowglobes. ❄️✨


In this tutorial, we’ll show you how to create double-sided castings, apply transfers, and achieve that glossy finish on your castings. Plus, we’re sharing handy tips and tricks for working with clear cast resin and IOD Moulds that you’ll definitely want to add to your repertoire for future projects.


The best part? By layering our Tinsel Gilded Transfer between clear resin castings, you’ll create ornaments with a gold motif on one side and a shimmery silver on the other—how cool is that?!


Ok, it’s time to leave you to the tutorial! Are you keeping these beauties for yourself or gifting them to someone special? Let us know in the Facebook Creative Tribe! Either way, we can’t wait to see your creations! ❤️


Grab your IOD products and supplies by using the store locator and finding a stockist near you.

IOD Products Needed: 

Other Supplies: 

  • Alumilite Clear Cast Plus Resin
  • Silicone Casting Resin Tools
  • Alumalite Resin Release Spray
  • Gloss Spray Sealer
  • UV Resin Glue
  • UV Resin Light (optional: the glue comes with a pen that cures it just fine)
  • Gold Gilding Paint
  • Silver Gilding Paint
  • Jewelry Bail

Step-by-Step Guide

STEP ONE: PREP YOUR RESIN & MOULDS

This time we used Alumilite Clear Cast Plus Resin. We had very few bubbles and poured a 1 to 1 ratio and stirred thoroughly, but gently for two minutes before our pours. Allow to set completely. This can be affected by several factors, most importantly temperature. So if you have a cold workspace, expect it to take a little longer. 

STEP TWO: APPLY GLOSS SEALER

Once fully cured, de-mould your castings, then move to a well-ventilated area. We took ours on a little field trip outside where we sprayed once with a gloss spray sealer. Ours recommended two coats, three minutes apart. Then we took it back inside to dry. 

STEP THREE: APPLY YOUR TRANSFERS

Once dry, take the backs of your castings to apply your transfers. Trust us, it’ll make sense! For a wintery, snowy look, we did one with snowflakes from the Tinsel Gilded Transfer, one with mistletoe, and one with our sweet birds from the Yuletide Transfer. For our birds, we wanted their faces to peep out from behind the cage bars, so we cut them in half and spread them apart so the elements we wanted most would be fully visible. We used a variety of sizes for our snowflakes. These would also be darling with some of the trees from the same set along the bottom.


Pro Tip: Keep your transfers with their backings. If they fall off the backings, make sure you put them back on the waxed side of the transfer paper. We had a very pretty golden tree piece of paper because of this. 

Configure Your Stamping Tools
STEP FOUR: GLUE YOUR CASTINGS TOGETHER

Once you’re satisfied with your transfers, it’s time to glue them together. There are probably other glues that would work just fine, but we went with a UV Resin glue for speedy adhesion. To avoid any glue obscuring your transfers, we placed the glue solely on the parts we intended to paint, leaving the “clear glass” parts free of glue. Don’t worry, they aren’t going anywhere once the resin cures. Line the castings up carefully and either use the light that came with your UV resin kit or if you have a UV lamp handy, you can use that as well for a hands-free cure time. We only needed 60 seconds of cure time.


NOTE: If you’re making your cloches into ornaments, this would be the time to add your hangers. We used jewelry bails for this as they are flat and allow the cloches to still meet up evenly. 

Seal the Design
STEP FIVE: PAINT YOUR CLOCHE

Now for painting! We loved the warm gold with our birds, so we painted gold paint on both sides of that cloche. When you’re doing a regular transfer, you can expect it to be one-sided. What’s great about our gilded transfers is that the backs are silver. To really highlight that, we added gold paint to one side, and silver on the other, making a two-for-one decor item. Allow the paints to dry fully before moving on to the other side, using a small art brush to get into all the little details, avoiding your “glass” portions.


Once dry, you’re all set! We hope this tutorial fills you with plenty of inspiration for your handmade holiday projects. ♥️

Seal the Design

If you're just kicking off your creative journey, have no fear — our Product 101 pages are packed with straightforward techniques to set you up for success. We're thrilled to accompany you as you explore and create. For more how-tos and creative inspo, make sure to browse through the rest of our blog.


Once you've crafted your final piece, share it with our Facebook Creative Tribe! This community is not just a showcase but also a supportive hub for when you hit those creative roadblocks. And remember, your local stockist is always ready to assist with IOD supplies and expert advice. We're excited to see what you'll bring to life!

Back to blog