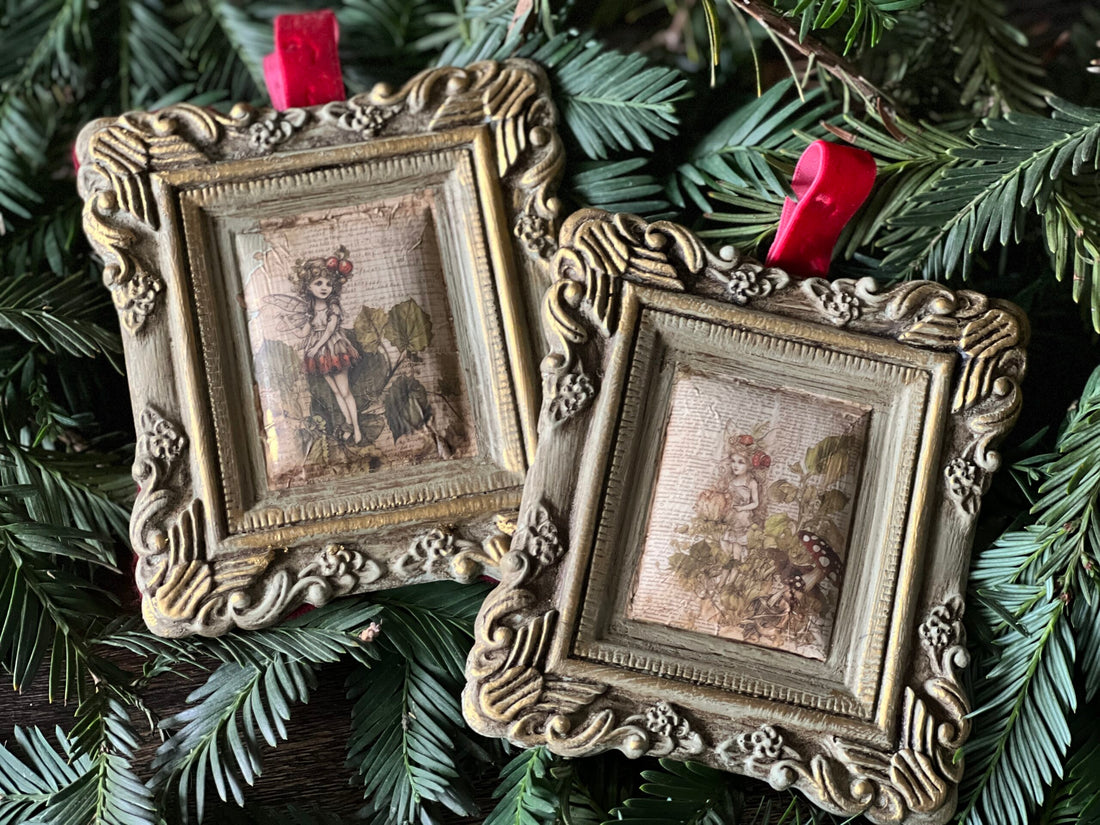
DIY Christmas: Create Stunning Fairy Ornaments with Resin and Transfers
Looking for the perfect touch of elegance to adorn your tree or a wonderful handcrafted gift this season? This elegant Christmas fairy ornament is sure to delight, and it’s really quite easy to make with just a few simple steps.
In this tutorial, you will learn how to cast moulds in quick-set resin, paint them, and add a transfer. We’ll seal the ornaments with wax. PRO TIP: If you first seal your project with clear wax, and then go back in with the dark wax second, you will get wonderful details that pop with that lovely aged look. If you go straight in with the dark wax, you might get an overly dark or muddied appearance that may not be as desirable. We always start with the clear wax first before applying our dark wax.
For the transfers, if you snagged one of our Fairy Merry Christmas Transfers, you have an array of darling fairies to choose from. The Holly Glen Transfer would also work beautifully with an assortment of critters to choose from! If you don’t have either of those, think about spare transfer scraps that might look nice (think a little sliver of Elysium for a floral burst!). You could also use stamps like Winter Adornment, or Portobello to decorate the interior of your frame. There are really so many options. You can’t go wrong!
Ok, it’s time to leave you to watch the video – let us know if you’re keeping this project for yourself, or if you will gift it to someone else. ❤️
Grab your IOD products and supplies by using the store locator and finding a stockist near you.
IOD Products Needed:
- Frames 2 Mould
- Fairy Merry Christmas Transfer (or favorite transfer of your choice)
Other Supplies:
- Amazing Cast Resin
- Popsicle Stick for Mixing
- Chalk or Mineral Type Paint (Sage Green Color)
- Paint Brush
- Clear Wax
- Dark Wax
- Rag or Towel to remove excess wax
- Wax Brush
- Felt or piece of fabric
- Scissor
- Gold Gilding Wax (or Gold acrylic paint)

If you’re just kicking off your creative journey, have no fear — our Product 101 pages are packed with straightforward techniques to set you up for success. We’re thrilled to accompany you as you explore and create. For more how-tos and creative inspo, make sure to browse through the rest of our blog.
Once you’ve crafted your final piece, share it with our Facebook Creative Tribe! This community is not just a showcase but also a supportive hub for when you hit those creative roadblocks. And remember, your local stockist is always ready to assist with IOD supplies and expert advice. We’re excited to see what you’ll bring to life!
 ×
×
popular
- How to Apply IOD Athenaeum Gilded Transfer to Colored Glass Bottles
- From Ugly Duckling to Gorgeous | Black Dresser Makeover with IOD Marché des Fleurs
- 5 Creative Ways to Use One Decorative Stamp
- Turn Thrifted Finds into Charming Garden-Inspired Decor with a DIY Jadeite Finish
- Little Lark Paint Inlay Projects: Vintage Teapot & Canvas Wall Art with IOD