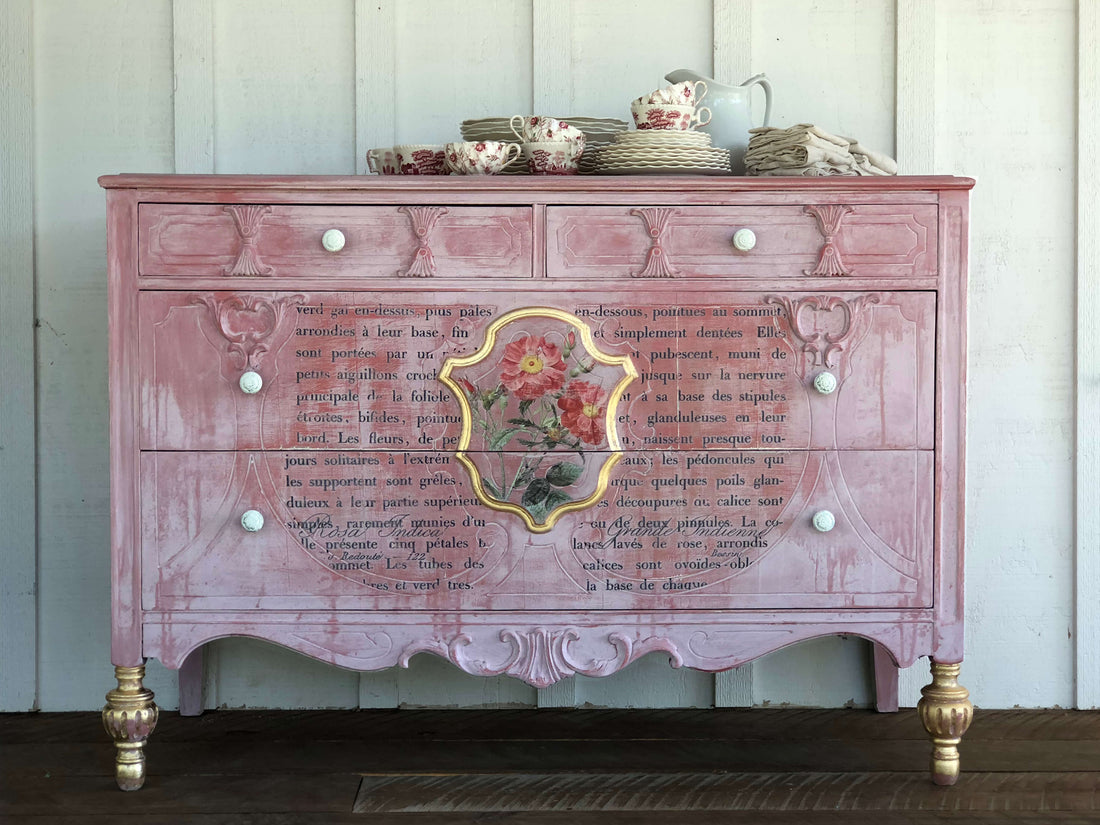
DIY Pretty in Pink Dresser Makeover
Hello lovelies! We are back in our series of video tutorials to KICK OFF the Summer 2018 product release shipping to IOD stockists ( find your very own stockist HERE ) and pre order your faves!
Today we are giving a tired dresser new oomph with some lovely chalk paint techniques in PINK! Who doesn’t love this new trend of all things pink?? It’s all loveliness and we had to hop on board. Watch the video below to see how you can create some beautiful texture and depth easily on a tired piece of furniture of your own, or even more fun… go rummage your local thrift store to find a new piece! The bottom line is this is something that YOU CAN DO! We highlight our new Decor Transfers™ in Le Petit Rosier and Redoute 4 ! See why everyone is in love with these new designs and then let us know in the comments what you think about some pink!
If you haven’t yet seen this post and would like to see our whole line up for the Summer 2018 read HERE !
Below you can watch our video or read the tutorial or BOTH!
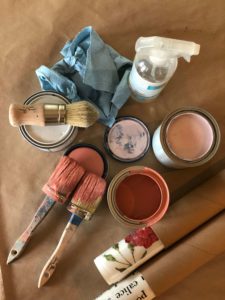
Materials
- Two shades of paint, I am using Annie Sloan Scandinavian Pink and Antoinette
- Transfers (I am using Le Petit Rosier and Redoute 4)
- Round chalk paint and wax brush
- Shop Towels (or other lint-free cloth)
- Clear Wax
- Sanding Sponge
- Spray Bottle
- Adhesive Size (I am using the Old World Brand)
- Gold leaf ( also Old World Brand)
-
-
-
1.
Our first coat will be the Scandinavian Pink applied in broad loose strokes. We are going more for texture than a smooth fresh finish. Coat the entire piece with your base color. The great thing about chalk paint is that you can layer and layer and get a different look every time. The brushes were are using are rounded brushes – the differ from flat or chip brushes in that that have substantial strength to them. It helps a lot with stippling and getting into little crevices.
-
-

-
-
-
2.
After the base coat dries we are taking our light color, Antoinette and using 2 parts paint to 1 part water. This leaves it a little heavier than a wash but lighter than just the paint alone. Go in loose with your lighter coat.
-
-

-
-
-
3.
Spritz with your water bottle, lightly in some areas and heavier in others to create that ‘drip’ look. You don’t want this coat to fully set so you may want to work in sections if you have a larger piece.
-
-

-
-
-
4.
After this sits up for a couple of minutes with a fan on it, lightly dab with your damp shop cloth. This will take off some of the second layer of lighter paint to reveal the darker shade underneath. The areas that were sprayed a little heavier, more of this second coat will lift off.
-
-

-
-
-
5.
You don’t want to use a pattern, but rather have random areas to achieve a more natural aged look. Let this second coat dry before you begin to add your transfers.
-
-
-
-
-
6.
Cut the transfers into portions and tape them into place to help hold it still while you apply. You want to keep the transfer with the backing until you are ready to apply it to keep it from getting dirty/dusty, which makes it difficult to adhere.You want to be careful while cutting to avoid letting the transfer touch anything other than it’s backing.
-
-

-
-
-
7.
I am using the Le Petit Rosier on either side of the raised center so after cutting out the portion that I want to use, I am going to cut it in half as well.
-
-
-
-
-
8.
Next you can line up your transfer where you want it and get ready to tape in place. If you are laying your transfer over the front of more than one drawer, you will want the drawers to be flush. If the drawers are not flush, you will want to cut your transfer to fit each drawer.
-
-
-
-
-
9.
I am working with an ornate dresser, so I am also cutting my transfer to fit around the raised details on the dresser.
-
-

-
-
-
10.
Now that the transfer is cut to fit and taped in place, we want to start applying the transfer. Once the entire section has been transferred you can remove the backing.
-
-

-
-
-
11.
Using your clean, dry hand and go over any little parts that may be loose. Then take your dry shop towel and gently burnish down the entire transfer.
-
-
-
-
-
12.
Next, I want to use a rose from the Redoute 4 transfer and I want it to overlap the edges of this raised bit in the center. I am going to carefully cut and place the rose where I want it (being careful not to let the transfer fold over onto itself). Then tape it into place.
-
-

-
-
-
13.
Repeat the process that we did for the first transfer, making sure we have all of our section transferred before removing the backing. When you are working over a textured area, it can be a little tricky to make sure that the transfer lays down smoothly around the edges.
-
-
-
-
-
14.
If you are working on a textured piece, you will want to use a sanding sponge to gently work around the raised edges to remove any of the design that is hanging over. Always move away from the design and be careful not to pull or tug at the design.
-
-
-
-
-
15.
After all transfers have been applied, use a clean sanding sponge to distress it a bit.
-
-

-
-
-
16.
For a finishing touch we are applying a little gold leaf around the rim of this raised center portion and the legs. First you will apply what is called adhesive size. You apply it directly to your piece with a brush. It will go on milky and will become clear once it sets up. You will want to let it set up before you apply your leaf.
-
-

-
-
-
17.
Lay the leaf over the area where you have applied adhesive size and gently stipple down with your brush. When you apply your leaf, you want to make sure your hands are clean and dry, if you have any adhesive on your hands, the leave will stick.
-
-

-
-
-
18.
After applying the leaf, gently buff with your dry shop towel to burnish it in. This will also soften a bit of the shine.
-
-
-
-
-
19.
Finally, we are going to seal this piece using a clear wax. Brush the entire piece with a light coat, you don’t want it to be too heavy. After you have applied your wax you can gently buff with your dry shop cloth for a soft satiny sheen.
-
-

 ×
×
popular
- How to Apply IOD Athenaeum Gilded Transfer to Colored Glass Bottles
- From Ugly Duckling to Gorgeous | Black Dresser Makeover with IOD Marché des Fleurs
- 5 Creative Ways to Use One Decorative Stamp
- Turn Thrifted Finds into Charming Garden-Inspired Decor with a DIY Jadeite Finish
- Little Lark Paint Inlay Projects: Vintage Teapot & Canvas Wall Art with IOD