)
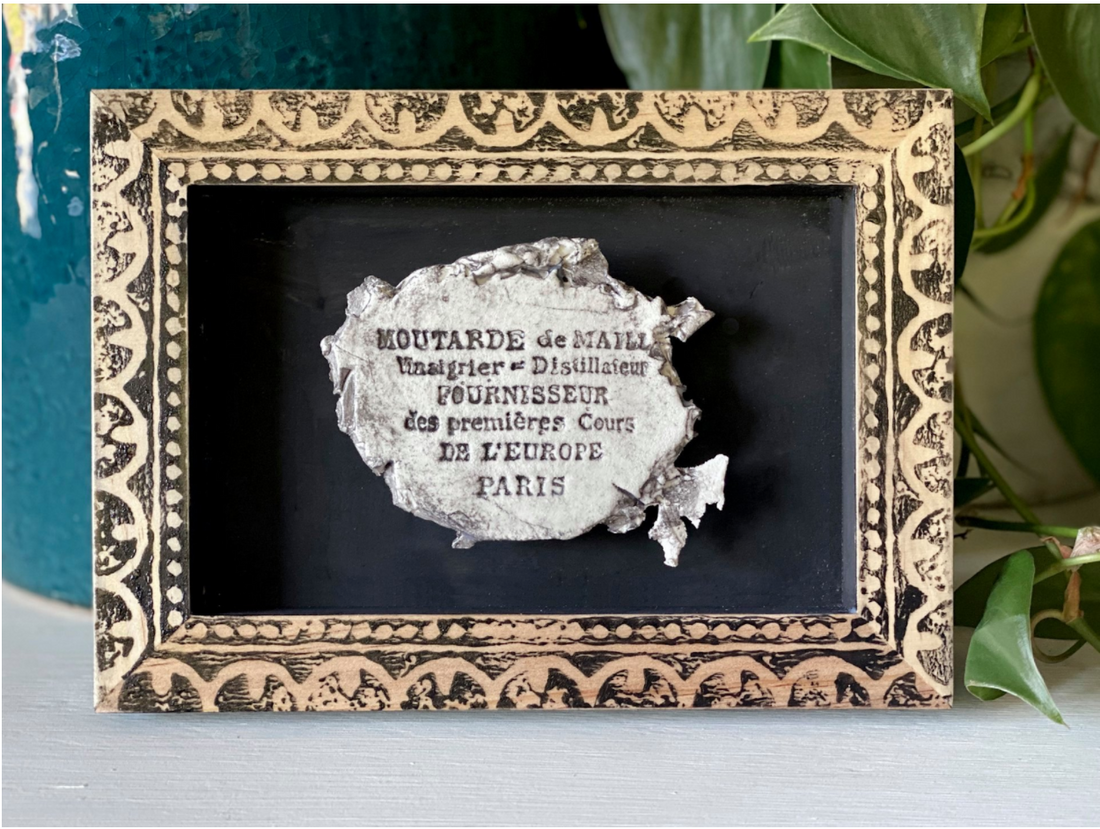
DIY Shadow Box for Your Old Family Relic (Wink, Wink!)
Sometimes you need to tell a story about the pieces in your wall gallery, especially if there’s one that screams history – like an “antique” relic dramatically displayed in a shadow box.
Where did it come from? Is it an old heirloom? “Well, actually…”
Spin that tale of family lore (wink, wink)… Or you could just say “I made that!”
Because the truth is – it’s so easy to create this type of rustic wall decor using the new IOD Wood Gallery Blanks, some IOD stamps, and air dry clay.
Do you want to learn how to DIY your own shadow box with an antique relic?
Josie recently did a Live video in our Creative Tribe for Technique Tuesdays where she shows just this very thing. (What a coinkydink – wink, wink!)
No time? Pin this for later.

Check out our step-by-step video below or keep scrolling for a supply list and instructions.
Meet the New IOD Wood Gallery Blanks
For this project, we’re introducing a new IOD product that you can use for all your DIY wall decor projects.
They come in rectangles and squares. Big ones and small ones. All made of high quality pine – the new IOD Wood Gallery Blanks are flat with a smooth surface. Paint them, apply IOD transfers, moulds, and stamps and arrange them together because we designed them in complimentary sizes for the perfect gallery wall!

Or (…and this is just so cool if we do say so ourselves…) turn them over and you’ll find the perfect shadow box ready for transformation! You can use the outer edge as a built-in frame perfect for staining or creating a custom frame using IOD moulds.

IOD Wood Gallery Blanks come in six different sizes and are all 3/4 in thick:
- 3-⅜” x 5-⅜”
- 5″ x 7″
- 8″ x 8″
- 8″ x 10″
- 11″ x 14″
- 12″ x 16″
Even the deepest set shadow box provides the perfect spot to fill with IOD moulds and transfers.
You can get any (or ALL) of the wood gallery blanks from your local IOD stockist. To find the one nearest you, click here.
Now let’s get to the makey-makey.
Here’s everything you need to make this project.
(This post contains affiliate links.)
- 5” x 7” IOD Wood Gallery Blank – Click here to find your local IOD stockist
- Crockery Stamp – Click here to find your local IOD stockist
- Bohemia Stamp – Click here to find your local IOD stockist
- Air Dry Clay – Click here to find your local IOD stockist
- Brayer – Click here to find your local IOD stockist
- Your favorite chalk or mineral-base paint in black
- Paint brushes
- Low tack tape
- Titebond Quick & Thick Multi-Surface Glue
- Silicone clay sculpting tool
- Flat wood ‘guides’ (we used a paint stir stick broken into two pieces)
- Small rolling pin
- Lint-free shop cloth
- Small pieces of corrugated cardboard
- Paper plate or other mixing surface to make color wash
- Cup of water
- Fine grit sandpaper block
- General Finishes Flat 450 Topcoat or other flat water-based polyurethane topcoat
- Fan (optional – to help project dry faster)
Step-by-Step Instructions: DIY Shadow Box with Faux Antique Relic
Create the relic with air dry clay
Step 1: Choose which Crockery stamp design fits well inside the recessed shadow box.
You want it to have enough space to allow for an irregular, tattered-looking edge within the frame, but you don’t want it to look cramped.

Step 2: Create your bump out (or mount – this is what the relic will rest on in the shadow box).
Keeping the size of the stamp you plan to use in mind, cut out two pieces of cardboard that will hold the relic up (‘bump it out’) in the shadow box. There’s no right answer to the size you choose but remember that you want the cardboard to be a large enough surface that it can give the relic piece good support, while also remaining hidden underneath it.
Stack and glue the two pieces of cardboard together with a craft glue. (We like the Tight Bond glue because it doesn’t slip when you’re putting things on a vertical surface.)

Set the cardboard bump out aside to dry and put something heavy on it like a book to maximize the contact while the glue dries.
Step 3: Assemble the tools needed for rolling out the air dry clay.
You’ll need a smooth surface (we use a bit of backing from the stamps or you could use an acrylic thin mount sheet), the paint stir stick pieces (or something similar that will help you roll an even thickness), and the little rolling pin tool.
Step 4: Roll out your clay.
Pull off the amount of clay you think you’ll need (taking care to immediately wrap up whatever you don’t use so the clay doesn’t dry out). Roll it into a ball and then mash it out to a flat pancake shape between the two paint stir sticks.
Start to roll out the clay working from the middle out to the edge of the clay – just like rolling out pie crust dough! Keep the ends of the rolling pin on the paint sticks to ensure an even thickness.

Check the size of the rolled clay against both the stamp and the size of the cardboard bump out you made. Don’t be afraid to add more clay like Josie did if you think it’s too small. Just add it to the existing pancake of clay and continue rolling from the middle outward.
Step 5: Stamp the clay and make an impression.
Remove the clay from the work surface and turn it over to use the smooth side for the relic image. Apply the raised Crockery stamp design onto the flat clay piece and gently press it into the clay making sure to run your fingers over all the details.

Next, lift the stamp in one motion so as to maintain a clean impression.
You might get a bit of a pillowed look around the impression. To flatten this out and make your relic look more authentic, lay a smooth acrylic sheet over the impression and apply light, even pressure to smooth the puffed up clay down.

Step 6: Shape the edge of the relic.
The excess clay needs to be removed in a way that avoids stretching or warping the design. Use a silicone tool to pull off chunks of the clay in a rough pattern around the edges. Since this is a relic it shouldn’t look symmetrical but rather have a chiseled and irregular looking edge.

Once you’re happy with how it looks, set the relic aside to dry a bit. If you’re doing the project in one sitting, put the stamped clay in front of a fan to speed up this process. This will allow you to paint your relic before it’s completely dry.
Shadow Box Transformation
Step 1: Create a mitered edge look on the frame.
Grab the low tack tape and tear off four small pieces. Apply them diagonally on the four corners.

Step 2: Stamp the long sides of the shadow box frame.
Load the black chalk paint onto the brayer. Then, apply it to the raised design of the Bohemia stamp. Roll in multiple directions to ensure good paint coverage.
Pick up the stamp and hover it design side down over the area you plan to stamp. After lining it up, gently lower the stamp onto the wood and use your fingers to trace over all the details.

You want to make sure all the design details make contact with the wood before removing the stamp. Be careful not to shift when you lift, otherwise you might smudge the image.
Once the long edges are dry, move the tape to mask on the diagonal where you just stamped.
Step 4: Paint the box black.
Using a brush full of the black paint, evenly apply the color over all the interior box surfaces. Next, paint the outer edges of the shadow box taking care not to get paint on the stamped frame.

Step 5: Stamp the short sides of the shadow box frame.
After the whole box is painted, reapply the four pieces of low tack tape to the opposite mitered corners. This will protect the image on the long sides of the frame.

Load the roller up with more black paint and apply it to the stamp again.
Hover and place the stamp where you want and then lay it down. Hold it in place so there’s no slipping and gently apply pressure to the stamp.
Once it’s dry, pull off the tape to reveal your gorgeous shadow box frame!
Paint and Mount the Relic in the Shadow Box
Step 1: Glue the cardboard bump out into the shadow box.
Grab the cardboard pieces that you previously glued to form your bump out and your relic. Lay them out inside the shadow box to plan where you want to glue them. Then take them back out and apply the glue to one side of the bump out and adhere it in your planned spot.

Step 2: Paint the sides of the bump out.
This so you won’t be able to see the bump out under the relic. If it’s easier, you can also paint the cardboard before you glue it down.
Set the shadow box aside to let the glue and paint dry.
Step 3: Color wash the relic.
You want your relic to look old, antique and crusty. The easiest way to do that is to give it a quick color wash.
To make the color wash, dab a small amount of black paint on a paper plate with a paint brush. Then, using that same brush, dip it into the water and then mix the water with the paint on the plate. Do this with the water a few times to dilute the intensity of the paint color.

Liberally paint the wash across the relic without pushing too hard. Remember the air dry clay just has a crust on it, but it isn’t fully cured yet.

After you’re done painting, but before the paint dries or sets up, take a crumpled wet shop cloth and gently blot the relic to remove some of the paint.
You can also use a wiping motion but just be careful not to over-do-it because the clay is not fully cured. You don’t want to accidentally distort your stamped impression.

The color wash should dry pretty quickly because the clay is porous. If you’re in a hurry, you can always put it back in front of a fan for a few minutes to speed things up.
The Big Reveal: Distress, Assemble and Finish Your DIY Shadow Box and Relic
Step 1: Make your “antique” look like an antique.
If you want to really give your piece a vintage look, take a fine sanding block and softly distress the stamped surface of the box.
Check out how gorgeous the wood looks peeking through the stamp design! (Note: Josie did this step later in the video, but it’s best done before gluing the relic.)

Step 2: Glue the relic on the bump out.
It’s finally time to secure the relic in the shadow box! But don’t rush to this step. You want to give all the pieces time to fully dry so the relic doesn’t sag on the mount.
Apply a generous amount of glue all over the surface of the cardboard mount. Place the relic on the mount and nudge it around until you’re happy with the placement – ideally centered over the mount and in the shadow box.

Step 3: Seal your DIY shadow box relic.
After everything is dry, finish your piece by applying a coat of high quality water-based matte sealer. If you plan on hanging your piece, hammer a hanger on the back side and you’re done!
Other things you can make using this technique
We loved the suggestion made by Valerie of Bluebird Mercantile! She mentioned how this could make a great handmade wedding gift — especially if you use one of the IOD font stamps to monogram the newlyweds’ initials in the relic. Or, to commemorate their anniversary, you could stamp their wedding date. Personalized gifts are our FAVORITE kinds of gifts!
So, what do you think? Is this something you’d like to make? Let us know in the comments below or share what you make with us on social media.
We’d love to see!
Other DIY home decor project posts you might enjoy…
Oh, the Things You Can Make with Your IOD Crockery Stamp!
If this is your first time using IOD’s clear stamps, please check out this post for instructions on how to condition, care for and clean your stamps.
 ×
×
popular
- How to Apply IOD Athenaeum Gilded Transfer to Colored Glass Bottles
- From Ugly Duckling to Gorgeous | Black Dresser Makeover with IOD Marché des Fleurs
- 5 Creative Ways to Use One Decorative Stamp
- Turn Thrifted Finds into Charming Garden-Inspired Decor with a DIY Jadeite Finish
- Little Lark Paint Inlay Projects: Vintage Teapot & Canvas Wall Art with IOD