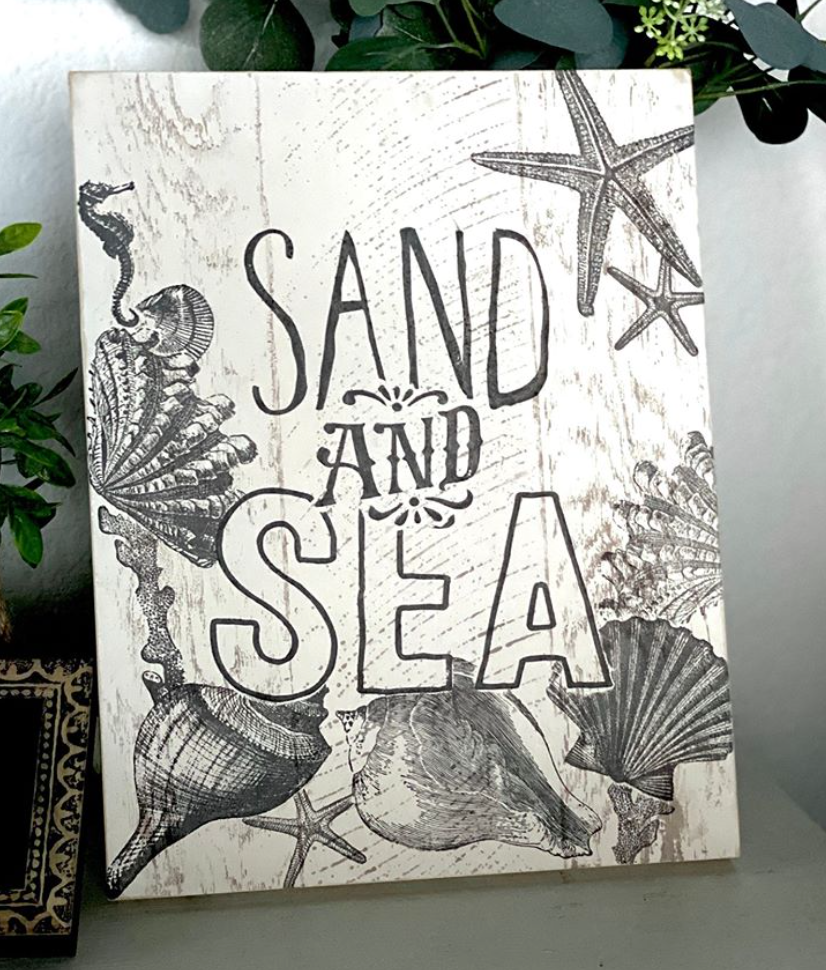
Sand and Sea: DIY Wooden Beach Sign
Y’all know we’re born and raised California girls which means we can’t pass up the chance to make a DIY wooden beach sign – seashells, sand dollars, and starfish, oh my!?!

Now, we have to fess up – we did a bit of double duty with this project. In addition to playing with the new IOD Seashore and typography stamps, we dug into how to use the masking technique and all the stamping basics. So, now you get to choose your own adventure…
Do you want to read about how to prep your stamps for first use, learn how to mask, how to use different mediums with stamps, how to fill a blank ink pad, how to clean your stamps and more?
If yes, then check out this post here (you’ll still get to see us make the beach sign, but the focus is on the basics of how to stamp, how to mask and some other fancy-pants stamping techniques).
<<< OR >>>
Do you want to focus on learning how to make this beach-tastic sign?

If yes, then hang ten (whoops – we mean hang tight!) with us right here on this page. We’re going to detail out the project supply list and break down all the steps.
No time now? Pin this project for later.
You can watch the step-by- step video tutorial below or keep on scrolling if you prefer reading.
Note: We started with a project board that was already painted and stamped to look like barnwood planks. If you want to learn how to do that, keep scrolling down to the first part of the written instructions below.
Here’s everything you need to decorate your DIY wooden beach sign.
(This post contains affiliate links.)
IOD products can be purchased from approved stockists. To find a shop local to you, click here. To find an online store, click here.
To create the basic barnwood plank sign, you’ll need…
- 11″ x 14″ IOD Gallery Wood Blank
- Barnwood Plank Stamp by IOD
- Brayer by IOD
- Your favorite chalk or mineral-based paint in antique white
- Your favorite chalk or mineral-based paint in light gray
- Paper plate
- Chip paint brush
- Fine grit sanding block (optional, if you want a more distressed look)
To make your DIY sign beach-tastic, you’ll need…
- Block Type Stamp by IOD
- Retro Stamp by IOD
- Farmhand Stamp by IOD
- Seashore Stamp by IOD
- IOD Ink in black
- Blank ink pad by IOD
- Thin mount with gridlines by IOD
- Fine grit sanding block (optional, if you want a more distressed look)
- General Finishes Flat 450 Topcoat or other high quality flat water-based polyurethane topcoat in matte
There are two parts to this project.
First, paint and create a wood plank finish for you DIY wooden beach sign.
We started with a project surface that was already painted and stamped to look like barnwood planks. If you want to learn how to do that, we included a video tutorial and instructions below (just use the paint colors suggested for the Sand & Sea sign).
For this project, use an antiqued white chalk or mineral paint for the base color and then use light gray chalk or mineral based paint on the Barnwood Plank stamp.
Here are the basic steps.
Step 1: Paint the smooth, unframed side of the wood gallery blank with the antique white paint.
Load your chip brush with paint.
Use long, even brush strokes on the wood gallery blank in the direction that you plan to ‘lay the planks.’ Think of it like painting along with what would be the wood grain.
Let the paint dry.
Step 2: Prepare to stamp.
Lay your IOD Barnwood Plank stamp down on your work surface with the design side up face up.
Pour a bit of light gray paint on a paper plate. Using your brayer, roll through the paint until it’s evenly coated. Then, roll the paint-loaded brayer onto one of the plank stamps.

To get the look you see in this beach sign project, use a light hand when applying the paint to the stamp. You may even want to only coat part of the plank design so that you’re creating a more weathered impression of barnwood.
Step 3: Stamp away!
Pick up the loaded stamp, flip if over, and hover until you have it lined up just where you want it on your painted board. Then commit by applying the stamp to the surface without shifting.

Run one hand along the design details while stabilizing the stamp to keep it from shifting with your other hand.
Repeat in rows until you’re happy with the barnwood plank look. Then add a few plank joints and wood knots to make it look authentic.

Once it’s dry, use a fine grit sanding block to create a distressed look. Wipe any dust off before moving on to the second part of this project.
Now you’re ready to start having some seaside fun!
Here are the steps to add the lettering and seashells to your beach sign.
Step 1: Stamp the foreground first.
First, let’s talk about what we mean by ‘foreground.’ In this project we’re going to use a stamping technique called masking. That’s where you cover what you’ve stamped to keep the image clear as you layer on additional stamped images on top. You have to think in reverse a bit when masking as you want to first stamp what will appear closest to the viewer – that’s what the foreground is.
In our design, the wording is going to be in the foreground. Start by arrange the “AND” stamp from the IOD Block Type Stamp set where you want it on your sign.

Then, lay the thin mount on it and press so that the stamp sticks to the acrylic.

Lift up, flip it back over and lay the thin mount down with the stamp design surface facing up. Apply ink to the “and” from the IOD Block Type Stamp set with black ink by patting the design side with a loaded ink pad.

Then, pick it up, flip it over, and stamp down in the center of your sign. Apply even pressure on each letter and design detail – commit, don’t shifts.

Lift your stamp straight up off you project surface. Then let your stamped image dry.
Step 2: Arrange your clear letter stamps.
For this project, we used the IOD Farmhand Stamp to write “SAND” and the IOD Retro Stamp to write “SEA.” Before inking your stamps, lay out your words where you want to stamp them design side down.

Then, take your thin mount and lay it on top of your arranged letters and press down so that the letters stick to the acrylic when you lift it up.

Step 3: Mask what you’ve already stamped.
Set the thin mount with the stamps attached aside. Now lay down the plastic mask for the “and’ from the Block Type stamp set, taking care to line it up with the image you already stamped.

Step 4: Stamp the words.
Ink the stamps by patting the design side with a loaded ink pad.

Pick up the thin mount and flip it over so you’re holding it inked side side down. Hover it over your sign until it’s where you want to stamp. Then lay it down – commit, don’t shift – to avoid smudging or a double image.

Press down, applying even pressure to make sure the stamps make good contact with the project surface.
Lift the thin mount straight up and let the ink dry. Once it’s dry, mask the individual letters to protect them from subsequent stamping.
Step 5: Layout the stamps that you want in the foreground and stamp.
The IOD Seashore stamp is most easily used if you cut the stamps apart while they are still stuck to the backing. Then you can use the backing as the mount.

Lay the stamps down how you like. Remember, these images are the ones that will appear in front. Once you like the arrangement, individually ink the designs. Hover over where you want to stamp – then commit don’t shift. Apply even pressure by running your fingers over the back of all the design details, then lift straight up.

Let the ink dry and then lay the corresponding masks on each stamped image.
Step 6: Arrange your background stamps and keep on stampin’.
Lay the stamps down how you like – layering over your masked foreground stamp images. Remember, the images you’re stamping now will appear in the “back” – behind the stamped images from the last step.
Once you’re happy with the arrangement, individually ink the designs. Hover over where you want to stamp – then commit don’t shift. Apply even pressure by running your fingers over the back of all the design details, then lift straight up.

Step 7: Carefully remove the masks and TA-DA!!!!!
Keep in mind that the plastic masks will have wet ink on them when you remove them. Lift each mask straight up one at a time and set aside.
Let the project completely dry.
Step 8: Distress and seal your DIY wooden beach sign.
If you like a little shabby chic, vintage-y look, lightly sand the edges your sign with a fine grit sanding block. Wipe away any dust and apply a thin layer of a high quality, water-based polyurethane using a chip brush.
We just love making beach house decor because it instantly transports us to the ocean. Can you smell the salty air and hear the seagulls circling overhead?
What beach-tastic projects have you made lately? Share with us in the comments below or tag us on social media. We want to see your beautiful work.
If you dig DIY sign projects, here’s a few ideas you might want to check out:
 ×
×
popular
- How to Apply IOD Athenaeum Gilded Transfer to Colored Glass Bottles
- From Ugly Duckling to Gorgeous | Black Dresser Makeover with IOD Marché des Fleurs
- 5 Creative Ways to Use One Decorative Stamp
- Turn Thrifted Finds into Charming Garden-Inspired Decor with a DIY Jadeite Finish
- Little Lark Paint Inlay Projects: Vintage Teapot & Canvas Wall Art with IOD