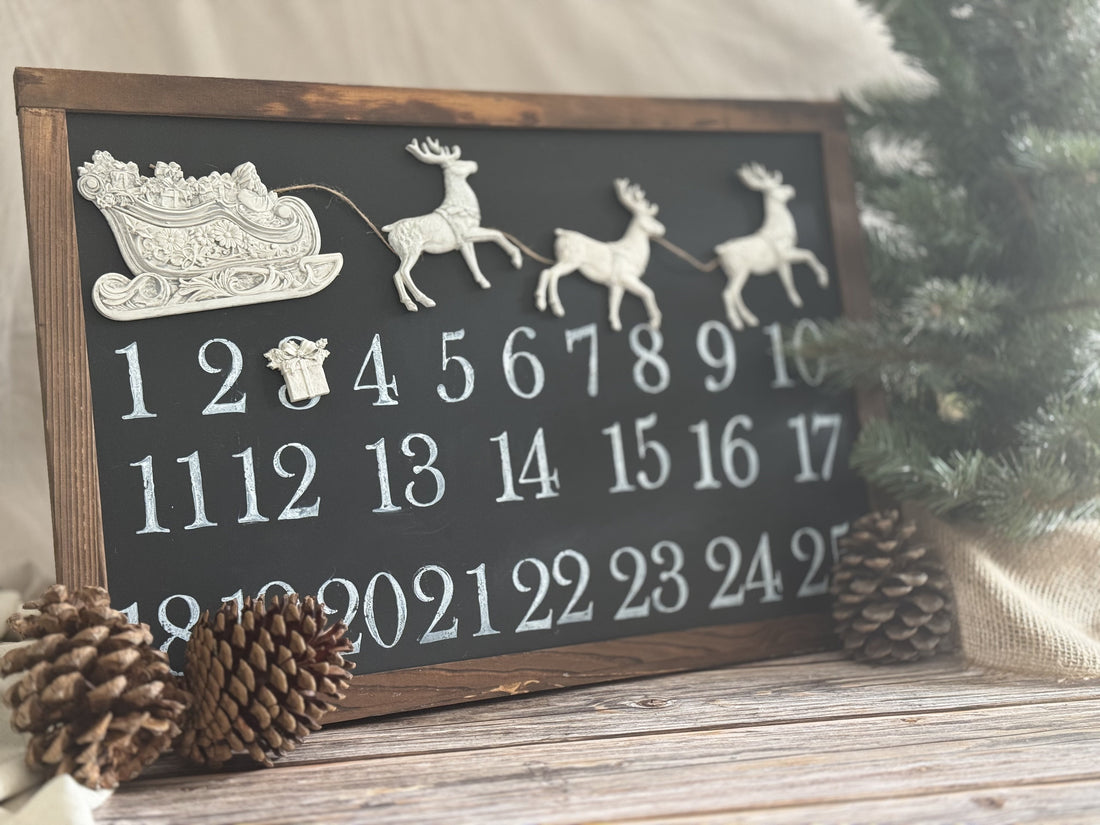
Handmade Magnetic Advent Calendar with Santa’s Sleigh Mould

Why settle for another store-bought advent calendar when you can make something truly custom? This magnetic advent calendar with the Santa’s Sleigh Mould isn’t just a beautiful craft—it’s a clever solution. Dig into your craft stash for supplies or find them at your local thrift store, and create a lovely calendar that doesn’t just count the days til Christmas but becomes part of your evolving seasonal décor. The best part? With magnets on the back, these pieces are interchangeable, letting you update your calendar with new moulds year-round. Less clutter, more creativity—how great is that?🤩
Grab your IOD products and supplies by using the store locator and finding a stockist near you.
IOD Products Needed:
- Santa’s Sleigh Mould
- Typesetting Stamp
- Erasable Liquid Chalk (ELC) Ink
Other Supplies:
- Magnetic Chalkboard (16x24)
- Magnetic Backing for Moulds
- Amazing Cast Resin
- Twine
- Soft Grey Glaze
Step-by-Step Guide
STEP ONE: PREP YOUR MOULD
The first step is to make some castings from Santa’s Sleigh Mould. We used Amazing Cast Resin in a 1-to-1 ratio, a silicone measuring cup, and a stir stick for ease of cleanup and measuring our pours. Remember to be thorough with your mixing! Pour the sled, and reindeer, and pick out a favorite present to mark your current advent calendar day. Extra resin? Pour more presents for your fridge or extra goodies for your calendar. Allow to set thoroughly, especially around the fiddly bits like the antlers and ankles. We don’t want any amputations here! Repeat two more times for a total of three reindeer.


STEP TWO: PAINT YOUR CASTINGS
We were going for a fresh timeless look so we painted our castings with soft white chalk paint. We used an artist brush to get into all the little details, and let it dry.

STEP THREE: APPLY A SEALER
Now we’re adding a quick coat of sealer before we apply our glaze. We’re doing this because we don’t want to reactivate our chalk paint and have it wipe off when we dab at our glaze. We applied one coat of flat-out-flat sealer, but check with your stockists for recommendations! Let dry.


STEP FOUR: STAMP YOUR CALENDAR
While you wait, you can get started on the calendar portion of this project. We were fancy and used two sets of typesetting but you can absolutely get away with one. It’s just handy to have a little extra, especially when you’re working on spacing. Take your Erasable Liquid Chalk (ELC) and your thin mount and pull off your letters. We knew we wanted our Santa to appear flying across the top of our calendar, so we left enough room for him (our chalkboard was 16x24 for reference).
We have room for three rows of numbers. Work slowly, being aware of your spacing. Use the grid lines from your thin mounts to help keep your lines straight and then go for it! Add a fresh coat of ELC onto your ink pad and apply it to your stamps. Similar to all stamp projects, commit don’t shift! Press firmly onto each number. If you find it hard to maneuver your thin mount, remember you can cut them up into smaller pieces to give you more control. You’ll see us switch to a smaller one for the numbers on the far edge. Repeat until you’ve got 1-25. Cleanup any smudges with a baby wipe or wet paper towel.
Side note: Want your advent calendar to be permanent? Instead of using chalk, our IOD White Decor Ink would be a great alternative.

STEP FIVE: APPLY YOUR GLAZE
Next up, glazing! We used a premade soft grey glaze, but you could absolutely make your own with chalk paint and water in a 1:3 ratio. Cover your castings entirely and wipe off the excess from your high points, leaving the grey to pop out all of the stunning details. Repeat this process.

STEP SIX: APPLY YOUR MAGNETS
It’s time to apply your magnets! No need for glue, these magnets have a strong adhesive. Just remove the backing on your magnet and press firmly against your mould. We applied two magnets on each reindeer, four on the sled, and one for the present.

STEP SEVEN: ADD THE TWINE
For a little added touch, cut a length of twine and as you place your sleigh and reindeer, use the twine to act as reins. Set your present on the first day of the month and enjoy counting down the days to Christmas!


If you're just kicking off your creative journey, have no fear — our Product 101 pages are packed with straightforward techniques to set you up for success. We're thrilled to accompany you as you explore and create. For more how-tos and creative inspo, make sure to browse through the rest of our blog.
Once you've crafted your final piece, share it with our Facebook Creative Tribe! This community is not just a showcase but also a supportive hub for when you hit those creative roadblocks. And remember, your local stockist is always ready to assist with IOD supplies and expert advice. We're excited to see what you'll bring to life!


