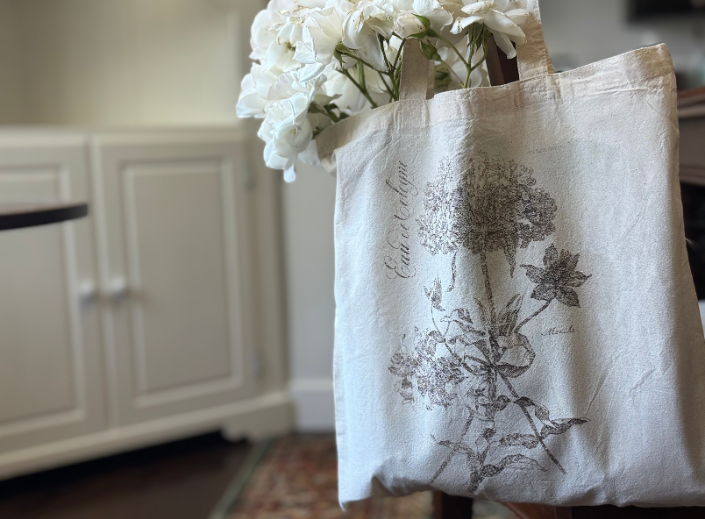
How to: Apply IOD Paint Inlays to Fabric

You guys, we’ve been so giddy to share this one with you! Raise your hand if you're curious about applying IOD Paint Inlays to fabric? 🙋🏼♀️ Well…we can't see those hands, but we know there are a lot of them!
Yes, friends, with the right fabric medium, Paint Inlays transfer beautifully onto fabric, and believe it or not, you can even get multiple impressions just like you would on other surfaces! One thing to keep in mind is that the texture of your fabric and how you apply the inlay can impact the final result. So go in with an adventurous spirit and maybe do a little test run before you commit to a whole project.
For this tutorial, we’re using the Floriography Paint Inlay from our 2025 Summer Collection. Those romantic Parisian labels and delicate floral motifs felt just right for a sweet farmers market tote bag. And let's just say, we're swooning over how it turned out! 💐 So grab your IOD supplies from your local stockist, and let's delve in!
IOD Products Needed:
Other Supplies:
Step-by-Step Guide
STEP ONE: PREP YOUR FABRIC
We have a few important things to note before we get started. First things first, make sure your fabric is washed and completely dry. This helps remove any sizing or leftover chemicals from manufacturing that could keep your paint from sticking properly.
Next, let’s talk about fabric texture. The smoother the weave, the clearer your image will be. If your fabric has a looser weave or lots of texture (think those little “nubs”), your design may look a bit more distressed. It's still beautiful, but something to keep in mind when you're picking your fabric.
STEP TWO: APPLY YOUR GAC 900
Grab your GAC 900 and a brush, and let’s get that fabric prepped! You’ll want to brush on a generous layer right where you plan to place your inlay. There's no need to coat the entire surface, just the area where your design will go.
Pro tip: The inlay won’t adhere to any dry spots, so be thorough! If you’re working with a tote bag or something with two layers, you can slide a thin mount or cardboard between the layers to keep the GAC from seeping through. Don't worry if a little does seep through, it won’t hurt a thing!


STEP THREE: APPLY YOUR INLAY
Cut out the design you want to use. There's no need to mist it for this project. Just place it face down onto the area where you brushed your GAC. Use your fingers or a brayer to gently press it into place, making sure it’s got good contact with the surface.
You’ll know it’s working when you see the inlay darken as it absorbs the medium. If it’s not pressing in or darkening, that’s your cue to add a bit more GAC and try again. You want it to feel nice and saturated, so the inlay transfers beautifully!


STEP FOUR: DRY TIME TIPS & TRICKS
Now for the hardest part, keep your hands off and let it dry! 😅
Dry time can vary depending on your environment. If it’s cold and damp (like my laundry room was), it might take overnight and then some. Warmer spaces will definitely speed things up a bit.
Important note: GAC is heat-activated, so resist the urge to grab your heat gun! That shortcut could cause the carrier sheet to fuse to your fabric, and nobody wants that.
Once the surface feels mostly dry, go ahead and hang it up to finish air drying completely. Patience here will pay off big time!
STEP FIVE: REMOVE YOUR INLAY CARRIER SHEET
Now for the fun part, grab a damp paper towel or give the inlay a gentle mist with your spray bottle. Once the carrier sheet is nice and wet, start peeling it back slowly. You might need a slightly firmer tug than usual, so don’t be shy, but keep that water close in case it needs a little extra help.


STEP SIX: HEAT SET YOUR INLAY
For heat setting, I used an iron on the highest setting the fabric could handle, just be sure to check your fabric type first. GAC offers a few other heat-setting options (like using the dryer), but I stuck with the iron method. You can find more info on alternative methods here.
Using the cotton setting on my iron, I pressed each section for at least 30 seconds to make sure it was fully “cured.” You’ll want to do this in a well-ventilated space because the GAC can give off a bit of an odor as it sets.
And that’s it! Once heat-set, your project should hold up just fine with cool washes, just skip the dryer to keep it looking its best. 😀

If you're just kicking off your creative journey, have no fear — our Product 101 pages are packed with straightforward techniques to set you up for success. We're thrilled to accompany you as you explore and create. For more how-tos and creative inspo, make sure to browse through the rest of our blog.
Once you've crafted your final piece, share it with our Facebook Creative Tribe! This community is not just a showcase but also a supportive hub for when you hit those creative roadblocks. And remember, your local stockist is always ready to assist with IOD supplies and expert advice. We're excited to see what you'll bring to life!


