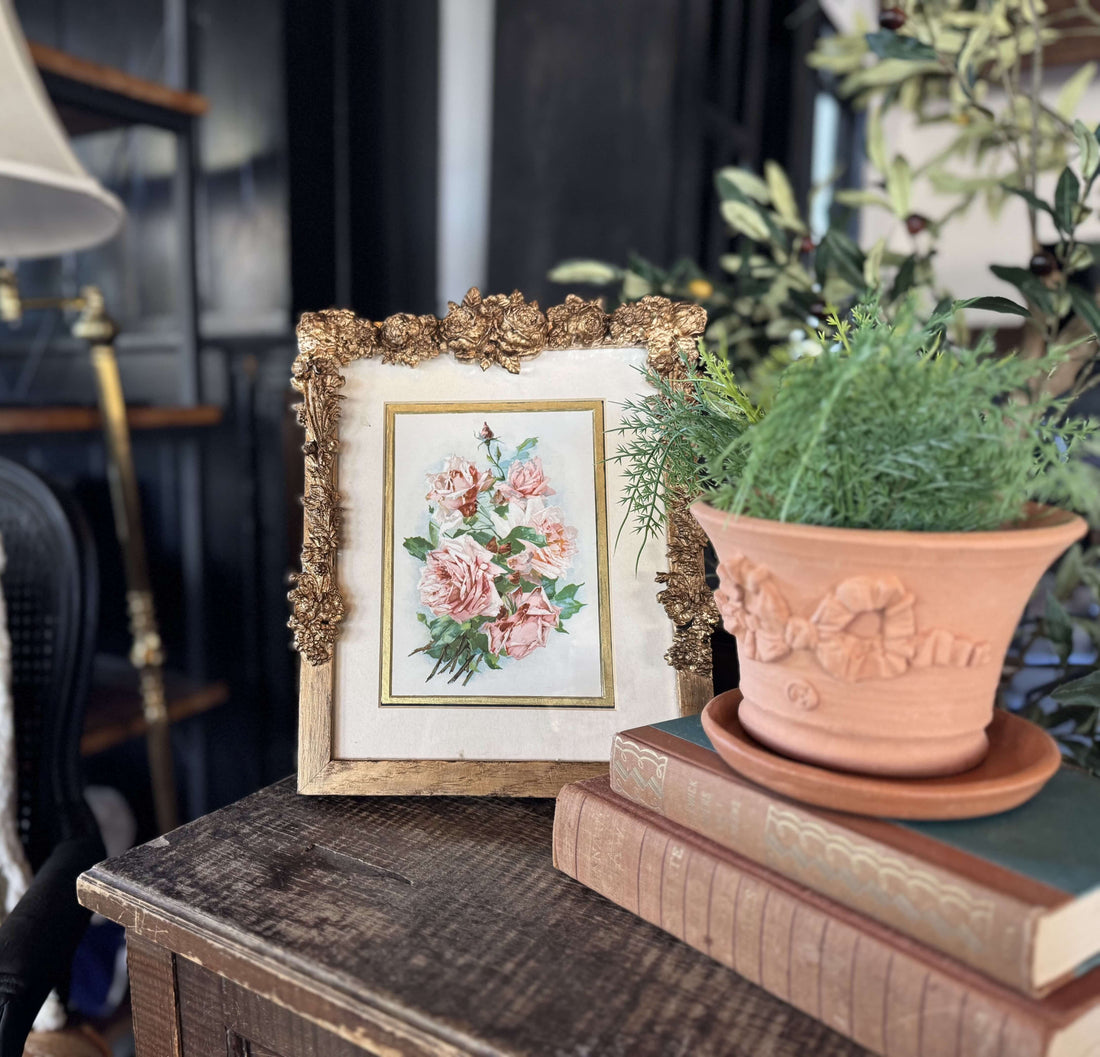
How To Thriftflip a Plain Frame to Look Absolutely French!

How To Thriftflip a Plain Frame to Look Absolutely French!
Pin this article to save for later

How often do you walk out of a thrift store with a frame that’s a little plain, but brimming with potential? Same here—we can’t help ourselves! There are so many ways to breathe new life into those frames. A little creativity and some love from IOD can uplevel those frames into fabulous wall art that looks like it belongs in a high-end boutique.


In this tutorial, we’re upcycling a thrifted frame with the IOD Felicite Mould, gold leaf paint, and a few trusty tools from our craft stash. Of course, frames come in all shapes and sizes (literally!), which means you can get creative with almost any IOD Stamp, Transfer, Mould, or Paint Inlay. Pick the product that fits your frame and vision best, and let your creativity do the rest!


Ready to stock up on your favorite IOD goodies? Use our store locator to find a stockist near you and snag everything you need to complete your next creative endeavor!

IOD Products Needed: 

Other Supplies: 

  • Thrifted artwork
  • Gold Paint Pen
  • Gold Leaf Paint
  • Amazing Cast Resin
  • Dark Wax
  • Blue Painter’s Tape (optional)

Step-by-Step Guide

STEP ONE: CLEAN & PREP YOUR FRAME

Disassemble your artwork and give it a good wash, including both sides of the glass. Our mats didn’t want to come apart so that dictated our method. If yours will, you can slide out the artwork and paint the areas you want to change without worrying about the mess. Or, if you’re like us, we wanted a little extra pizzazz to our mats so we taped off the mats to get crisp lines of gold instead of black. Next, we took a gold paint pen and smoothed it over the black. It’s oil-based, so be careful with it. Set that aside to dry.

STEP TWO: PREP AND CAST YOUR MOULDS

Take your Felicite Mould and prepare your resin. Amazing cast resin is a 1:1 ratio but always read your box to make sure you follow their instructions. Pour carefully into the cavities and allow to set. For a mirrored effect on both sides of the frame, you’ll repeat this process so you’ve got two sets of each (except for the double rose in the middle).

STEP THREE: ASSEMBLE YOUR MOULDS

The goal is the feeling of a floral garland draped across the top of the frame. Start in the center and move outward, using the smallest flowers to fill in the gaps in your garland. Allow to dry.

Configure Your Stamping Tools
STEP FOUR: PAINT YOUR FRAME

Paint your entire frame with gold leaf paint. A quick tip: Make sure you’re working in a well-ventilated area while using gold leaf paint—it’s a game-changer, but it comes with strong fumes. Use a small brush to get into all those intricate nooks and crannies, and don’t forget to clean your brush with odorless mineral spirits when you’re done. Oil-based paints can be a little fussy, but trust us, the shimmery finish is well worth it!

Configure Your Stamping Tools
STEP FIVE: APPLY DARK WAX

Once that’s dry, take a little bit of dark wax and brush over for a vintage finish.


Pro-tip: Pay attention to what’s at the top of the frame. If there isn’t a hanger already, you’ll want to add one! 

Configure Your Stamping Tools
STEP SIX: REASSEMBLE YOUR PIECE

There’s nothing left to do but reassemble your artwork, hang it, and wait for the compliments!😄

Configure Your Stamping Tools

If you're just kicking off your creative journey, have no fear — our Product 101 pages are packed with straightforward techniques to set you up for success. We're thrilled to accompany you as you explore and create. For more how-tos and creative inspo, make sure to browse through the rest of our blog.


Once you've crafted your final piece, share it with our Facebook Creative Tribe! This community is not just a showcase but also a supportive hub for when you hit those creative roadblocks. And remember, your local stockist is always ready to assist with IOD supplies and expert advice. We're excited to see what you'll bring to life!

Project Image

How To Thriftflip a Plain Frame to Look Absolutely French!

How To Thriftflip a Plain Frame to Look Absolutely French!
Pin this article to save for later

How often do you walk out of a thrift store with a frame that’s a little plain, but brimming with potential? Same here—we can’t help ourselves! There are so many ways to breathe new life into those frames. A little creativity and some love from IOD can uplevel those frames into fabulous wall art that looks like it belongs in a high-end boutique.


In this tutorial, we’re upcycling a thrifted frame with the IOD Felicite Mould, gold leaf paint, and a few trusty tools from our craft stash. Of course, frames come in all shapes and sizes (literally!), which means you can get creative with almost any IOD Stamp, Transfer, Mould, or Paint Inlay. Pick the product that fits your frame and vision best, and let your creativity do the rest!


Ready to stock up on your favorite IOD goodies? Use our store locator to find a stockist near you and snag everything you need to complete your next creative endeavor!

IOD Products Needed: 

Other Supplies: 

  • Thrifted artwork
  • Gold Paint Pen
  • Gold Leaf Paint
  • Amazing Cast Resin
  • Dark Wax
  • Blue Painter’s Tape (optional)

Step-by-Step Guide

STEP ONE: CLEAN & PREP YOUR FRAME

Disassemble your artwork and give it a good wash, including both sides of the glass. Our mats didn’t want to come apart so that dictated our method. If yours will, you can slide out the artwork and paint the areas you want to change without worrying about the mess. Or, if you’re like us, we wanted a little extra pizzazz to our mats so we taped off the mats to get crisp lines of gold instead of black. Next, we took a gold paint pen and smoothed it over the black. It’s oil-based, so be careful with it. Set that aside to dry.

STEP TWO: PREP AND CAST YOUR MOULDS

Take your Felicite Mould and prepare your resin. Amazing cast resin is a 1:1 ratio but always read your box to make sure you follow their instructions. Pour carefully into the cavities and allow to set. For a mirrored effect on both sides of the frame, you’ll repeat this process so you’ve got two sets of each (except for the double rose in the middle).

STEP THREE: ASSEMBLE YOUR MOULDS

The goal is the feeling of a floral garland draped across the top of the frame. Start in the center and move outward, using the smallest flowers to fill in the gaps in your garland. Allow to dry.

Configure Your Stamping Tools
STEP FOUR: PAINT YOUR FRAME

Paint your entire frame with gold leaf paint. A quick tip: Make sure you’re working in a well-ventilated area while using gold leaf paint—it’s a game-changer, but it comes with strong fumes. Use a small brush to get into all those intricate nooks and crannies, and don’t forget to clean your brush with odorless mineral spirits when you’re done. Oil-based paints can be a little fussy, but trust us, the shimmery finish is well worth it!

Configure Your Stamping Tools
STEP FIVE: APPLY DARK WAX

Once that’s dry, take a little bit of dark wax and brush over for a vintage finish.


Pro-tip: Pay attention to what’s at the top of the frame. If there isn’t a hanger already, you’ll want to add one! 

Configure Your Stamping Tools
STEP SIX: REASSEMBLE YOUR PIECE

There’s nothing left to do but reassemble your artwork, hang it, and wait for the compliments!😄

Configure Your Stamping Tools

If you're just kicking off your creative journey, have no fear — our Product 101 pages are packed with straightforward techniques to set you up for success. We're thrilled to accompany you as you explore and create. For more how-tos and creative inspo, make sure to browse through the rest of our blog.


Once you've crafted your final piece, share it with our Facebook Creative Tribe! This community is not just a showcase but also a supportive hub for when you hit those creative roadblocks. And remember, your local stockist is always ready to assist with IOD supplies and expert advice. We're excited to see what you'll bring to life!

Back to blog