


DIY Holiday Cushion: How to use IOD Stamps with Embroidery
You asked for it and your patience is being rewarded! Here’s a wonderfully creative and BEAUTIFUL tutorial with mixed media artist Kayla Cassie Carrier of Creative Thought on how to use IOD Stamps with embroidery.
No time now? Pin for later.

Watch the video below as she shows you how to make a holiday-themed cushion or keep scrolling for a supply list and written instructions. (And we ❤️ the sweet little voices of her kiddos in the background – as working moms, we feel you, girl!)
If you love this video, be sure to subscribe to Kayla’s channel here, follow her on Instagram, or join her Facebook group.
Here’s what you need for this DIY project
- Branches and Vines Stamp by IOD
- Bohemia Stamp by IOD
- Alphabellies Stamp by IOD (optional, to stamp bows and embellishments on the bulbs)
- IOD Decor Ink
- Fabric for pillow top and back
- Flannel (optional to layer behind pillow top for texture)
- Scissors
- Embroidery hoop
- Embroidery thread in a variety of colors
- Sewing needle
- Batting
- Sewing machine (optional as you can hand stitch, use fusible webbing or hot glue as well)
How to use IOD Stamps with Embroidery
Step 1: Choose and prep your fabric.
When choosing fabrics, you should go with something that isn’t stretchy. Broadcloth cotton or dropcloth (something durable) so that it will survive many washes – pillows get dirty! Consider making a smaller scale project if you want to experiment with different fabric types.
Wash you fabric prior to starting the project.
Step 2: Stamp your design.
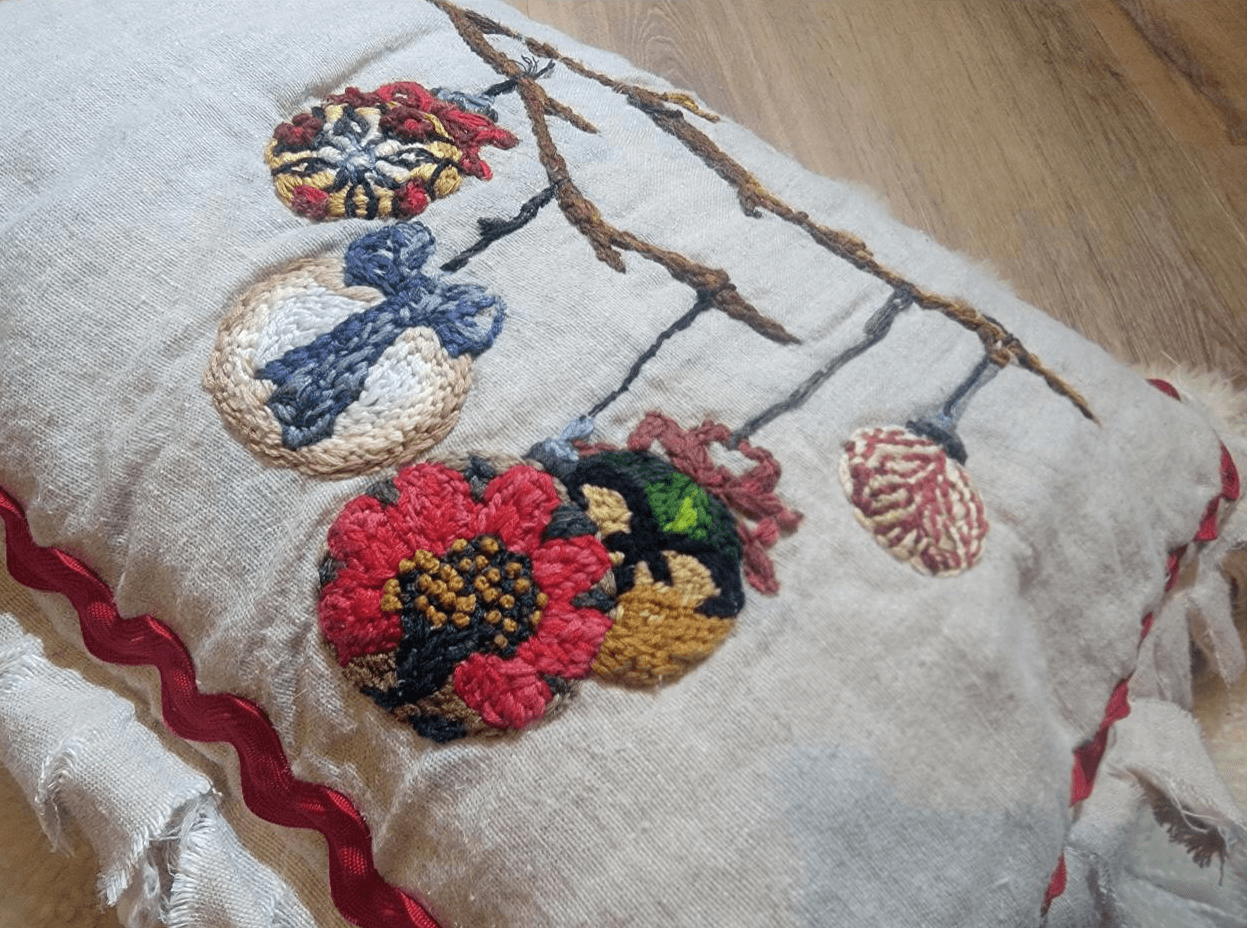
For this project, Kayla knew she wanted to have a branch with Christmas bulbs hanging off of it. She used the Branches & Vines Stamp to make the tree branch image. Then she cut different-sized circles from a sheet of paper and used it as a masking stencil. This formed the bulb shape with the Bohemia Stamps. (This could be fun with other shapes as well!)

For extra embellishment, you can use the bows and pretty flourishes from the Alphabellies stamp.
For the bulbs that didn’t have bows on them, Kayla hand drew a little ornament top and put lines in from each bulb up to the tree branch to make them look like they were hanging.
Step 3: Organize and choose your embroidery floss.
After going through a mountain of unorganized floss, Kayla narrowed it down to a few choice colors and found some neighboring tones to give a gradient for each one. When embroidering, she doubled up her thread on every stitch to make filling in the project quicker and to give it a cartoony effect. Each embroidery thread has 6 strands in it, so this means she was using 12. If you’d like a more realistic look, you can use fewer strands per stitch by pulling apart the thread.

Step 4: Set up your hoop and start embroidering.
Start by mapping out which colors you want to go where. Then, use short and long stitches, French knots, and satin stitches to follow the lines of the stamps and fill in the spaces. (For a wonderful beginner tutorial on basic embroidery stitches, check out this video.)
Use a gradient of color with the threads to create the illusion of light shining in the front of the bulbs to give them more dimension. You can use this technique with the bows and the top of the branch if you like.


Step 5: Cut the fabric and add a border.
Cut the fabric down to the desired size for your cushion. Kayla wanted to frame it with some red rick rack so she drew a line three inches around the perimeter of the front of the pillow. Pin the rick rack along this line and sew it into place.


Step 6: Assemble the cushion.
Layer all your fabric pieces – pillow top, flannel for extra texture (optional), pillow back – and sew them all together about 2 inches away from the raw edge. After sewing, Kayla snipped a fringe perpendicular to the stitch line, being careful not to cut through it. This causes intentional fraying after washing – the drop cloth frays and the flannel fluffs so and gives the pillow more texture.

Kayla wants to make an embroidered cushion for each season – we can’t wait to see what she comes up with next!
Have the IOD Peonies or Chrysanthemums Stamps? Learn how to make classic no-sew poinsettias.
And if you’re looking for another project to do with your Branches and Vines Stamp, see how to use it to make a cornucopia.
 ×
×
popular
- How to Apply IOD Athenaeum Gilded Transfer to Colored Glass Bottles
- From Ugly Duckling to Gorgeous | Black Dresser Makeover with IOD Marché des Fleurs
- 5 Creative Ways to Use One Decorative Stamp
- Turn Thrifted Finds into Charming Garden-Inspired Decor with a DIY Jadeite Finish
- Little Lark Paint Inlay Projects: Vintage Teapot & Canvas Wall Art with IOD
