Seven Spring Decor Ideas Just for You
If you’ve been thinking about making your own spring decor, but don’t think of yourself as the “crafty-type” then this post is for you!
Spring is a great time to push yourself to grow a bit by trying something new. (It’s also perfect for anyone looking to procrastinate on their spring cleaning… or is that just us?)
Either way, we’ve curated seven “egg-cellent” spring decor projects that are just the excuse you need to get creating with IOD!
No time to read now? Pin this post for later.
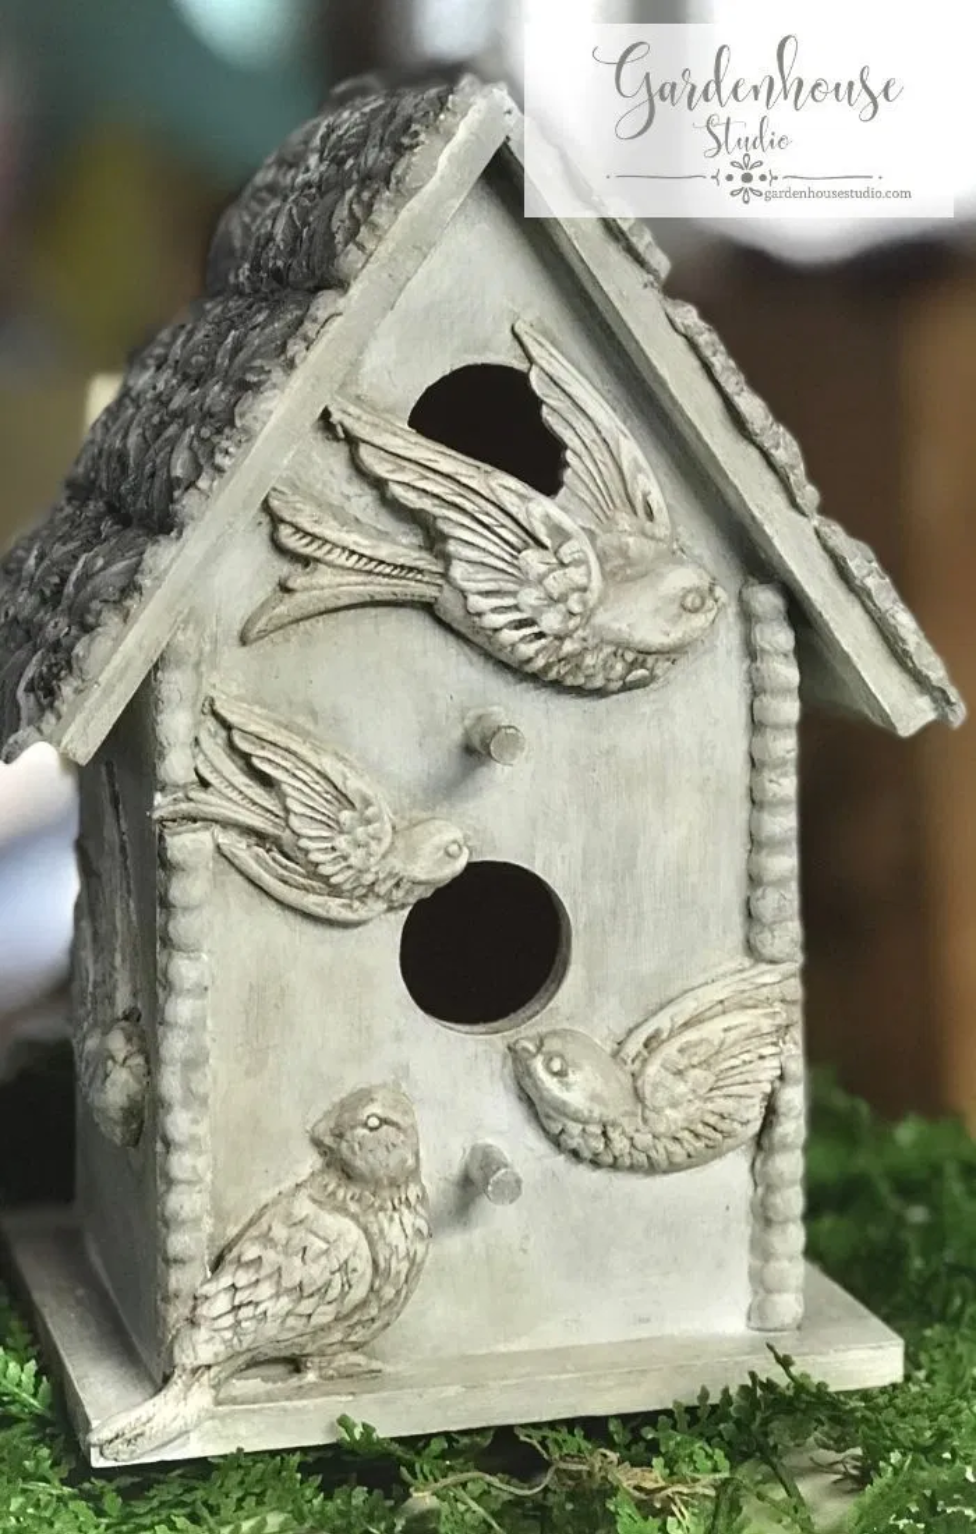
1. Decorate a Birdhouse
Don’t you just love all the cheeky little birds that start flitting about everywhere in springtime?
Now you can bring some of that energy indoors with this birdhouse decorated with the Birdsong and Classic Elements moulds.

Plain wooden birdhouses are inexpensive and easy to find in local craft stores this time of year. Or, if you’re looking for a variety of designs, you can easily order online.
Peggy from Gardenhouse Studio shares all the details for this birdhouse plus more DIY spring decor inspiration on her website. Check out her birdhouse tutorial by clicking here.
2. Craft a Wooden DIY Growth Chart
Wouldn’t this make the most adorable baby shower gift or a DIY nursery project?

Whether you’re measuring kids, grandkids, or flowers in your garden, this DIY growth chart will bring you joy for years to come. You can either use a painted wooden board or opt for a natural wood grain depending on your home decor style.
In this step-by-step tutorial by Michelle from Serendipity House, she uses floral designs from the Wild Flowers Botanical transfer.
3. Create a Chalkboard Easter Sign
Get ready to welcome the Easter Bunny with this easy stamped chalkboard sign.

Complete with a basket of eggs, this project uses the IOD Bohemia and Typesetting stamps, as well as the white erasable liquid chalk ink.
As part of this project, you’ll learn a technique called masking which can be used with stamps and transfers to add depth and realism to your projects. You won’t want to miss this one by Carmen from Curious Farms Market.
4. Make a Knife Block with Old Books
Don’t throw away those old books when you’re spring cleaning! You can transform them into a knife block.
You know this is one of those projects that will have everyone who sees it thinking you’re the sharpest knife in the block! (Ha, ha! Get it?)
Seriously, this is a fun way to bring some color into your kitchen while organizing your countertop.

Have you noticed that lemons are everywhere in home decor this spring? We just loved how Tonya from Hey There Delyla used a bit of the Lemon Drops transfer and Typesetting stamps to create this clever home accessory.
In her tutorial, you’ll learn an easy paint technique to create a grasscloth finish before applying the transfer. Don’t want to use a transfer? No problem. You can also use stamps or moulds to decorate the old books.
For step-by-step instruction on how to make your own knife block, check out Tonya’s post here.
5. Upcycle Spring Tin Can Planters
It wouldn’t be spring without getting your hands dirty with some planting!

This project uses IOD air dry clay with the Laurel and Fleur de Lis moulds, but we can imagine this project with any of the IOD moulds.
The pastel colors remind us of Easter eggs. Maybe the tin cans should be filled with jelly beans instead of lavender plants?
Learn how to make these sweet upcycled planters from Jami Ray Vintage in the video below.
6. Paint Wooden Farmhouse Easter Blocks
Here’s some easy spring decor that can be done with scrap wood cut into blocks and the Typesetting stamp.
Using an antique white paint and a little distressing with sandpaper, these blocks are a fun complement for your farmhouse table.

Yikes! Did spring fly by and you want to decorate for summer or fall? You can quickly update these Easter blocks to go with whatever season you’re decorating for by repainting, distressing, and stamping new words.
Want to try this project? Sam from Raggedy Bits has step-by-step instructions just for you. Check out her Farmhouse wooden Easter blocks tutorial by clicking here.
P.S. She also has an adorable Farmhouse bunny pillow cover and a book page Easter banner that will nicely complement your Easter blocks if you get on a roll.
7. Experiment with Some Extra Fancy Easter Eggs
You won’t want to hide these beauties! You can use whatever eggs you have on hand – even cheap plastic ones (just rough them up with sandpaper and don’t leave any candy inside).

We love the vibrant, metallic colors Vonda from The Painted Heirloom chose for her egg decorating tutorial. And she even mixed and matched by using several different moulds!
Learn how to make your own fancy Easter eggs with her step-by-step tutorial by clicking here.
This project can be done with whatever moulds you have on hand. And if you prefer a more classic or farmhouse look, you can style your eggs with muted or neutral colors and use a dark finishing wax for antiquing.
This Easter egg project is a perfect beginner spring craft because it provides lots of opportunity for mould experimentation. You could also easily do this one with kids.
So what are you waiting for? Let’s welcome and celebrate the spring season by making something beautiful.
Looking for some more spring decor ideas? You might also love:
How to DIY a Flow Blue Vintage Pot from Plain Terra Cotta
How to Turn a $7 Plastic Planter into a French Clay Pot
Did you make one of these projects? Make sure to share it with us on social media. We’d love to see!
 ×
×
popular
- How to Apply IOD Athenaeum Gilded Transfer to Colored Glass Bottles
- From Ugly Duckling to Gorgeous | Black Dresser Makeover with IOD Marché des Fleurs
- 5 Creative Ways to Use One Decorative Stamp
- Turn Thrifted Finds into Charming Garden-Inspired Decor with a DIY Jadeite Finish
- Little Lark Paint Inlay Projects: Vintage Teapot & Canvas Wall Art with IOD