DIY Chalkboardesque Dresser with Birds, Branches, and Blossoms
Hi Lovelies,
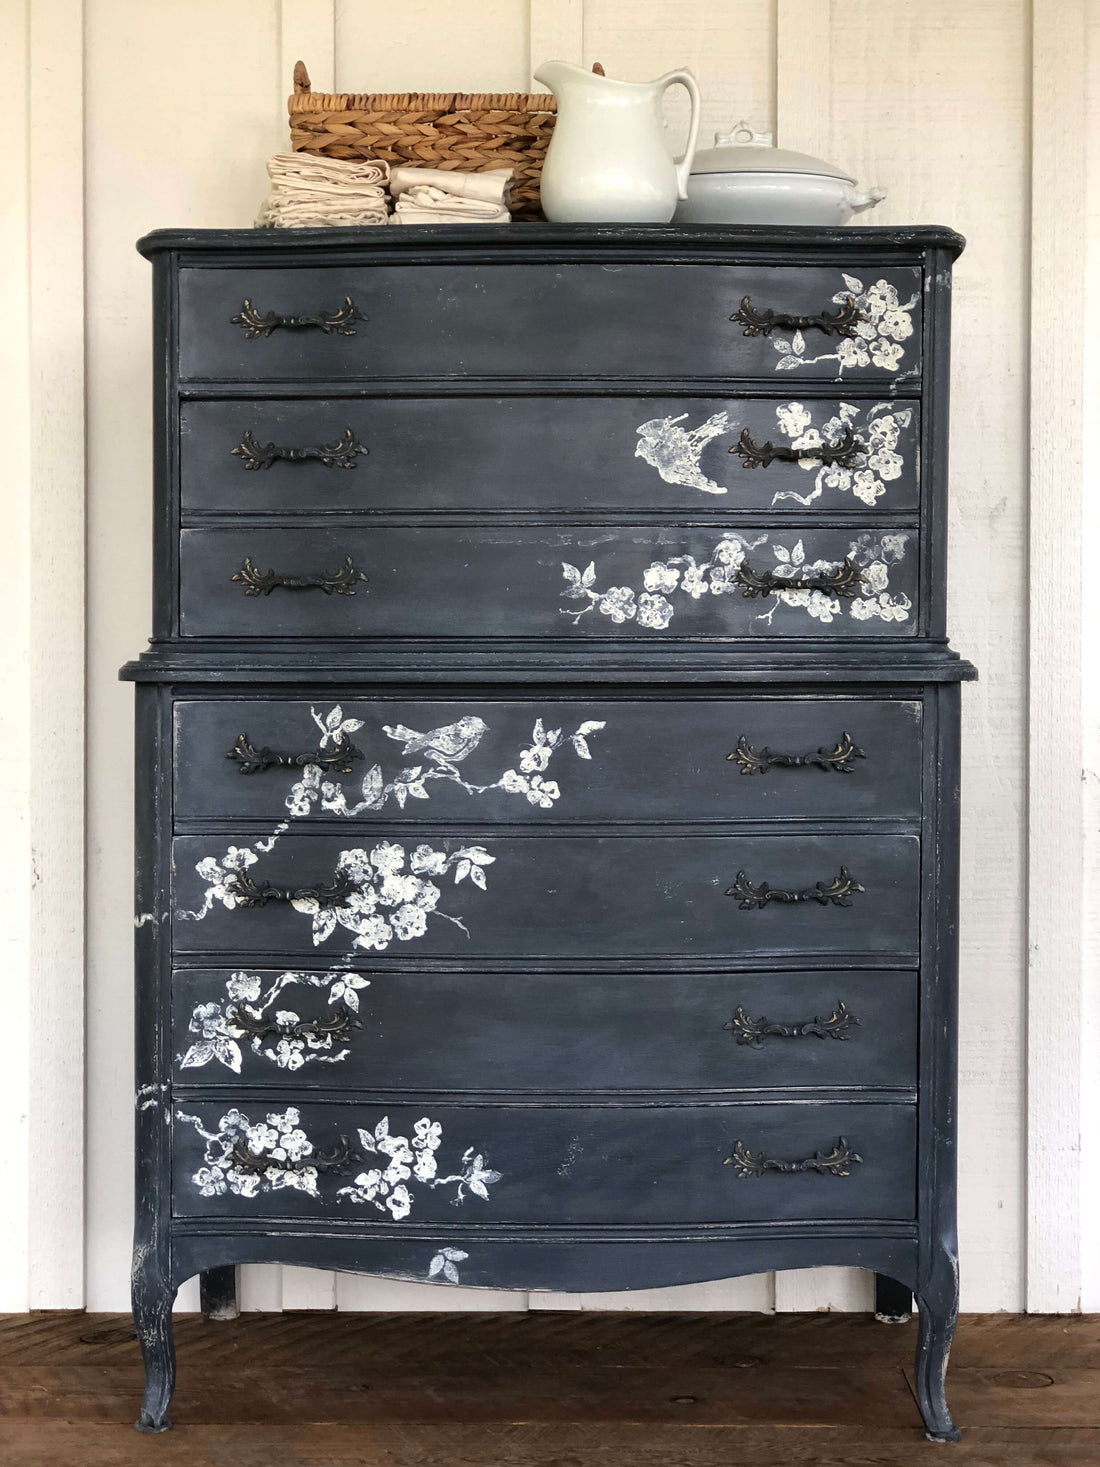
Today we are going to show you our new stamp Birds, Branches, and Blossoms Decor Stamp™. I am going to show you how easy it is to use these stamps to create a great look on any Project! ( Scroll to the end to see how I created an “A-DOOR-able” front entrance )
You can use different types of medium with these stamps; chalk paint, acrylic, Ink etc. Many different option, play around with them and watch our Decor Stamps 101 Video HERE. Here is the video of our project:
Materials
- Decor Stamps™ (I am using “Birds, Branches, and Blossoms”) Click HERE to find a stockist locally or if you don’t have one, click HERE to find one online (shipping to retailers late June 2018)
- Brayer Tool ( Your local IOD Stockist will have the IOD branded Brayer )
- acrylic sheet or silicon mat
- Chalk style paint in a dark gray or graphite type color and a slightly warm white ( most IOD retailers or “stockists” also carry a brand of mineral based, or sometimes called chalk style paint in an array of colors)
- Paint brush to apply base coat ( again, carried at your local IOD retailer!)
- Sanding sponge
- Sealer ( I’m using a clear wax style) ( Once again, you will find what you need at the establishment of your local IOD stockist! Yay for one stop shopping! )
-
-
1.
First I am going to paint my dresser with two coats of graphite ( you might notice in the video and images the paint is slightly wet still near the drawer pulls, that is because I forgot to remove them before I painted. oops! I had to base coat them again)
-

-
-
2.
Next I am going to use the brayer to load up my stamp. We are placing the birds first.
-

-
-
3.
With this stamp we find it helpful to first roughly plan your layout, place your birds, then your blossoms and then connect all of it with your branches. Place your loaded stamp onto your surface, for me it is my dresser. Once placed press lightly without shifting. Carefully peel off the stamp and reload with your brayer.
-

-
-
4.
Follow steps 2 and 3 until you have the coverage you want with your “Birds, Blossoms and Branches” Decor Stamp™.
-

-
-
5.
Once you are finished and the design has had time to dry, you can lightly sand the surface and then apply a sealer. In this case I used a clear wax.
-

 ×
×
popular
- How to Apply IOD Athenaeum Gilded Transfer to Colored Glass Bottles
- From Ugly Duckling to Gorgeous | Black Dresser Makeover with IOD Marché des Fleurs
- 5 Creative Ways to Use One Decorative Stamp
- Turn Thrifted Finds into Charming Garden-Inspired Decor with a DIY Jadeite Finish
- Little Lark Paint Inlay Projects: Vintage Teapot & Canvas Wall Art with IOD