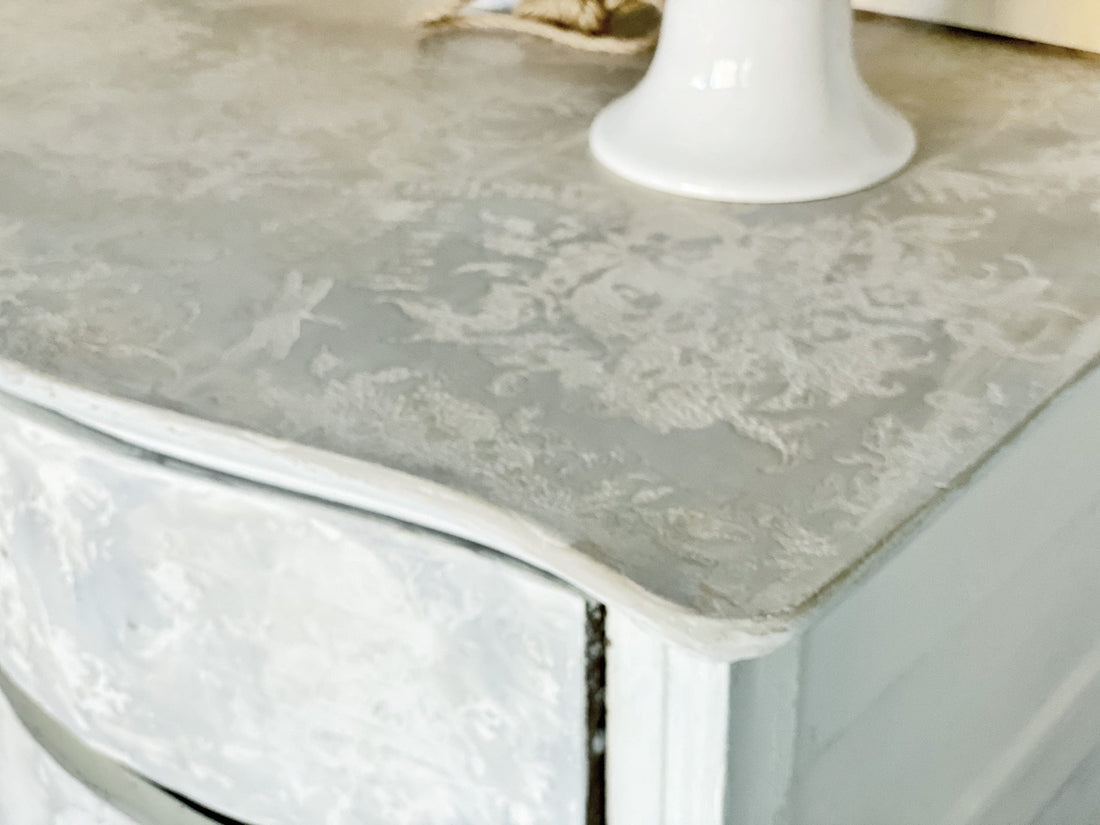
Move Over Raised Stencils - There's a New Technique in Town
If you love texture or the look of raised stencils on furniture, you’re gonna want to give this easy stamping technique a try! (Or, maybe even better, if you HATE sanding down chipped or damaged wood veneer and just want to cover it up… this technique is a dream come true. Totally NOT kidding!)
No time now? Pin this post for later.

(Note: This technique may not work as well with non- IOD stamps as the quality, durability, and depth of design might not be to the same standard.)

(Here’s a little teaser we did with a turquoise boho-style dresser drawer – check it out here.)
We don't want to leave you hanging, so we're sharing a ‘deep dive’ into how to create some beautiful texture. You can watch below or keep scrolling for a supply list and step-by-step instructions.
(Note: This tutorial is about the PROCESS, not the finished product. Learn and practice this technique and then, the sky’s the limit!)
So, are you ready to ditch your raised stencils? (JK! We don’t have anything against raised stencils – they can be gorgeous! We just wanted to get your attention!)
HERE’S EVERYTHING YOU NEED TO GET STARTED WITH THE IOD TROWELED STAMPED IMPRESSION TECHNIQUE
All IOD products can be purchased from an approved stockist. To find a shop local to you, click here. To find an online store, click here.
(This post may contain affiliate links)
- Furniture that you want to “IOD” 😆
- Kindest Regards Stamp by IOD
- Rose Toile Stamp by IOD
- IOD Brayer
- IOD Silicone Paint Blade
- Palm Paint Brush
- Your favorite furniture paint in two contrasting or complementary colors (we chose dark grey and antique white)
- Sanding block of varying grits (fine, medium, coarse)
- Dust mask (optional, for when sanding)
- Lint Free Shop Cloth
- Matte Polyurethane topcoat OR clear wax
Keep in mind that you can use any IOD stamps for your project! Pick what suits your interior design or home decor style.
And, if this is your first time using IOD stamps, you’ll need to condition the design side of the stamp. Click here to check out a stamping basics tutorial to show you how.
HOW TO USE IOD STAMPS FOR TEXTURE ON PAINTED FURNITURE
STEP 1: PREPARE YOUR PIECE WITH 2 COATS OF YOUR FAVORITE FURNITURE PAINT.
Apply two base coats of paint (your local IOD stockist can recommend the best brand for this project). We used a dark grey.
Let the paint dry thoroughly.
STEP 2: APPLY A VERY THICK 3RD COAT OF PAINT USING THE SAME COLOR AS THE BASE COAT.
We applied the dark grey paint since that was our base coat. You want an even, thick coat of paint over the entire piece. Keep the brush at a consistent, low angle as you lay the paint down.

The time you let the paint set (or start drying) will impact how strong of an impression the stamp makes. If you let the paint dry for too long, it’s ok! Just apply another coat of paint and try again.
As the paint dries, get down eye level with your piece and apply more paint to any areas that look thin. Experiment with different amounts of set up time until you get your desired look.
STEP 3: TIME TO IMPRESS!
The paint should be set up, but not dry. This means the paint exposed to the air has started to dry but underneath it’s still wet. Look for a haze, that’s when you want to make the impression. (If it’s still glossy or wet looking – keep waiting.)
Lay the stamp down, commit and don’t shift! Use your brayer over the stamp with concentrated pressure. This will allow the stamp design and all the delicious details to get evenly impressed into the paint.

Lift the stamp, straight up and you’ll have a beautiful varied impression texture on the furniture. Go for the reps! Practice.

Josie recommends keeping the rigid backing on your stamp for this technique. While it takes away some of your control over the stamp, it can free you up to make bolder decisions about the texture in your piece. Don’t be afraid to use just a portion of the stamp to add texture to small areas.

It’s normal to look at your piece at this point and think “It’s a mess!”
Don’t worry! Variation in the raised texture and mixed clarity of the stamp designs enhances the end result.
Let the paint dry completely. (We let ours dry overnight!)
STEP 4: KNOCK DOWN THE HIGHEST LEVEL OF PAINT WITH QUICK, EASY, LIGHT-HANDED SANDING.
Imagine your piece is a varied landscape with mountains and valleys. Sand down just the highest peaks of the mountains, keeping the rest of the mountain, hills, and valleys. Pay attention to areas that feel rough or jagged. Avoid being too heavy-handed to keep the texture in your piece.

STEP 5: WIPE DOWN WITH A DRY LINT FREE SHOP CLOTH.
Remove dust from the low parts, revealing the dimension that makes this technique special.
You could apply clear wax, stop here and leave the piece as is! Or if you want more texture and contrast, continue to the next step.
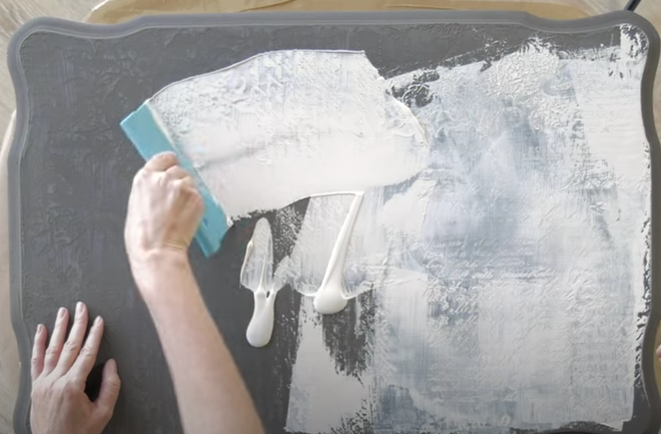
STEP 6: SIMULTANEOUSLY ADD AND WIPE DOWN PAINT.
You’ll need your flexible Silicone Paint Blade or you could substitute a silicone kitchen spatula with the handle removed.
Squeeze on contrasting paint (we used antique white), then apply firm pressure to your trowel as you spread it. The flexible silicone trowel fills in the low areas with paint, giving you more contrast.
After the paint dries, you might notice an area that you wish had less paint. Don’t worry, you can sand the paint down (but it will take some time and elbow grease)!
Variation is encouraged if that is the look you want! You’ll get more variation the longer you spend troweling. (Just keep in mind the paint will dry fairly quickly as you work with it.)
After she was done trowelling, Josie decided to paint the beveled edge of her piece so the color was consistent across the top of the piece.
STEP 7: GET OUT THE SANDING BLOCK.
Josie used a coarse grit sanding block, you could also get away with medium grit depending on how thick your top coat is and on how much paint you want to remove. Don’t forget a dust mask to keep from breathing in the paint dust!
Clean away the dust with a dry brush or shop cloth and take a look. Any areas that you’d like more texture to come through, keep sanding. The variation is beautiful!

Once you are done sanding, thoroughly wipe your piece down with a lint-free shop cloth and a clean soft bristle brush to get the dust out of the crevices.
If you want to get super thorough in your dust removal, you could use a bristle head vacuum.
STEP 8: APPLY CLEAR WAX OR BRUSH ON A HIGH-QUALITY POLYURETHANE TOP COAT.
Time to really POP the raised furniture texture! Josie used a matte polyurethane topcoat over the entire piece.

If you loved this DIY home decor stamping technique, you might also like the following tutorials


HAVE YOU MADE USED THE STAMPED IMPRESSION TECHNIQUE? LET US KNOW IN THE COMMENTS BELOW OR SHARE A PICTURE WITH US ON SOCIAL MEDIA. WE’D LOVE TO SEE ❤️
Now, go make something beautiful!
 ×
×
popular
- How to Apply IOD Athenaeum Gilded Transfer to Colored Glass Bottles
- From Ugly Duckling to Gorgeous | Black Dresser Makeover with IOD Marché des Fleurs
- 5 Creative Ways to Use One Decorative Stamp
- Turn Thrifted Finds into Charming Garden-Inspired Decor with a DIY Jadeite Finish
- Little Lark Paint Inlay Projects: Vintage Teapot & Canvas Wall Art with IOD