DIY Vintage Christmas Gallery Wall
Decorating your home for the winter season couldn’t be easier with this gorgeous vintage Christmas gallery wall that you can make yourself! Using some of our new alpha stamps and the limited edition Woodland Christmas transfer, you can DIY a gorgeous collection of holiday wall art before the eggnog runs out.

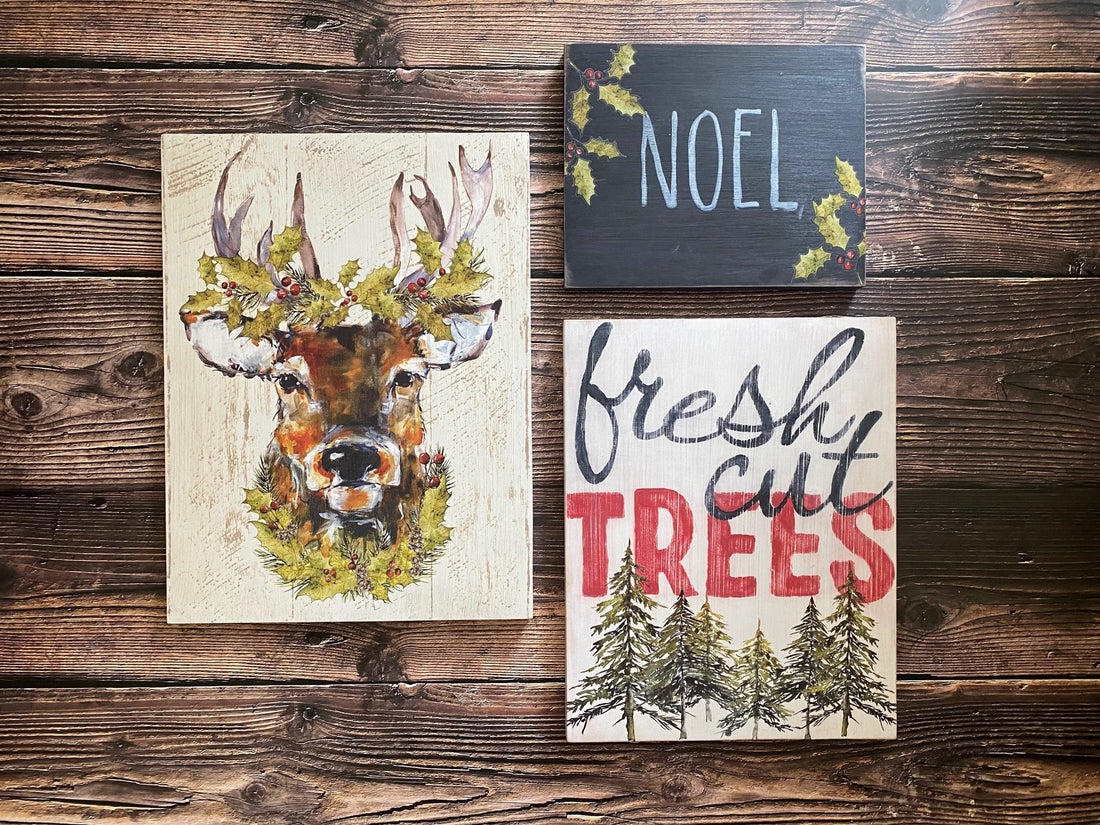
Welcome the winter season with your own vintage “Fresh Cut Trees” sign, a handsome (and hand-painted) buck on barnwood, and a chalkboard-esque “Noel” sign embellished with holly sprigs.
And the best part is — you only need ONE IOD Woodland Christmas transfer to complete all three projects… AND you’ll STILL have oodles and oodles of transfer left over for other holiday, winter, and DIY Christmas decor projects!!!
(Pssst… you can EVEN do a project with the transfer pad packaging – check out this cool idea by IOD stockist Lynne of Ellen J Goods.)
Watch our step-by- step video tutorial below to see how to make this holiday gallery wall or keep on scrolling if you prefer reading.
No time now? Pin this project for later.
Here’s everything you need to DIY vintage Christmas wall art
All IOD products can be purchased from an approved stockist. To find a shop local to you, click here. To find an online store, click here.
(This post contains affiliate links.)
- 12” x 16” IOD Wood Gallery Blank
- 11” x 14” IOD Wood Gallery Blank
- 8” x 10” IOD Wood Gallery Blank
- Barnwood Plank Stamp by IOD
- Woodland Christmas Transfer by IOD
- Swoosh Stamp by IOD
- Retro Stamp by IOD
- Farmhand Stamp by IOD
- IOD Ink in white
- Brayer by IOD
- Blank ink pad by IOD
- Thin mount with gridlines by IOD
- Scissors
- Small paint brush
- Fine grit sanding block
- Antique white chalk or mineral-based paint
- Taupe chalk or mineral-based paint
- Red chalk or mineral-based paint
- Soft black chalk or mineral-based paint
- Low tack tape (optional to secure the transfer while you rub it on)
- Chip paint brush
- Lint-free shop cloth
- Paper plate
- General Finishes Flat 450 Topcoat or other high quality flat water-based polyurethane topcoat in matte
DIY Christmas Buck Wall Art
(Note: If this is your first time stamping with IOD, make sure you condition your stamp before use. Learn how to do that in this IOD Products 101 tutorial.)
Prep work: We started with a project surface that was already painted and stamped to look like barnwood planks. If you want to learn how to do that, we included a video tutorial and instructions below (just use the paint colors suggested for the Christmas gallery project).
Step 1: Paint your 12” x 16” wood gallery blank with an antique white chalk or mineral-based paint.
Use long, even brush strokes with the chip brush on the wood gallery blank. Your strokes should be in the direction that you plan to ‘lay the planks.’ Allow the paint to dry.
Step 2: Lay your IOD Barnwood Plank stamp down on your work surface with the design side up face up.
Pour a bit of taupe paint on a paper plate. Using your brayer, roll through the paint until it’s evenly coated. Then, roll the paint-loaded brayer onto one of the plank stamps.

To get the look you see this project, use a light hand when applying the paint to the stamp. You may even want to only coat part of the plank design so that you’re creating a more weathered impression of barnwood.
Step 3: Stamp your board, varying the plank stamps used.
Line up your stamps in a pattern that mimics side-by-side barnwood planks. Add a few plank joints and wood knots to make it look authentic.

Step 4: After the paint is dry, seal with a high quality water-based polyurethane sealer in matte.
This last step is important because it improves the adhesion of the transfer.
Now you’re ready to rub on the most handsome, hand painted buck you’ve ever seen!
Step 5: Using scissors, cut around the large buck to separate him from the rest of the transfers on the sheet.
Take care to keep the non-stick backing with the transfer piece until you’re ready to rub it on. Lay the buck down on your project surface to make sure you know where you want to position him.
Step 6: Remove the non-stick backing and place the Christmas buck transfer.
Lay the transfer down again where you want it, using the gridlines to ensure it’s straight. Using your hands, lightly stick him to the surface.

Alternatively, you can stick pieces of low tack tape on the corners of the transfer to hold the buck in place while you rub on the image.
Step 7: Using the IOD transfer tool, firmly rub on backing until the Christmas buck image releases fully.
You’ll see that it’s released because the design starts to look translucent through the backing. If you accidentally pull up the backing before everything is released, just lay it back down in the same spot and keep rubbing.
Step 8: Burnish the transfer.
Using the leftover non-stick backing that previously had the transfer on it, rub in small circles over every bit of the image, paying special attention to the edges. This will make sure the transfer is fully adhered and will keep it looking beautiful for years to come.

Step 9: Seal with a high-quality water-based polyurethane sealer in matte.
Isn’t he just the most gorgeous buck evah?!?
DIY Fresh Cut Trees Vintage Christmas Sign
Prep work: We started with a project surface that was already painted and stamped with the words. If you want to learn the best way to stamp with letters, check out the video tutorial below starting at 3 minutes 25 seconds.
Here’s what we did specifically for this DIY Christmas signage.
Step 1: Paint a 11″ x 14″ wood gallery blank with antique white chalk or mineral-based paint.
Let the paint fully dry.
Step 2: Stamp the words “fresh cut” and then mask the stamped letters.
Using the Swoosh Stamp letters, arrange the words “fresh cut” where you want them on your project surface. There are a couple of ways to get the connected, scripty look with the Swoosh stamp – check out this video for technique details.
Using a brayer, apply the soft black paint to the stamps. Then pick up the thin mount and stamp the board.
Once it’s dry, mask the stamped Swoosh letters using the plastic reusable masks that come with the set.
Step 3: Stamp the word “trees” and color in the letters.
Using the Retro Stamp letters, arrange the word “trees” where you want them on your project surface. Lay the thin mount on top of your stamps and press to stick them to the thin mount. Lift up the thin mount and flip it over. Set it next to your project with the stamping surface face up.
Using a brayer, apply red paint to the stamps. Then pick up the thin mount and stamp the board, being careful not to move the Swoosh masks.
Continue to keep the masks in place, color the interior of each letter in the word “trees” with red paint using a small brush.
Allow everything to dry and then remove the masks.
Step 4: Use a fine grit sanding block do lightly distressed the letters so some of the white paint peeks through.
Use a lint-free shop cloth to wipe the surface clean of any dust.
Step 5: After the paint is dry, seal with a high quality water-based polyurethane sealer in matte.
Now you’re ready to transfer a forest of lush snow-kissed evergreens!
Step 6: Cut out, position, and rub on the transfer.
Using scissors, cut out one row of hand-painted evergreen trees from the Woodland Christmas Transfer pad, taking care to keep the non-stick backing with it.
Using the gridlines, line up the transfer along the bottom of the sign, below the lettering.

Remove the non-stick backing and use your hands to lightly adhere the transfer into position. As you did with the buck, use the transfer tool to rub on the evergreen trees.
Step 7: Burnish the transfer and seal the vintage Christmas sign.
Can you practically hear the snow crunching under your feed and smell the fresh cut Christmas trees?
DIY Chalkboard-style Noel Sign with Sprigs of Holly
Prep work: For this last sign, we use the 8″ x 10″ wood gallery blank that was already painted and distressed.
Step 1: Paint and distress the gallery blank.
Coat the gallery blank with a soft black chalk or mineral-type paint. Then lightly sanded the edges to give it an old chalkboard look. Wipe away any dust from the surface with a lint-free shop cloth.
Step 2: Stamp the word “NOEL” with white ink.
Using the Farmhand Stamp set, peel off the letters for “NOEL” from the backing and arrange them on the painted gallery blank.

Lay your thin mount on the arranged stamp and, using the gridlines, adjust the letter so make sure they are straight and centered. Pressed down on the thin mount so the stamps stick to it, then lift up.
Next, flip over the thin mount so the stamping surface is face up and lay it next to your project. Using an ink pad filled with white IOD ink, load the letter stamps by patting the pad on the stamp surface.

Pick up the thin mount and hover it over the sign where you want to stamp. Then commit by laying the mounted stamps down without shifting.
Apply even pressure across each detail of the letters with one hand while stabilizing the mount with your other hand. Then lift the thin mount with the stamps straight off the sign. Allow the ink to dry.
Step 3: Seal the sign with a water-based polyurethane sealer.
This will improve the transfer adhesion. (We didn’t do this in the tutorial in the interest of time but it’s definitely a recommended step and worth your time to do.)
Step 4: Cut and rub on the holly sprig transfers.
Using scissors, cut out as many holly sprig as you’d like to use for embellishment. Keeping the non-stick backing with the transfer, lay them on the sign to decide on your desired arrangement.

Remove the non-stick back and gently rub your hands over the transfers to lightly adhere them. Then use the transfer tool to fully rub the holly sprigs onto your sign.
Step 5: Burnish the transfer and then seal the sign.
Now you have three pieces of wall art for your very own vintage Christmas gallery wall!
What else will you make with the Woodland Christmas transfer?
We can’t wait to see. Tell us in the comments below or share your finished projects with us on social media.
Now, go make something beautiful!
 ×
×
popular
- How to Apply IOD Athenaeum Gilded Transfer to Colored Glass Bottles
- From Ugly Duckling to Gorgeous | Black Dresser Makeover with IOD Marché des Fleurs
- 5 Creative Ways to Use One Decorative Stamp
- Turn Thrifted Finds into Charming Garden-Inspired Decor with a DIY Jadeite Finish
- Little Lark Paint Inlay Projects: Vintage Teapot & Canvas Wall Art with IOD