Quick and Easy DIY Seat Cushions!
Quick and Easy DIY Seat Cushions
– Seriously, this has to be one of the simplest updates one can do!

{This post contains affiliate links}
Hello, Iron Orchid Design friends! It’s Heather from Thicketworks, and I’m so pleased to be here with you today!
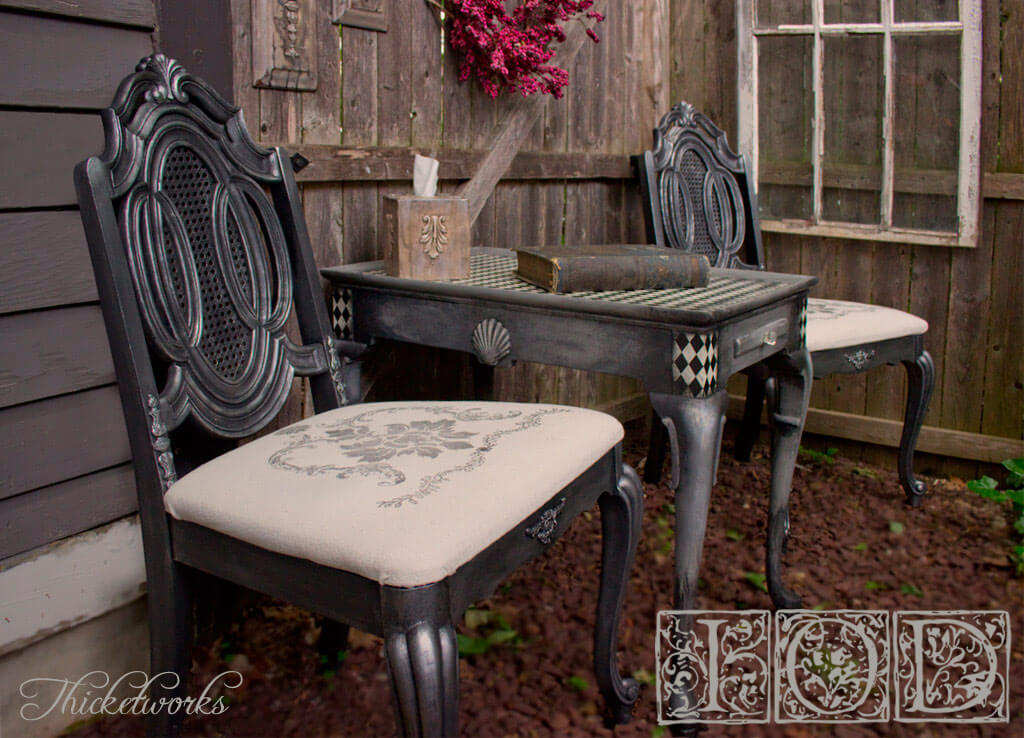
I’m constantly on the prowl for cast-offs that need some love…I know you know what I mean.
These two dated chairs were sidelined like Wallflowers at the Prom, til I spotted them and heard them whispering:
“Take us home…we have so much potential. Just a little help from you, and we’ll be the Belle of the Ball…”
How does one resist such charm? I wouldn’t know – didn’t even try!

The dated and frumpy finish was the first item of business, and that transformation is detailed HERE, if you’re interested.
However, our concern today is with that lackluster seat cushion fabric. What can be done?
PLENTY.
Supplies:
- Canvas Drop Cloth (I have stacks of these, and they are quickly becoming my go-to fabric resource for Home Decor)
- “Louis” Iron Orchid Designs Decor Stamps
- “Fleur” Iron Orchid Designs Decor Stamps
- Iron Orchid Decor Ink “Soft Black”
- Iron Orchid Designs Acrylic Stamp Block 10″ x 12″
- I happened to have one of THESE on hand, but it’s not necessary! (I found mine thrifiting)
- A large, smooth ceramic tile and Soft Rubber Brayer
- OR
- Prima Dry Foam Decor Stamp Pad
- Iron Orchid Designs Decor Ink Cleaner or elbow grease, a soft scrub brush, liquid detergent and running water!
- Staples & a Staple Gun
If you haven’t got your hands on the Iron Orchid Design Decor Stamps yet,
you will be as happy as I was to discover:
- They’re HUGE – there just aren’t any other stamps on the market with this impact
- They’re excellent quality
- The motifs are PERFECT for Home Decor (and paper-crafting too!)
For this project I wanted a bold focal point.
The “Fleur” Collection has an amazing Damask Floral – just what was needed.
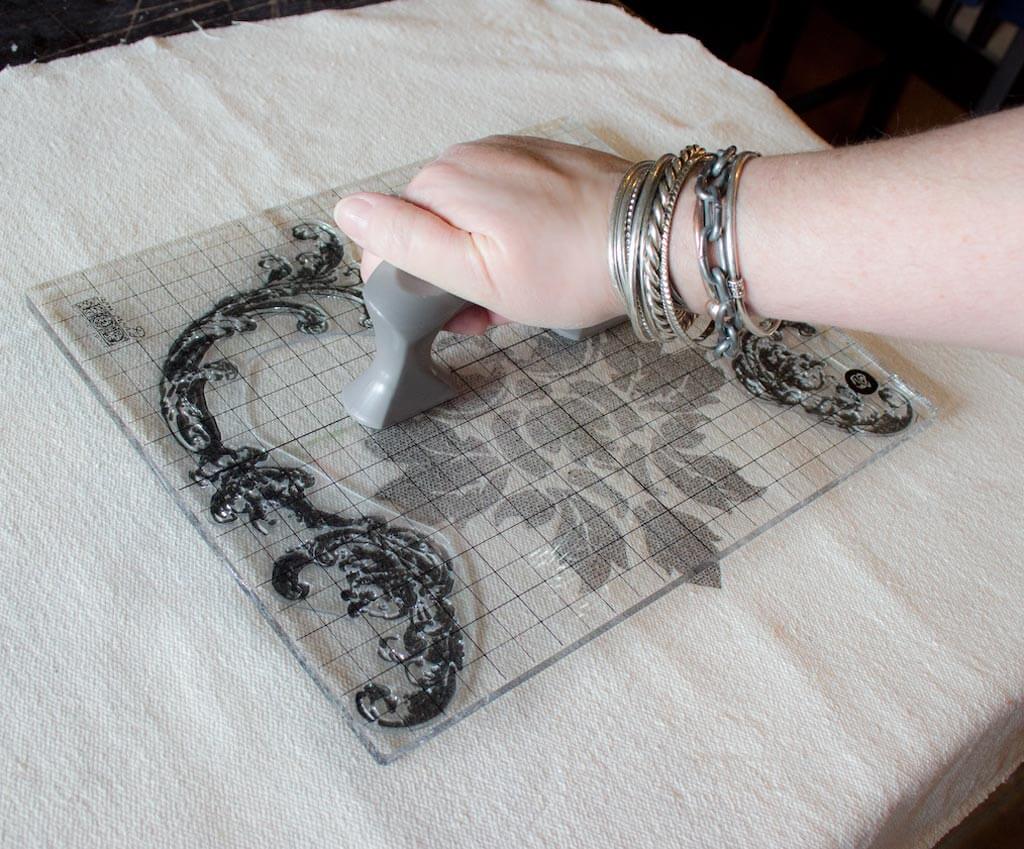
The stamps mount onto the acrylic stamp block, making it easy to align your images.
Note: I chose to use both the IOD block + another acrylic block in order to have a bit more control, but it’s not necessary.

I didn’t have access to a dry-foam stamp pad, and perhaps you don’t either.
A simple ceramic tile and brayer works beautifully with the Decor Ink.
Just shake the ink thoroughly, and spread a small line onto your tile.
Use the brayer to spread the ink and coat the roller completely.

Transfer an even coat of ink to the surface of the mounted stamp with the brayer:

Position the motif on the fabric, and press.
Allow the ink to contact the fabric for several seconds, and press all over the top of the acrylic block to ensure an even transfer of ink:

Carefully lift off the acrylic block, and admire the gorgeous motif!

Add additional elements to your design:
We could leave it like this…so pretty!

But hey, more is MORE! A final floral flourish along the lower edge completes our graphic design.

Note: for ease of clean-up, gently scrub the stamps, ceramic tile and brayer with warm water and liquid detergent or IOD Stamp Cleaner before the ink cures.
Allow the stamps to dry, then replace them in the packaging to keep them clean and ready for the next transformation!
Allow the fabric to dry thoroughly, then staple your seat covers in place:

Our little Wallflowers are ready to Waltz into their new home!

I couldn’t be happier with the results, or with the ease of this project!

Thank you for visiting Iron Orchid Designs today.
I hope you feel encouraged to try your hand at using the Decor Stamps – you’ll LOVE them!

Until next time,
Heather
P.S. visit Thicketworks for a world of quirky and bizarre projects and techniques! The door is always open…usually because of the fumes from Mad Scientist experiments!
You might also enjoy this post on how to beautify a tissue box using IOD Decor Moulds:

 ×
×
popular
- How to Apply IOD Athenaeum Gilded Transfer to Colored Glass Bottles
- From Ugly Duckling to Gorgeous | Black Dresser Makeover with IOD Marché des Fleurs
- 5 Creative Ways to Use One Decorative Stamp
- Turn Thrifted Finds into Charming Garden-Inspired Decor with a DIY Jadeite Finish
- Little Lark Paint Inlay Projects: Vintage Teapot & Canvas Wall Art with IOD