Chocolate Art + Cookie Decorating with IOD Moulds
Can you believe these beauties are EDIBLE?!?! Not only edible but fantastically DELICIOUS as well. 😋 And you’ll be shocked at how easy it is to dominate the dessert table using IOD Moulds to make sweet treats. (Psst… you can also decorate cookies with IOD Stamps…)
No time now? Pin for later.

IOD Stockist Lori of Milton’s Daughter in Brooklyn, NY is getting you ready for all your holiday cookie swaps! In the collection of three short (less than 5 minutes each) tutorials below, she teaches you everything you need to know to make all these jaw-droppingly gorgeous yet mouth-wateringly delicious treats.
To buy the Cameos and Frames Moulds used in Lori’s baking tutorials, please find an IOD retailer near you.
Everything you need and more to make chocolate cameos and cookies
(Note: Depending on the decorating technique you decide to use, you might not need everything on this list)
Ingredients
- Semi-Sweet Chocolate Morsels
- White Chocolate Morsels
- Cocoa Powder
- White Casting Modeling Chocolate
- Oil-Based Food Coloring
- Powdered Coloring
- Vodka
- Edible Pearls
- Shortbread or Sugar Cookies (store-bought or homemade)
- Your Favorite Cookie Dough
- Royal Icing
- White Chocolate & Dark Chocolate Candy Bars
- Pearlized Sugar Crystals
Baking tools
- Cameos Mould by IOD – find a retailer near you
- Frames Mould by IOD – find a retailer near you
- Paint Brush
- Gloves
- Paper Towels
- Small Spray Bottle
- Piping Bag
- Cookie Scribe or Toothpick
- Hair Dryer or Heat Gun
Basic & Intermediate Cookie Decorating Techniques
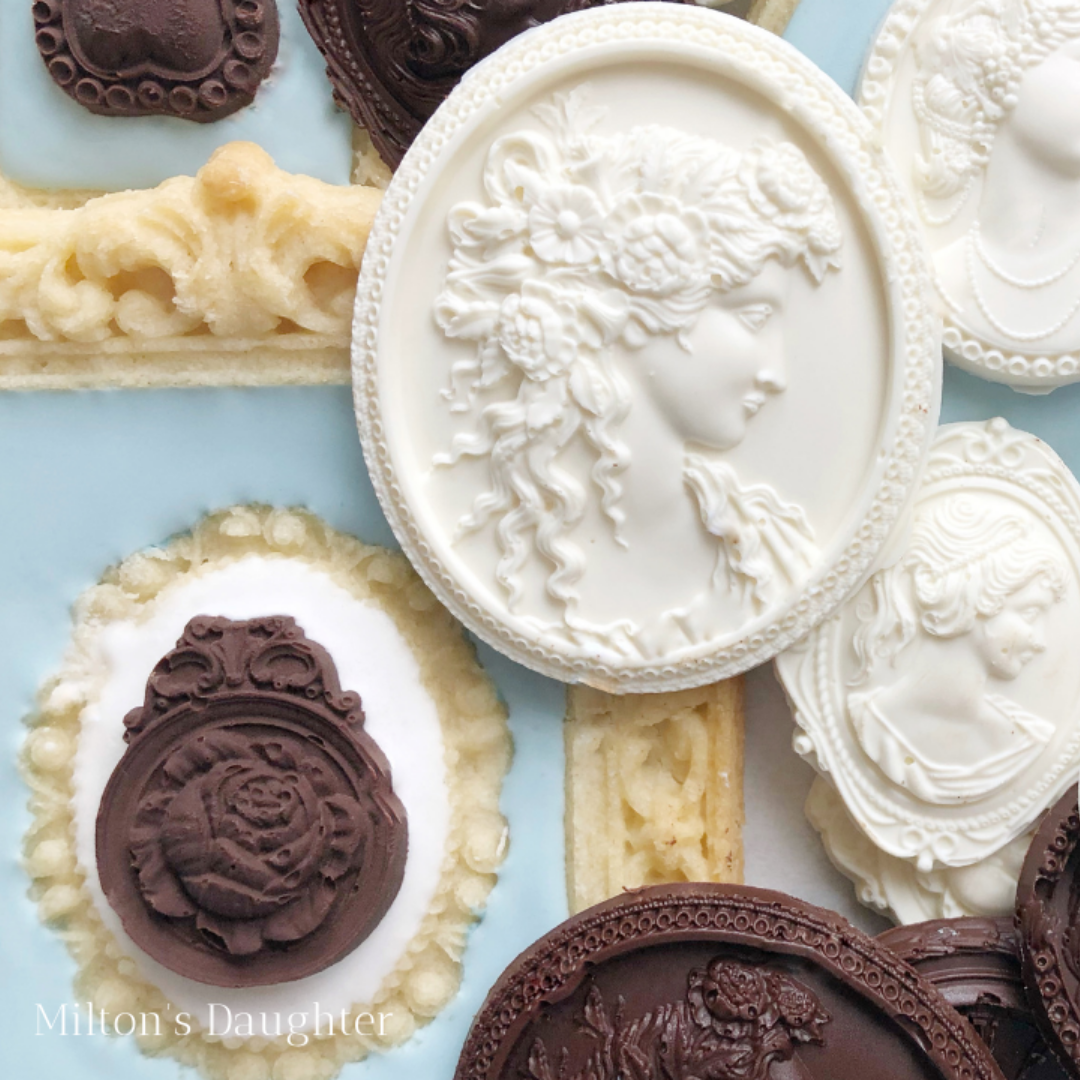
First, make the basic cameos.
Step 1: Start by melting the semi-sweet chocolate morsels in the microwave and with a piping bag, fill each of the cavities in the cameos mould.
Step 2: Then pick up the mould and gently drop it on your work surface and shake it a bit to level out the chocolate and remove any bubbles. Use a flat edge to remove any excess chocolate and further level out the backs of the cameos.
Step 3: Allow the chocolate to cool and harden then remove it carefully from the mould.
Step 4: Repeat the process with your white chocolate morsels.
If you want to make Cameos using the modeling chocolate, simply prep it by hand mixing it with a white oil-based white food coloring.
Second, things get fun.
Lori has dozens of ideas on how to create unique chocolate cameos. Not one of hers looked the same. She dusted the hardened chocolate cameos with the powdered food coloring, painted some, and used the vodka to wipe the paint off the high spots to create an antiqued look.
On her modeling chocolate cameos, she marbleized them with powdered food color and liquid food color, she colored the chocolate completely. She used dusting powder and edible pearls in the mould cavity before putting in the chocolate.
Make sure to watch all the way to the end of her tutorial! She snuck in her all-time FAVORITE cookies – Pecan Sandies by Keebler. She used the cookies as a mount with royal icing for her cameo masterpieces.
Chocolate & Royal Icing Cookies
Step 1: Bake your cookies in your IOD Moulds according to the instructions on your dough’s recipe. (IOD Moulds are made of food-grade silicone and are oven safe up to 425°F. We recommend you have a separate set for baking… you don’t want air-dry clay in your cookies!)
Step 2: Allow cookies to cool completely and remove them carefully from the mould.
Step 3: Melt your chocolate morsels in the microwave and place the chocolate in a piping bag.
Step 4: Pipe the chocolate into what would be considered the background of the frame making sure to get the chocolate into the corners and edges. Use a cookie scribe or toothpick to help get it into those small details. (Note: Instead of chocolate, you can use royal icing as your background to add color or taste to your cookies.)
Step 5: Place your cameo into the chocolate of the frame you’re working with.
Chocolate Art Gallery with Store-Bought Bars
Step 1: Using oil-based food coloring or colored food dusting powder mixed with vodka, “paint” the chocolate Cameos and Frames you made in the first tutorial of this series. Lori demonstrates several techniques and finishes so pick your favorite (or do them all).
Step 2: Using a store-bought white chocolate bar, lay it on your work surface with the flat side up.
Step 3: Use a hairdryer or heat gun to soften the back of the bar just enough to stick the cameos and other decorations to it.
We’d love to see any chocolates to cookies you make with IOD! Did you know that we have a Sugar Arts Facebook group? You can share your sugar arts with other creatives, get inspiration and ask for tips. Hope you join us there!
 ×
×
popular
- How to Apply IOD Athenaeum Gilded Transfer to Colored Glass Bottles
- From Ugly Duckling to Gorgeous | Black Dresser Makeover with IOD Marché des Fleurs
- 5 Creative Ways to Use One Decorative Stamp
- Turn Thrifted Finds into Charming Garden-Inspired Decor with a DIY Jadeite Finish
- Little Lark Paint Inlay Projects: Vintage Teapot & Canvas Wall Art with IOD