Too Pretty to Eat! Cookie Decorating for Beginners with IOD Stamps
Are you looking for an easy way to give your royal icing sugar cookies some IOD pizazz? Look no further because we’re about to show you how to “WOW” the crowd with these sweet treats. Whether you’re an experienced sugar artist or a total cookie decorating beginner, this ‘cookie decorating for beginners’ tutorial is one you won’t want to miss!
No time now? Pin this post for later.

Lori, one of our talented stockists and owner of the shop Milton’s Daughter in Brooklyn, NY shows you exactly what to do in this quick 8-minute video tutorial.
Watch her video below or keep scrolling for a supply list and step-by-step instructions.
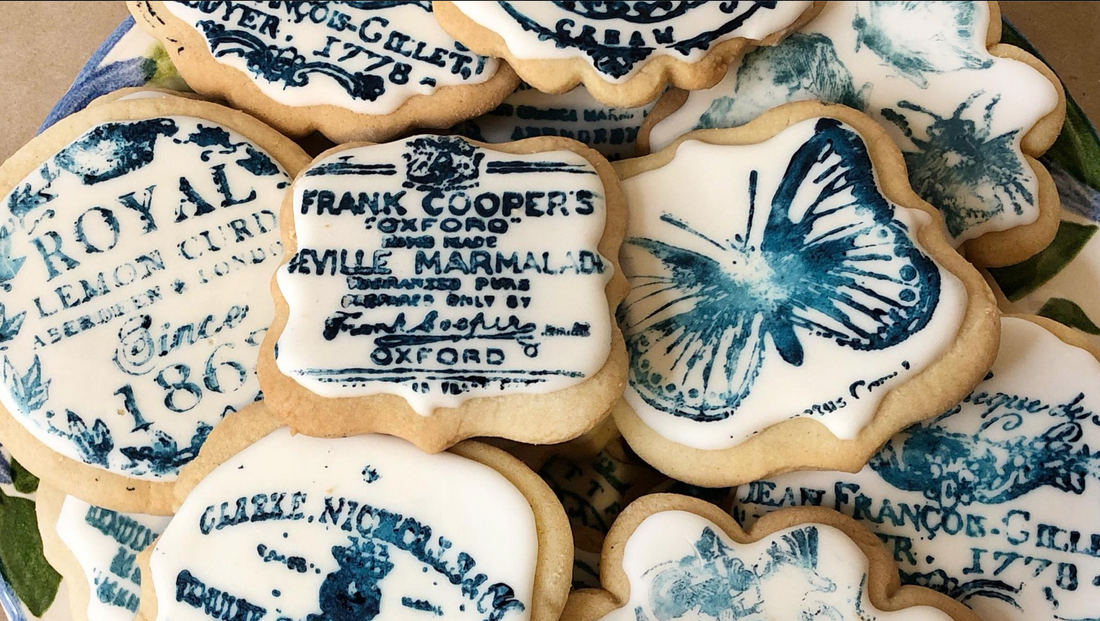
In this tutorial, Lori uses the Crockery Stamp, but she also shares examples of how you can use the Butterflies stamp, the Kindest Regards Stamp, the Farm Animals stamp, and the Queen Bee stamp to get a look you’ll love on your cookies.
All of the stamps she uses can be purchased from an approved IOD stockist. To find a shop local to you, click here. To find an online store, click here.
Here’s everything you need to decorate your cookies.
(This post contains affiliate links.)
- IOD Crockery Stamp (or other IOD stamp of your choice)
- IOD Brayer – Find the IOD stockist nearest you by clicking here
- Sugar cookie dough (pre-made works great if you don’t have time to make from scratch)
- Royal icing (pre-made royal icing or homemade)
- Soft gel paste in royal blue
- Icing piping bag, tips and coupler
- Mixing spoon for icing
- Mixing bowls for icing
- Popsicle stick
- Cookie sheet
- Cooling rack
Cookie Decorating for Beginners: Step-by-Step Instructions
Step 1: Make the cookies.
Use your grandmother’s recipe or buy pre-made sugar cookie dough in the refrigerated aisle at your grocery store – whatever works. The important thing is that you use a dough that allows you to roll the dough out so you can use a cookie cutter to get just the shape you want.
Follow the baking instructions in your chosen recipe or on the package.
Step 2: Make the icing.
Again, you can make your own (Lori used this recipe) or buy the royal icing pre-made. Both work equally well so it’s just a matter of personal preference.
Step 3: Create your piping icing and your flood icing.
Using the base royal icing, create two consistencies of icing by adding water a little bit at a time. The first one will be your piping icing and you want to mix in just enough water to make a toothpaste consistency.

For your flood (or fill) icing, you will add a bit more water until it’s the consistency of shampoo.

Step 4: Ice the cookies.
Fill one of the pastry bags fitted with a #2 tip with your piping icing (thicker consistency). Using even pressure, hover the tip above the cookie and let the icing fall from the tip around the border of the cookie.

Be prepared for some yummy mistakes as this part takes a little practice.
Fill a second pastry bag with the flood icing (thinner consistency). Fill or ‘flood’ the area within the border of piping icing. Don’t go all the way to the piping icing.

Carefully pick up the cookie and gently shake it from side to side to spread the icing.

Finally, use the popsicle stick to carefully tease the flood icing all the way to the piping border.

Step 5: Do NOT refrigerate your iced cookies.
Take it from Lori’s hard-earned experience – this will cause condensation to form on the surface of the icing. This moisture will cause any decoration – include a stamped image – to slide right off.
Instead, keep them at room temperature and give them a good 8-10 hours to dry out a bit so you get a beautiful, clear stamped image.
Step 6: Stamp all the cookies!!!
This is our most FAVORITE step because it’s where all the fun happens.
Start by squeezing out a generous portion of the royal blue soft gel paste on a clean, flat work surface. This can be a plate or silicone sheet – anything that’s food safe and won’t stain.

Next, lay your stamp backside down so that the raised design is facing you.
Roll your brayer through the gel paste until it’s fully covered.

Then roll the brayer on the stamp to transfer the gel paste. Roll in different directions and note that you may have to reload the brayer with gel paste and roll it on the stamp more than once to give it a good coating.
Note: If this is your first time using a brand new stamp:
Make sure to condition it first by scuffing it in two different directions with a fine grit sandpaper. Then thoroughly wash the stamp before using it with the gel paste. For more details on how to prep your IOD stamps when you first get them, check out this post.
Now, pick up the gel-loaded stamp and flip it over so the design is facing down. Hover the stamp over the cookie to decide where to place it and then commit by laying it on the cookie. Be careful not to shift the stamp as you lay it down or you’ll smudge your design.

Use one finger to stabilize the stamp and with your other hand, gently run your fingers along the backside of the stamp to make sure all the details of the design make contact with the icing.
Then, holding the edges of the stamp, lift it off the cookie – again being careful not to shift as you lift. (This might take a bit of practice – but we promise you’ll get it!)
Step 7: Let the gel paste completely dry before plating or storing your cookies.

Now you’re ready to be queen of the bake sale, master of deserts or whatever other delicious title you want to give yourself!
And remember — IOD stamps aren’t the only product that’s food safe. You can also use IOD moulds to shape cookies, create beautiful fondant decorations or even decorate a pie.

Watch the short step-by-step video below to see how Gina of Vintage Charm Homestead in Livertyville, IL makes the gorgeous pie crust you see above.
What scrumptious delight are you going to make with Iron Orchid Designs? Share with us on social media – we’d love to see!
************
If you love the Crockery stamp that Lori used on these cookies, check out this post for tons of ideas for other things (besides gorgeous cookies) that you can make with it.
If you love sugar arts, try your hand at cake decorating with this step-by-step tutorial: How to Use Fondant with IOD moulds
We also have a video tutorial on using both moulds and stamps in cake decorating – check out the post: A Sweet Idea. Let Them Eat Cake!
Do you love Sugar Arts (or just like looking as beautiful sweet treats?) Join our private Facebook group dedicated to Sugar Arts with IOD products by clicking here.
 ×
×
popular
- How to Make a 3D Swan Figurine with the IOD Swans Mould
- Thrifted Stool + Lamp Makeover with the IOD Fern Fables Transfer
- How to Apply IOD Athenaeum Gilded Transfer to Colored Glass Bottles
- From Ugly Duckling to Gorgeous | Black Dresser Makeover with IOD Marché des Fleurs
- 5 Creative Ways to Use One Decorative Stamp