Create a Shabby Chateau Finish
If you want to create a Shabby Chateau Finish, you now have an amazing set of tools at your beck and call…
Hello, Iron Orchid Design friends – Heather here, from Thicketworks. I’m excited to share this simple method to transform a shabby old accessory into a fabulous Shabby Chateau Treasure!

Every good story has to include a bit of drama…
Ours unfolds with this forlorn and woefully outdated little folding screen. She was dying a slow death in the depths of the local thrift store, abandoned and forgotten.
Surely, someone had loved her once…long ago, but those days were gone.
She caught my eye, though. I immediately saw past the mass-produced faux-folksy motifs…I saw her underlying structure, and knew that she was bursting with potential to become Fabulous!

Update October 2020: The products used in this tutorial are First Generation IOD, which means they’ve been discontinued. You can join our IOD First Gen Pop Up group on Facebook to try to purchase. Or, you can make something very similar using current products. Reach out to an approved IOD stockist and they will be able to suggest current moulds to make this project.
Click here to use our store locator to find a brick and mortar store near you or you can click here to find an online shop.
Supplies:
- One abandoned accessory, suitable for an EXTREME make-over!
- IOD moulds
- IOD Air Dry Clay
- Strong white glue (I used Aleene’s Tacky Glue)
- DIY Chalky Paint (recipe HERE)
- A heat tool
- A scruffy paint brush or two
- A flat, strong tool like a putty knife
- A palette knife
- Stencils
- Joint compount
- An emery board
- Your favorite script stamps / ink
- Black Craft Paint, and a small container to mix it in
- A Spray Bottle of Water
- Rags
How-To:
I took her home with me, confident that together we could create a thing of beauty!
Using the Iron Orchid Designs First Gen Baroque Moulds, I quickly created a series of appliques that I adhered to the surface of each panel.
I work with the appliques while they are freshly moulded: no waiting for them to cure!
This allows me to make multiples very quickly, which suits my impatient nature…

Once the main motifs were in place, I was struck by how inappropriate the blocky / rectangular frame was.
Using just one half of the border mould below (Baroque 6), I quickly created narrow strips that helped to unify the design by altering that clumsy frame:

In order to pull castings while the clay is still moist, I press the clay very firmly into the cavity, smooth the surface with my metal blade, and then ‘crack’ the seal between the clay and the mould, working my way around the perimeter:

Once the seal is broken, flip the mould face down, and bend it back in a rolling motion, depositing the casting onto the work surface:

Add adhesive to the back of your casting, and place it on your project. Cut to fit.

Allow the appliques to cure overnight before proceeding.
The next step is to create layers of texture that will further unify the ornate motifs with the plain substrate.
Stencils are a wonderful tool for this. The goal is to ‘confuse the eye’ by creating a complex surface that distracts the viewer from the plain boxy shape of the framework.
Here, I’m choosing to place these complex motifs along the surfaces of the frame:

Create interest, and break up the surface by spreading Joint Compound through stencils wherever you choose:


Don’t neglect the edges:

Once you’ve completed stenciling, clean your tools right away!

Allow the Joint Compound to dry.
The curing time will vary, depending on the temperature and humidity. This project took about an hour.
Once it is bone dry, a quick ‘sanding’ with an emery board will get rid of any rough edges.
Wipe away any dust, and coat the piece with your DIY Chalky Paint.
Use a stippling, rather than a stroking motion to create the most complete coverage:

Finally, we begin to get a glimpse of the final transformation:

Use a heat tool to speed the drying process.
Once the paint is dry, add further interest with script stamps, randomly applied over the entire piece.

Messy is fine. We just want another layer of history…
Dry the ink thoroughly with a heat tool before proceeding:

Create a ‘wash’ by thinning black craft paint with a bit of water.
Paint a messy layer of this wash along the upper edge of the piece:

While the paint is still wet, spritz it with water, and allow the pigment to run down the face of the piece.

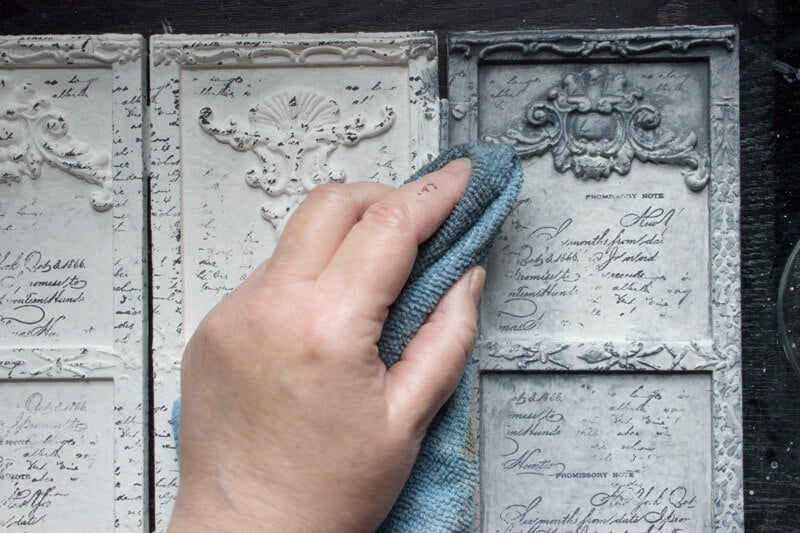
Use a damp rag to wipe back the color of the glaze, allowing it to gather in the nooks and crannies of your design.

Continue adding the wash of paint, and wiping back over the whole piece.
Soften the look by scumbling the surface of the wash with a dry, scruffy brush:

Don’t neglect the edges:

Once dry, add a second wash of pigment at the upper edge of the piece, and blend it into the surface using the same techniques:

This second wash will result in much greater depth of color:


Now, use a dry brush technique to add subtle touches of DIY Chalky Paint to the raised surfaces of the appliques and stenciled motifs.
Wipe most of the pigment off of the brush, then lightly stroke the bristles along the uppermost areas of the raised motifs.

To my eye, this is when the magic really happens. All the layers we’ve created now pay-off with this final, soft highlighting:

Add a few subtle drips, here and there:

Viola! You have created a gorgeously aged, Shabby Chateau Finish where once kitsch reigned supreme.
I chose this project knowing that IOD Decor Moulds would provide the basis for an unbelievable transformation –
I hope you agree that these tools make the impossible – possible!
Thank you so much for taking the time to visit IOD today!
It’s been an honor and a pleasure to share my love of these tools with you.
Now, my splendid little folding screen provides the perfect place to drape my ‘jewels’…

What do you have that can be transformed?
For more tutorials and techniques, stop by Thicketworks and poke around – the door is always open!
If you enjoyed this tutorial on how to makeover thrift store home decor using IOD products, then check out these projects:
How to Make Cheap Tile Look Expensive
 ×
×
popular
- How to Apply IOD Athenaeum Gilded Transfer to Colored Glass Bottles
- From Ugly Duckling to Gorgeous | Black Dresser Makeover with IOD Marché des Fleurs
- 5 Creative Ways to Use One Decorative Stamp
- Turn Thrifted Finds into Charming Garden-Inspired Decor with a DIY Jadeite Finish
- Little Lark Paint Inlay Projects: Vintage Teapot & Canvas Wall Art with IOD