DIY Bracelets & More: How to Make Your Own Faux Carved Stone Jewelry
Josie and I were Live this week on Facebook sharing an easy way to DIY bracelets, earring and pendants using polymer clay and IOD moulds.
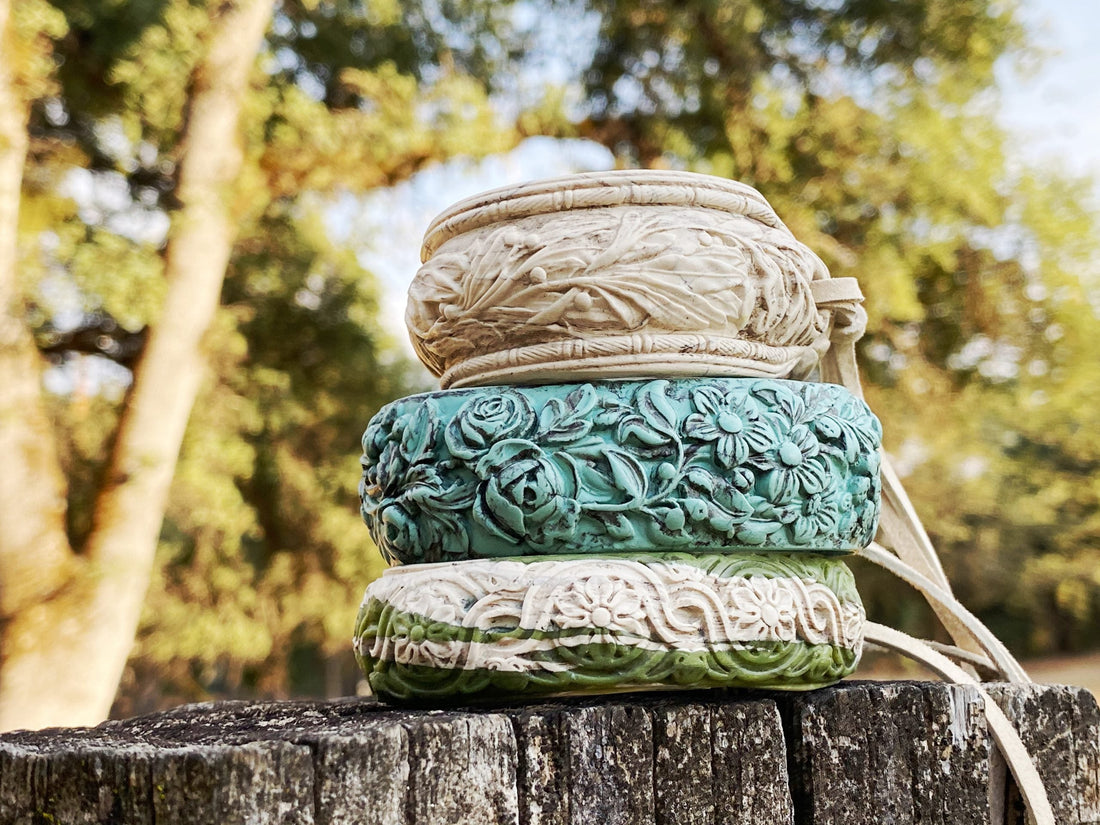
Using the techniques we show you, you can easily make faux carved stone and bone jewelry.

Any-hoo, the Live audience asked if we could write a post to share all the juicy how-to details in writing… so here you go!
No time now? Pin this post for later by clicking here.
If you want to tune in for future Live videos, join our Creative Tribe on Facebook.
(Note: You need to first join our Creative Tribe on Facebook to view the videos. You can do that by clicking here and then requesting to join).
How to Make Polymer Clay Jewelry with IOD Moulds
Watch the video below to see all the steps in action, or if you want to read through the supply list and instructions, keep scrolling down.
Supply List for DIY Polymer Clay Bracelets
All IOD products can be purchased from an approved stockist. To find a shop local to you, click here. To find an online store, click here.
(This post contains affiliate links.)
- Trimming 1 or Trimmings 2 Moulds by IOD
- 2.5 oz turquoise polymer clay
- 2 oz white polymer clay
- 0.5 oz wasabi polymer clay
- Silicone craft mat or heat press transfer sheet
- Clay press or clay conditioning machine
- Plastic container
- Artist acrylic paint in raw umber
- Acrylic rolling pin
- Clay trimming and shaping tools
- Baking sheet
- Leather cord, twine or chain to hang the jewelry
- Sanding block
- Sealer – Krylon matte finish spray sealer (optional)
- Small dremel tool (extra fun but optional)
We use the Trimmings 1 and Trimmings 2 moulds a lot when making DIY bracelets, so first let’s give you a good look at them.


You’ll also see ideas for how to use the Monarch Mould and the Lock & Key Mould.
You can get these or any other IOD products by contacting one of our stockists. To find the one nearest you, click here to use our retailer locator.
Instructions for DIY Bracelets and other Faux Carved Stone Jewelry
Step 1: Condition your polymer clay to mix the colors and soften it for use.
Using a clay conditioning machine, wind a chunk of clay through a few times. Each time you put it through, adjust the opening progressively smaller. This will make the sheet of polymer clay get thinner which really softens it and mixes the colors beautifully.

Note that different brands of clay have different hardness so the amount of conditioning you’ll need to do will vary.
Be aware of bubbles in your clay and make sure you eliminate them because you don’t want them in your finished piece.
The Blue Bottle Tree is a great resource for learning more about how to use polymer clay in your creative adventures.
Step 2: Tear pea-sized pieces off your conditioned block of clay. Then roll them into loose ball shapes and put them in a plastic container.

Step 3: Add a pea sized amount of the acrylic paint to the container and swirl it around in the container until all the pieces coated.

Why use artist acrylic paint instead of craft acrylic paint? Because the artist acrylic paint has less moisture and more pigment density. This helps to create a more authentic turquoise look.
Step 4: Using your hands, mush all the clay pieces together but be careful not to work it too much or fold it onto itself.
Be careful not to fully re-incorporate the individual pieces together.

Step 5: Roll the clay into a rope with your hands to the desired length. You can cut any excess off if you roll the clay rope too long.

Step 6: Use your thumbs to push the clay into the mould.

Step 7 Using your rolling pin, roll over the back of the clay to smooth it into the mould cavity.
You want to go slowly so as not to accidentally pull up the casting out of the mould.

Step 8: Trim the excess clay off the edge with a clay trimming tool.
Use the micro rim on the mould as your guide to get a really smooth edge (and don’t worry if you can’t get it perfect – you can sand it later).

Step 9: Flip the mould over and bend it back to release the casting onto the silicone mat.
Try not to pull on the casting if possible because that might distort the design.

Step 10: Gently lay the casting around your wrist to mark where you want to cut it to your size.

Step 11: Using the end of a thin paint brush or a clay sculpting tool, press a hole through each end of the casting.
Make the hole is big enough to fit whatever you’ve chosen as your fastener – leather straps, twine, jewelry chain, earring hooks, etc.

Step 12: Check your edges to see if you need to trim off any more clay and now is your chance to adjust the design (e.g. bevel the ends).
You can sand excess and rough spots later, but the outcome is better if you can minimize sand for shape after the bracelet is baked.
Step 13: Shape your bracelet.
If you don’t have a bracelet form, you can lay your casting on its side on your silicone mat and shape it into a nice oval. Superficially stick the ends of the bracelet together so that it maintains its shape.

Check the shape from multiple angles to make sure the bracelet is level and doesn’t have any uneven slumping.
Step 14: Place your silicone mat with the bracelet on a baking sheet. Bake at 275 degrees Fahrenheit for 30 minutes per ¼ inch thickness of clay.
We baked our bracelet for about 45 minutes.
If possible, we recommend you use a dedicated craft baking sheet and oven because the polymer clay releases toxins when it cooks.
Step 15: After the bracelet has cooled, sand the edges and surfaces of it.
This will smooth any rough bits and reveal some of the color variation and veins. This gives it a more antique and authentic turquoise look.

If you like, you can use a dremel tool to get in the nooks and crannies of the design.
OPTIONAL Step 16: Evenly coat your bracelet with the spray sealer.
Update: We decided to seal our bracelet with a matte sealer. However, we’ve since learned that because polymer clay is essentially plastic, there is no need to seal it. Also, depending on the sealer you use, it may make it too sticky to wear. So we’ll leave it up to you to decide if you want to seal your jewelry or not.
If you do decide to seal your bracelet, only use MATTE and – please don’t be like us — wear gloves and do it outside to reduce your chemical exposure.

Here are some other ideas of how you can use polymer clay with IOD moulds
- Use the Lock & Key Mould to make pendants
- Make a leather cuff with floral accent from the Heirloom Roses Mould
- Earrings with the Wings & Feather Mould or with the Monarch Mould (like Sally does in this video)
You could also make napkin rings, buttons or headbands using this technique.
Are you inspired to make something beautiful? Share with us in the comments below.
If you like this post, you might also enjoy learning how to make wrist cuffs with quick-curing resin or how to upcycle tin cans into napkin rings.
 ×
×
popular
- How to Apply IOD Athenaeum Gilded Transfer to Colored Glass Bottles
- From Ugly Duckling to Gorgeous | Black Dresser Makeover with IOD Marché des Fleurs
- 5 Creative Ways to Use One Decorative Stamp
- Turn Thrifted Finds into Charming Garden-Inspired Decor with a DIY Jadeite Finish
- Little Lark Paint Inlay Projects: Vintage Teapot & Canvas Wall Art with IOD