Frosty’s Sweet Shoppe Upcycled Wooden Serving Tray

 Frosty’s Sweet Shoppe Upcycled Wooden Serving Tray
Pin this article to save for later

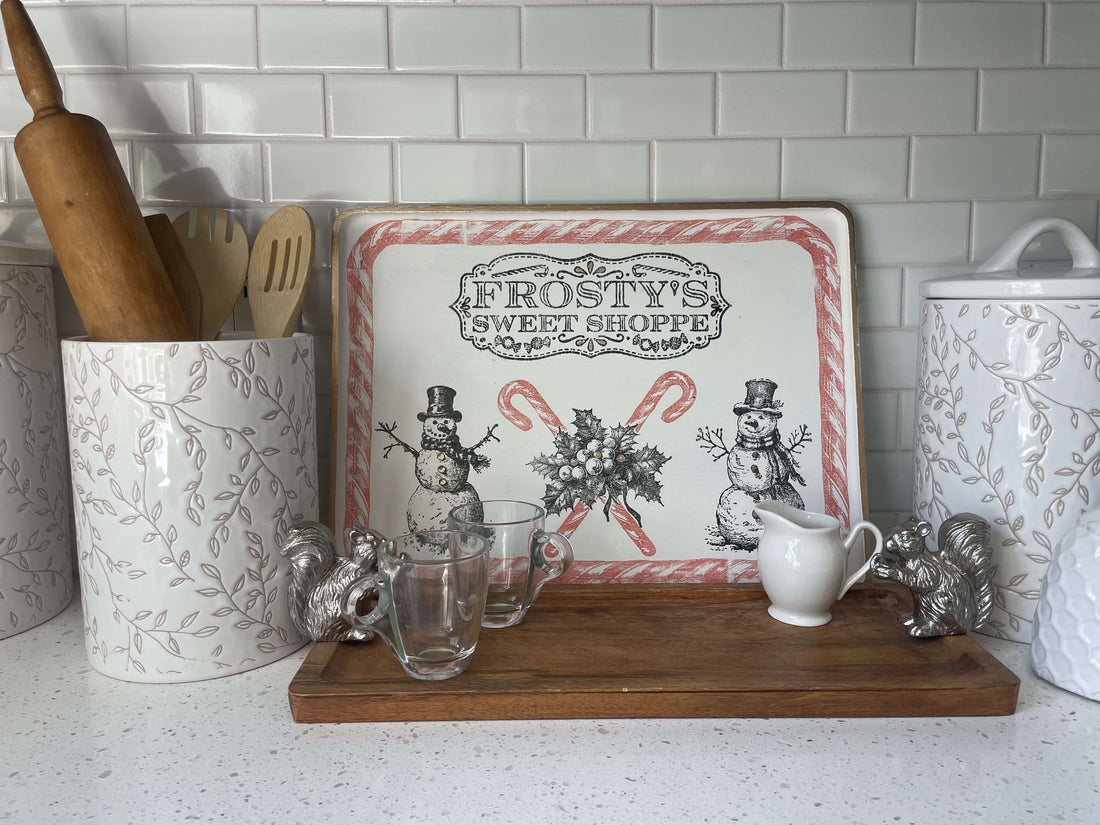
We couldn't resist a darling wooden tray upcycle with our whimsical Frosty's Sweet Shoppe Stamp.🎄✨ Think playful candy cane borders, cheerful snowmen, and a little gold shimmer—it’s an adorable addition to fun, nostalgic holiday styles.


In this tutorial, you’ll learn how to use stamp masking techniques to achieve specific designs—like the candy cane border we added to the edge of our tray. Don’t worry if you’re new to stamping or feel like stamp techniques like overlay stamp impressions aren't your strong suit. We guide you through each step—from prepping your stamp surface to creating a stamp mask and applying it until you're satisfied with the images on your project.☃️


Whether you’re working on DIY home decor, furniture, or craft projects, these tidbits can be used in so many ways. This is definitely a tutorial you’ll want to keep in your back pocket for future projects.💡


Most importantly, have fun with this one! Let yourself experiment, get playful, and enjoy the time spent in your creative space. We can’t wait to see where your imagination takes you! ♥️

IOD Products Needed: 

Other Supplies: 

*we used a chalk-type paint in this tutorial, but there are many brands and types of paint, talk to your stockist to learn which one is right for you!

Step-by-Step Guide

STEP ONE: PREP YOUR STAMP SURFACE

First up, we’re going to paint our tray. It took us two coats and a little touch-up to achieve the clean, soft white we wanted. Let the paint dry thoroughly between each coat.

STEP TWO: PREP A CANDY CANE BORDER

Once your paint is fully dry, you can get to stamping! We decided on a candy cane border with festive snowmen and signage in the middle. To get started with your border, begin with the corners. We chose red ink for our candy cane border to keep the playful candy cane theme. Apply an even layer of ink onto your stamp and hover while you make sure your corners line up correctly. The goal is to make sure your straight edges (where you connect the long pieces of the candy cane border) aren’t crooked. Straight lines are what we want! Commit, don’t shift, and apply even pressure for each corner.


Did you make a mistake? No problem. Just paint over what you aren’t happy with and try again when your paint is dry. In our case, we went a little high on the curve of the tray and it would have meant a crooked border. Not what we’re going for! Just keep your white paint and brush handy. No pressure, you’ll do great.


Quick Tip: If you have a pencil handy, it is helpful to take the edge of your thin mount and connect with a straight line from corner to corner. Unfortunately, we only had pens around, and the black ink would have shown through so we skipped it. Which is fine! It’s just another helpful tip for keeping your lines straight and pieces connected correctly.

STEP THREE: APPLY CANDY CANE BORDER

Grab your masks because those are going to be a lifesaver! Decide where you’re going to start and place the mask over the connecting corner. Take your straightaway candy cane and line it up on the very edge of the thin mount so you have best control and can get it right up to the edge of your tray. Line up as best you can with the first corner, then press firmly as you connect to the second corner.


Continue around your tray, moving the mask as needed. If you get to a part where the straightaway doesn’t meet up with the corner, place that mask down as well, and stamp over the remaining space. Don’t get held up if the patterns don’t match exactly. Just take a small art brush and your white paint and remove as much excess as you can. Dry brush over your seams so they all blend softly.

Configure Your Stamping Tools
STEP FOUR: APPLY SNOWMEN STAMP

Bring on the snowmen! Switch to your black ink and ink pads, and place them at the bottom edge of your border. Remember not to shift!

Seal the Design
STEP FIVE: OVERLAY STAMP IMPRESSIONS

Keeping with your black ink, place your sprig of mistletoe between the two snowmen. Remember, when you’re masking, what you want up front and center must be placed first! You want the mistletoe in the foreground of your candy canes.


Next, switch back to your red ink and grab your candy canes. Make sure your mask is properly in place on your mistletoe, then take your candy canes and place the tops, then re-ink and extend the bottoms down (this gives the illusion that the candy canes are longer than they are).

Seal the Design
STEP SIX: APPLY A GILDED TOUCH

Last up, we wanted a few gold touches, so we added gold leaf paint to the edge of our tray as well as the buttons of our snowmen, a few of the berries in the mistletoe, and a little gilding to the frosty’s sign. If your tray is going to be in use, you would want to finish up with a water-based sealer, but we left ours as-is.

If you're just kicking off your creative journey, have no fear — our Product 101 pages are packed with straightforward techniques to set you up for success. We're thrilled to accompany you as you explore and create. For more how-tos and creative inspo, make sure to browse through the rest of our blog.


Once you've crafted your final piece, share it with our Facebook Creative Tribe! This community is not just a showcase but also a supportive hub for when you hit those creative roadblocks. And remember, your local stockist is always ready to assist with IOD supplies and expert advice. We're excited to see what you'll bring to life!

Project Image

Frosty’s Sweet Shoppe Upcycled Wooden Serving Tray

 Frosty’s Sweet Shoppe Upcycled Wooden Serving Tray
Pin this article to save for later

We couldn't resist a darling wooden tray upcycle with our whimsical Frosty's Sweet Shoppe Stamp.🎄✨ Think playful candy cane borders, cheerful snowmen, and a little gold shimmer—it’s an adorable addition to fun, nostalgic holiday styles.


In this tutorial, you’ll learn how to use stamp masking techniques to achieve specific designs—like the candy cane border we added to the edge of our tray. Don’t worry if you’re new to stamping or feel like stamp techniques like overlay stamp impressions aren't your strong suit. We guide you through each step—from prepping your stamp surface to creating a stamp mask and applying it until you're satisfied with the images on your project.☃️


Whether you’re working on DIY home decor, furniture, or craft projects, these tidbits can be used in so many ways. This is definitely a tutorial you’ll want to keep in your back pocket for future projects.💡


Most importantly, have fun with this one! Let yourself experiment, get playful, and enjoy the time spent in your creative space. We can’t wait to see where your imagination takes you! ♥️

IOD Products Needed: 

Other Supplies: 

*we used a chalk-type paint in this tutorial, but there are many brands and types of paint, talk to your stockist to learn which one is right for you!

Step-by-Step Guide

STEP ONE: PREP YOUR STAMP SURFACE

First up, we’re going to paint our tray. It took us two coats and a little touch-up to achieve the clean, soft white we wanted. Let the paint dry thoroughly between each coat.

STEP TWO: PREP A CANDY CANE BORDER

Once your paint is fully dry, you can get to stamping! We decided on a candy cane border with festive snowmen and signage in the middle. To get started with your border, begin with the corners. We chose red ink for our candy cane border to keep the playful candy cane theme. Apply an even layer of ink onto your stamp and hover while you make sure your corners line up correctly. The goal is to make sure your straight edges (where you connect the long pieces of the candy cane border) aren’t crooked. Straight lines are what we want! Commit, don’t shift, and apply even pressure for each corner.


Did you make a mistake? No problem. Just paint over what you aren’t happy with and try again when your paint is dry. In our case, we went a little high on the curve of the tray and it would have meant a crooked border. Not what we’re going for! Just keep your white paint and brush handy. No pressure, you’ll do great.


Quick Tip: If you have a pencil handy, it is helpful to take the edge of your thin mount and connect with a straight line from corner to corner. Unfortunately, we only had pens around, and the black ink would have shown through so we skipped it. Which is fine! It’s just another helpful tip for keeping your lines straight and pieces connected correctly.

STEP THREE: APPLY CANDY CANE BORDER

Grab your masks because those are going to be a lifesaver! Decide where you’re going to start and place the mask over the connecting corner. Take your straightaway candy cane and line it up on the very edge of the thin mount so you have best control and can get it right up to the edge of your tray. Line up as best you can with the first corner, then press firmly as you connect to the second corner.


Continue around your tray, moving the mask as needed. If you get to a part where the straightaway doesn’t meet up with the corner, place that mask down as well, and stamp over the remaining space. Don’t get held up if the patterns don’t match exactly. Just take a small art brush and your white paint and remove as much excess as you can. Dry brush over your seams so they all blend softly.

Configure Your Stamping Tools
STEP FOUR: APPLY SNOWMEN STAMP

Bring on the snowmen! Switch to your black ink and ink pads, and place them at the bottom edge of your border. Remember not to shift!

Seal the Design
STEP FIVE: OVERLAY STAMP IMPRESSIONS

Keeping with your black ink, place your sprig of mistletoe between the two snowmen. Remember, when you’re masking, what you want up front and center must be placed first! You want the mistletoe in the foreground of your candy canes.


Next, switch back to your red ink and grab your candy canes. Make sure your mask is properly in place on your mistletoe, then take your candy canes and place the tops, then re-ink and extend the bottoms down (this gives the illusion that the candy canes are longer than they are).

Seal the Design
STEP SIX: APPLY A GILDED TOUCH

Last up, we wanted a few gold touches, so we added gold leaf paint to the edge of our tray as well as the buttons of our snowmen, a few of the berries in the mistletoe, and a little gilding to the frosty’s sign. If your tray is going to be in use, you would want to finish up with a water-based sealer, but we left ours as-is.

If you're just kicking off your creative journey, have no fear — our Product 101 pages are packed with straightforward techniques to set you up for success. We're thrilled to accompany you as you explore and create. For more how-tos and creative inspo, make sure to browse through the rest of our blog.


Once you've crafted your final piece, share it with our Facebook Creative Tribe! This community is not just a showcase but also a supportive hub for when you hit those creative roadblocks. And remember, your local stockist is always ready to assist with IOD supplies and expert advice. We're excited to see what you'll bring to life!

Back to blog