Bookshelf Decor: Upcycling Books into Vintage Home Accessories
So often we think of books as merely functional pieces that have little to no decorative value. Once read, they’re often forgotten on a shelf or tucked away to gather dust.
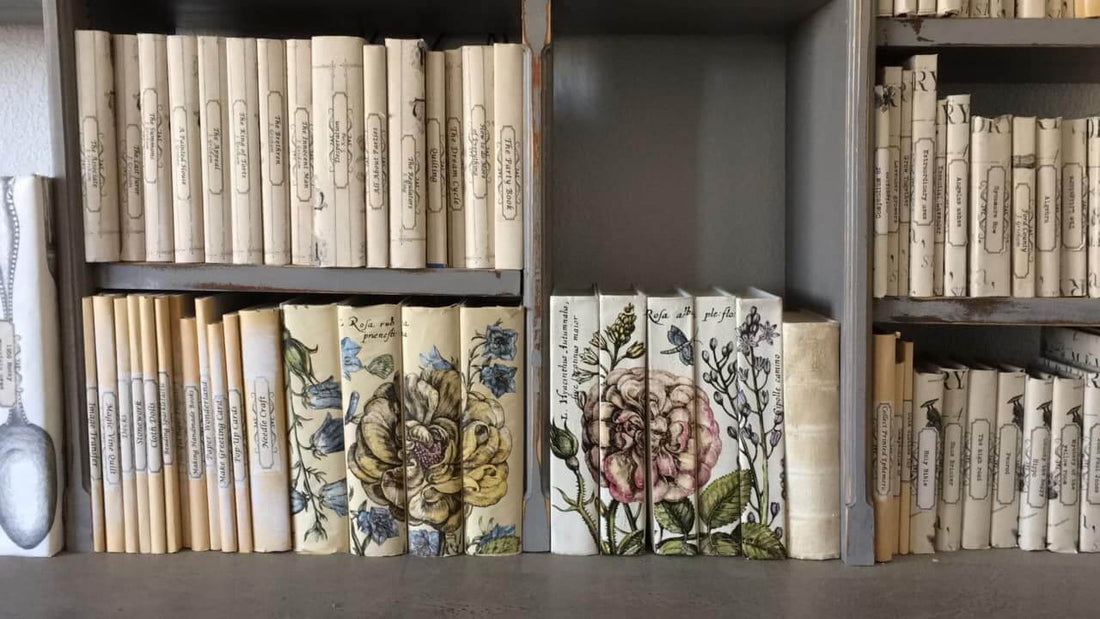
So many ways to make unique home accents with old books…
-

DIY knife block with Bohemia and Lock & Key Moulds -
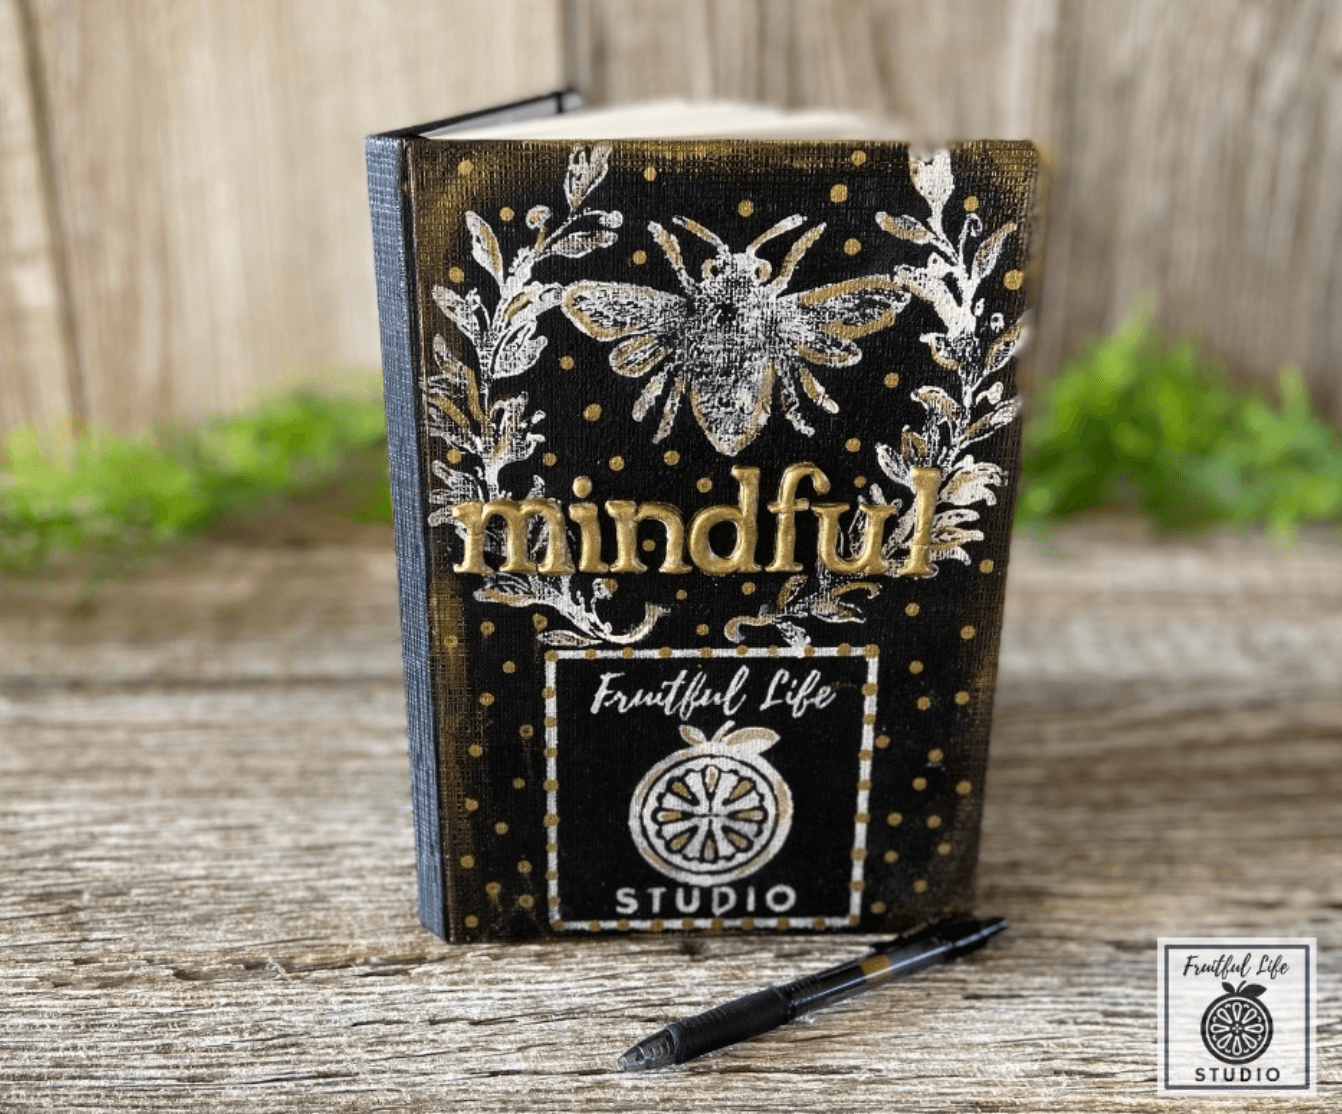
Journal cover by Fruitful Life Studio -

Lemon Drops knife block by Delyla Designs -

Altered books by Vintage Restore & More -

Vintage books created by Texas In-Laws

But we like to think of books as usable art just waiting to be brought to life as bookshelf decor. If you’ve got a pile of books lying around—let’s be honest, we all do!—and a little time to spare, try upcycling your books with this easy and inexpensive DIY home decor project by IOD stockist Carmen of Curious Farms Market in Bennet, CO.
No time now? Pin this post for later.
Check out the step-by-step tutorial below or read on for a supply list and written instructions.
And if you enjoyed Carmen’s DIY and want to see more from her, check out her YouTube channel here.
HERE ARE THE SUPPLIES YOU’LL NEED FOR THIS PROJECT
All IOD products can be purchased from an approved stockist. To find a shop near you, click here
- Several old books that roughly the same height; the wider the spine, the better
- Ladies in Waiting Transfer by IOD (this is a retiring design but there are many other IOD Transfer designs that would look lovely)
- Transfer tool included with your IOD Transfer
- Craquelure Stamp by IOD, Black Decor Ink and Blank Ink Pad (optional for a more distressed look)
- Press ‘N’ Seal (or anything you can wrap your pages in to keep paint from getting on them
- Your favorite brand of vintage white decor paint
- Paintbrush for painting and sealing
- Scissors
- High-quality water-based sealer
DIY VINTAGE-INSPIRED BOOKSHELF DECOR WITH IOD TRANSFERS
WRAP THE INSIDE PAGES OF EACH BOOK
To begin, Carmen wrapped each book’s pages with Press ‘N’ Seal. Though, she does note that you can use any other alternative to protect your pages from paint. This method is just the easiest!
Starting with one long sheet, she wrapped the entire bulk of pages from the first page all the way to the back. To make sure that all of the pages are sealed, Carmen suggests cutting your wrapper with a little excess. This way, you can wrap all the pages nicely and neatly.


PAINT BOTH COVERS AND SPINE
With the pages protected with plastic wrap, Carmen painted both the covers and the spine with plain white craft paint. But feel free to use whatever solid color you prefer. To ensure opacity, Carmen painted on two coats, making sure to let each dry in between.
Finish it off with a water-based sealer on the spine, so your transfer adheres easily and doesn’t pull up the paint.
-

Apply two coats of paint, drying between each layer -

Paint all the visible areas of the book cover
PICK, PLAN, AND CUT OUT YOUR IOD TRANSFER
Once your books are fully dried, pick out the IOD transfer you’d like to use. In line with a more vintage look, Carmen used the beautiful Ladies in Waiting transfer that features old English blooms and some charming calligraphy. To see the full collection of IOD transfers, go here.
Next, you’ll want to stack your books then turn them so the spines are facing towards you. Then, measure the width of each book, plus the total width of all the books next to each other. In Carmen’s case, she measured about 2 inches per book.
Using the gridlines, mark out the measured width and length of each book onto the transfer. Use crafting scissors to cut the width and length of transfer needed for each spine.
-

Line up your book spines (you may need to bolster them with an extra book on the side so they stand up) -

Plan out where you will be applying the transfer -

Measure and cut out strips for each spine
RUB ON EACH IOD TRANSFER
After you’ve cut up each transfer in the necessary size, you can start transferring!
Carmen suggests starting with either the first or the last books in the stack since these will be the “frame” of your bookshelf decor.
Once you’ve decided on a book to begin with, carefully align its corresponding transfer, starting at the top of the spine. Remove the non-stick transfer backing. Then, use the provided rubbing tool to adhere the transfer from the top, working your way down.
Once the image is transferred to the spine, snip off any excess. If your transfer is a little wider than your spine, you can snip them. Or, you can do what Carmen did and fold them over the sides so the transfer almost blends from the front of the book.
Use the non-stick backing paper to “smooth out” or burnish any bumps from the transfer and to make sure the image fully adheres to the book. Repeat with all the other books, making sure to keep each transfer aligned with the pattern of the one before it.
-

Rub on the IOD transfer -

Burnish by rubbing it with the transfer backing -

Line up the design for the next spine and repeat the steps for applying the transfer
ADD IN IOD TRANSFER DETAILS AND CRAQUELURE STAMP
Since we don’t want any of that lovely transfer to go to waste, you can do what Carmen did and rub on the calligraphy details to fill up the white space. If you end up with some extra stems or leaves, then here’s another pro-tip: save them for bigger transfer projects later on. (Check out this project where you can learn how to mix and match transfers and scraps.)
To add some more depth and character, Carmen then took her IOD craquelure stamp with black to carefully layer some more patterns over the IOD transfer. To make using each stamp easier, Carmen also advises cutting each one into more manageable sizes.
-

Add a bit of leftover transfer with script if you like -

Lightly stamp with the Craquelure Stamp (optional for a more distressed look)
SEAL AND SHARE YOUR “NEW” DIY BOOKSHELF DECOR
Finally, seal your hard work with a varnish or sealant of your choice! You can use a distressing agent for a shabby chic look or you can go for gothic romantic with a darker varnish. To be honest, though, the finished product is stunning already on its own, so you may just want to do what Carmen did, and use a clear poly-acrylic for protection and shine. And voila! All that’s left to do is to display your upcycled vintage books!


WHY SHOULD YOU TRY THIS DIY?
IT CAN BE UPLIFTING
Having a pretty space isn’t just good for the eyes, but for the spirit and the mind, too. Since many of us are spending more time at home, having a well-decorated space can boost creativity and productivity. Since there are now many professionals working from home, having eye-catching pieces like this can brighten up a designated workspace that may otherwise feel drab and downright depressing. Another home office DIY you could explore is this DIY Painted Cabinet Makeover that we’ve previously shared here. Now you can have aesthetically pleasing books and cabinets to perk up your workday.
DIY CAN BE THERAPEUTIC
Anyone who’s ever done some crafting will swear it’s therapeutic. Psychologists have even published studies that state that crafting can put you in a “flow” state. This can help you achieve peaceful mindfulness. For over a century, crafting has even been a part of occupational therapy. Now more than ever, having a healthy distraction like crafting is a welcome pursuit.
HOW CAN YOU DISPLAY THESE BOOKS?
You can display these books any way you want. But should you need some extra tips on using books as decor, you can check out this blog post where we also discussed bookshelf styling ideas like approaching each shelf as a vignette or playing around with heights and depths.
Upcycling is truly a win-win for everyone. Not only are you lessening waste, but you’re also creating a beautiful and usable accent that fills your home with joy.
Exclusively written for Iron Orchid Designs by Lesly Wilcher
Looking for more upcycle inspiration with IOD? Check out these posts.
 ×
×
popular
- How to Apply IOD Athenaeum Gilded Transfer to Colored Glass Bottles
- From Ugly Duckling to Gorgeous | Black Dresser Makeover with IOD Marché des Fleurs
- 5 Creative Ways to Use One Decorative Stamp
- Turn Thrifted Finds into Charming Garden-Inspired Decor with a DIY Jadeite Finish
- Little Lark Paint Inlay Projects: Vintage Teapot & Canvas Wall Art with IOD