


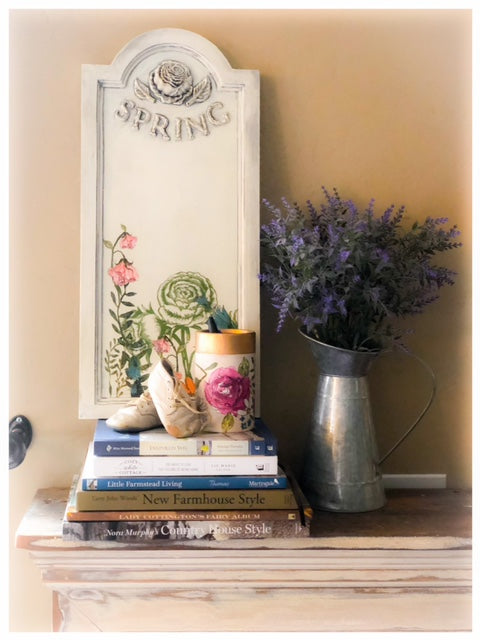
Spring Decor Idea: DIY Dry Erase Board with IOD Moulds & Transfers
IOD Design Team member, Lexi Grenzer, is back for this sweet spring-themed DIY dry erase board tutorial. This project will get you in the mood to clean out those winter cobwebs and seed your spring creativity!

No time now? Pin this project for later.
Meet Lexi, the beyond-talented artist behind our limited edition Woodland Christmas transfer design. She also created this lovely DIY Christmas resin ornament tutorial AND an upcycled milk jug place setting tutorial.

Learn more about Lexi by checking out her website (she offers art and DIY classes!) and follow her on Instagram.
HOW TO DIY DRY ERASE BOARD (it’s easier than you think!)
Supply List for a Homemade Whiteboard
All IOD products can be purchased from an approved stockist. To find a shop local to you, click here. To find an online store, click here.
(This post contains affiliate links.)
- Wander Transfer by IOD
- Heirloom Roses Mould by IOD
- Victoria Mould by IOD
- Upcycled Cabinet Door or a craft store chalkboard
- Quick Cure Casting Resin
- Krylon Dry Erase Board Spray
- Titebond Quick & Thick Glue
- Your favorite chalk or mineral-based paint in antique white
- Paintbrush
- Fine grit sanding block
- Acrylic Paint – gold and grey
- Cup, water, and lint-free cloth (for color wash)
- Water-based matte spray polyacrylic topcoat
- Silicone craft mat (optional, to protect your workspace and make for easy cleanup)
Bonus project – make a matching dry erase marker holder – here’s what you need:
- Matte water-based sealer
- Your favorite chalk or mineral-based paint in antique white
- Paintbrush
- New or thrifted ceramic jar or small vase for holding dry erase makers
- Liquid Leaf in gold
Before you start… Prep your workspace to make this DIY dry erase board (because the last thing you need is a mess!)
When setting up for this project, Lexi recommends taping down a trash bag to work over or you can use a silicone sheet dedicated to crafts.
STEP 1: MAKE YOUR LETTER AND DECORATIVE RESIN CASTINGS
Lexi had Heirloom Rose Mould and letter castings from the new Victoria Mould leftover from a previous project so she didn’t show this step. But, never fear, casting with resin is super easy! Check out this tutorial to see exactly how to cast with resin (yes, it’s for wrist cuffs, but the steps are the same 😀).
STEP 2: ARRANGE AND GLUE DOWN THE RESIN CASTINGS
Layout your letter castings as well as your flower and leaf appliques where you think you want them. Once you’re happy with how they look, glue them down using Titebond Quick & Thick Glue.
Be generous with the glue – spreading it all the way to the edges of the casting. Then press down firmly, paying extra attention to the edges and making sure good contact between the DIY dry erase board and the casting.

If any glue leaks out the sides, use a paintbrush dipped in water to remove glue glops. Make sure to wash your paintbrush with soap and water after you are done!
STEP 3 (& 4): PAINT THE ENTIRE SIGN WITH CHALK PAINT (and REPEAT!)
Once the glue is dry, coat the project, including the molded elements with your favorite brand of chalk or mineral-based paint. Then, make yourself a cup (or two) of tea or coffee because it’s dry time!

Then REPEAT! Let the second coat dry completely before moving to the next step.
STEP 5: ANTIQUE THE DIY WHITEBOARD AND ADD A LITTLE SHIMMER
Make a color wash by mixing approximately 1 part gray acrylic paint and 6-8 parts water (depending on how dark or light you want it). Loosely brush on the color was and then immediately wipe the glaze back using a damp, lint-free shop cloth or rag.
Lexi worked in stages, painting and wiping down a little at a time. (You don’t want the paint to set before you have a chance to wipe it back to the intensity you like.)

While the paint is still just a smidge moist, lightly rub a fine-grit sanding block over the letters to bring out the twisted vine details and add a distressed look to the rose applique. Wipe off any excess dust before continuing.
You’ve got the Midas touch! Using a little gold acrylic paint on your fingertip, add some gilding to the raised areas of the resin elements, a little bit is all you need!

STEP 6: PAINT OR SPRAY A MATTE TOP COAT
Take your piece outside (or to a well-ventilated area) and apply your water-based topcoat.
STEP 7: RUB ON THE FLORAL TRANSFER
Cut out the parts of the IOD Wander Transfer you want to use on this decor project. Leaving the backing on the cut transfer pieces, layout your design on the dry erase board.
Once you’re happy with the arrangement, consider snapping a quick pic so you can remember what you did! (And don’t forget to hang on to any small bits of cut transfer as they’ll come in handy as filler pieces later.)
Start by applying your largest transfer piece as an anchor, then fill in the smaller cut pieces of the rub-on transfers, and finally the filler bits. (For more tips on how to cut apart and arrange transfers, check out this post.)

These transfers look great layered so let your garden grow wild – no weeding needed!
Once all the transfers are applied, burnish them by firmly rubbing over them with a lint-free cloth in a circular motion. This ensures all the edges of the design make good contact with the project surface.
Next, gently sand your painted castings with a fine-grit sanding block, and then wipe away all the dust to clean your piece for the next step.
Note: If this is your first time using IOD transfers, check out this product basics post. Everything you need to know 🤓
STEP 8: APPLY THE KRYLON DRY ERASE SPRAY
Head back outside (or to that well-ventilated area) and follow the instructions on the can of Krylon Dry Erase paint. In a nutshell, hold the can 10-12 inches back and spray back and forth over the entire project (and follow all safety precautions).

Repeat this process 3 to 4 times and allow to dry 1.5 hours in between each coat. The dry time between each coat is important for achieving a smooth finish for your DIY whiteboard so don’t rush it!
Once all the coats are applied, the board will need to sit for 4 full days before writing your ‘to-do’ list on it.
Check out this cute dry erase marker holder that you can also make!

And, if Spring decor doesn’t suit your style but you love the functionality of a homemade whiteboard, check out this lovely DIY kitchen menu.

Created by Diane’s Designs at the Foundry in Minot, ND, she used the Laurel, Trimmings 1, Classic Elements, Acanthus Scroll, and Harper moulds to create a French-inspired look. Instead of using a dry erase spray, she poured epoxy in the center of the frame to create the wipeable whiteboard surface.
HERE ARE SOME OTHER DIY SPRING DECOR IDEAS YOU MIGHT LIKE!


Did you make this DIY spring decor project?
Let us know in the comments below or share a picture with us on social media. We’d love to see it!
 ×
×
popular
- How to Apply IOD Athenaeum Gilded Transfer to Colored Glass Bottles
- From Ugly Duckling to Gorgeous | Black Dresser Makeover with IOD Marché des Fleurs
- 5 Creative Ways to Use One Decorative Stamp
- Turn Thrifted Finds into Charming Garden-Inspired Decor with a DIY Jadeite Finish
- Little Lark Paint Inlay Projects: Vintage Teapot & Canvas Wall Art with IOD