Handmade Holiday Gift Ideas: DIY Flower Vase
Do you LOVE pickles…? Or anything else that comes in large glass jars? 😁 Learn how to create this darling DIY flower vase from an upcycled (or new) glass jar that you can give as a beautiful handmade gift.
This is a perfect hostess gift, sister-in-law gift or something special for your mother-in-law! Heck, you can even give it to yourself if you need an inexpensive DIY centerpiece for your holiday or wedding tablescape. (Or, as Josie jokes, you could give it as a year’s supply of bath salts! 🤣 🛁 🤣)
No time now? Pin this post for later.

Easy DIY Flower Vase Tutorial from an Upcycled Glass Jar
Watch the video below to see all the steps in action, or if you want to read through the supply list and instructions, keep scrolling down.
HERE’S EVERYTHING YOU NEED for this handmade gift
All IOD products can be purchased from an approved stockist. To find a shop local to you, click here. To find an online store, click here.
(This post contains affiliate links.)
- Rose Toile Stamp by IOD
- China Blue Ink by IOD
- Blank ink pad by IOD
- Air dry clay by IOD
- Classic Elements Mould by IOD
- Clean, empty large glass jar – here’s the one we used
- Titebond Quick & Thick Glue
- Your favorite chalk or mineral-type paint in antique white
- Toothpick or chop stick to trim away parts of the casting
- Chip paint brush
- Lint-free shop cloth
- Container of color wash: Mix 1/2 tsp of Ivory Black artists acrylic and 1/2 tsp of Raw Umber artists acrylic with a cup of water
- Cornstarch (optional, for easier casting release)
- Sealer, you could use a clear wax or a matte spray sealer
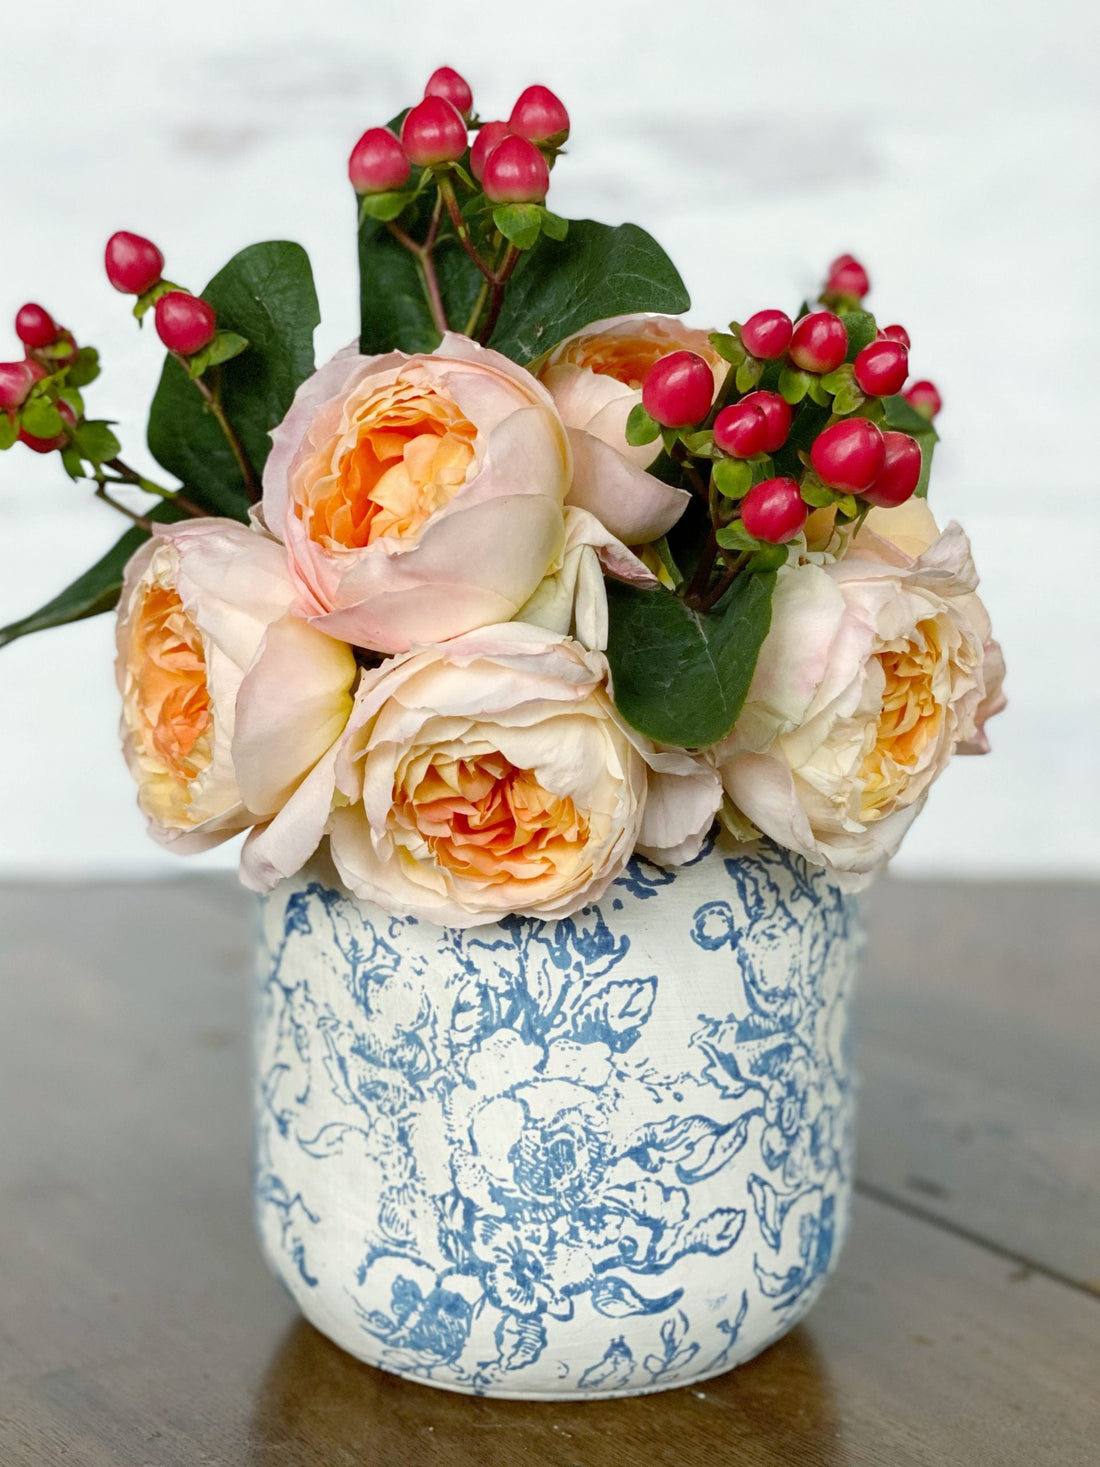
- Fresh florals and greens, we used roses and red Christmas berries
Step-by-step instructions for a DIY Flower Vase
Step 1: Make your air dry clay castings.
If this is your first time using IOD moulds, check out this beginner tutorial to catch up on all the basics.
This project can be done with any of our moulds, so pick a design that goes with your purpose. For example, if you’re making this as a DIY Christmas table centerpiece, use the Evergreen Mould. If your mother-in-law loves butterflies, use the Monarch Mould. (Check out our catalog here to see all the IOD mould design possibilities.)
Recommended: Dust the mould cavity that you’ll be using with cornstarch. This allows for an easy release of the clay without pulling or accidentally distorting the design.
Pull off the approximate amount of clay you need from the block and wrap up any unused clay right away so it doesn’t dry out.
Using your thumbs, push the clay in the Classic Elements Mould. You can modify the casting by cutting away the parts you don’t want after you make it.

Remove any excess clay and expose the micro rim so you get a crisp, clean edge to your casting. Also, make sure the back of your casting is super flat so it sits flush on the glass. You can use the side of a credit cart or other rigid straight edge to flatten and level the surface.
Flip over the mould onto your project surface and fold it back to release the casting without any tugging or pulling. Let gravity help you!
Step 2: Glue the castings onto the glass jar.
Apply an even layer of glue to the back of the casting, smoothing it all the way to the edges to prevent any curling up or warping as the clay dries.
You can use your finger, small paint brush, or a craft stick to spread it.

Lay your jar on its side. We used chunks of clay to stabilize the jar, but check out the video at the bottom of this post for all our tips and trick for stamping curved surfaces.
Gently position and press the casting where you want it on the glass jar. Make sure the entire back of the casting makes good contact with the project surface.

Let your glue and casting dry. Ideally wait 24 hours, but if you’re in a rush, you can move on to the next step after the clay forms a crust.
Step 3: Paint your DIY flower vase.
It’s super important to use a chalk paint or thick mineral-based paint so that it adheres to the glass.. Latex or other types of paint will slide off the project surface.
Liberally paint the glass jar and mould castings, using the chip brush.

Make sure to get paint into all the fine details. A word of caution — if your castings aren’t fully dry, take care not to push too hard with the brush otherwise you might distort the design.
Let the paint fully dry.
Step 4: Stamp the vase.
If you’re new to using IOD stamps, check out this video to learn how to condition and prep them for first use.
For this project, it’s easier to stamp without a thin mount. This allows the stamp full flexibility and you can wrap around the curved surface of jar.
Using a full ink pad, pat the pad on the design side of the stamp to load it with color.

Pick it up and hover it over where you want to create an impression on the vase. Then commit to stamping, taking care not to shift as you run your fingers over the back of all the design details.

This is another place where you can let your creativity guide you. Use your favorite IOD stamp set, pick a different color ink, use letter stamps to monogram the vase – whatever will make you love it!
Let the ink fully dry. This can take up to 24 hours depending on temperature, air flow and humidity.
Step 5: Glaze to pop your mould details.
Decide how dark or light you want your glaze to be as this will inform your ratio of paint to water. We mixed 1 tsp of artists’ acrylic paint to 1 cup water because we wanted an antiqued look.

Liberally brush on the glaze all over the vase – paying special attention to the casting details. Let it pool a bit to create shadows and highlight the details.
Using a folded shop cloth, blot the excess glaze. Work at this until you’re happy with the shading and texture, but not too much as you don’t want to reactivate the paint or ink.

Step 5: Seal your beautiful handmade gift!
Apply a clear wax or spray with a matte polycrylic sealer. Let dry and then fill was water and arrange your flowers and greenery.

Stamping Curved surfaces is skill that takes a bit of practice – but you can do it!
Is your jar rolling away when you try to stamp it? Here’s our best tips and tricks tips for stamping curved surfaces.
Will you be making DIY gifts this Christmas season? Let us know in the comments below.
If you love giving handmade gifts, check out this post to learn how to make polymer clay earrings. You could also make this stamped scarf or a monogrammed pillow.
 ×
×
popular
- How to Apply IOD Athenaeum Gilded Transfer to Colored Glass Bottles
- From Ugly Duckling to Gorgeous | Black Dresser Makeover with IOD Marché des Fleurs
- 5 Creative Ways to Use One Decorative Stamp
- Turn Thrifted Finds into Charming Garden-Inspired Decor with a DIY Jadeite Finish
- Little Lark Paint Inlay Projects: Vintage Teapot & Canvas Wall Art with IOD