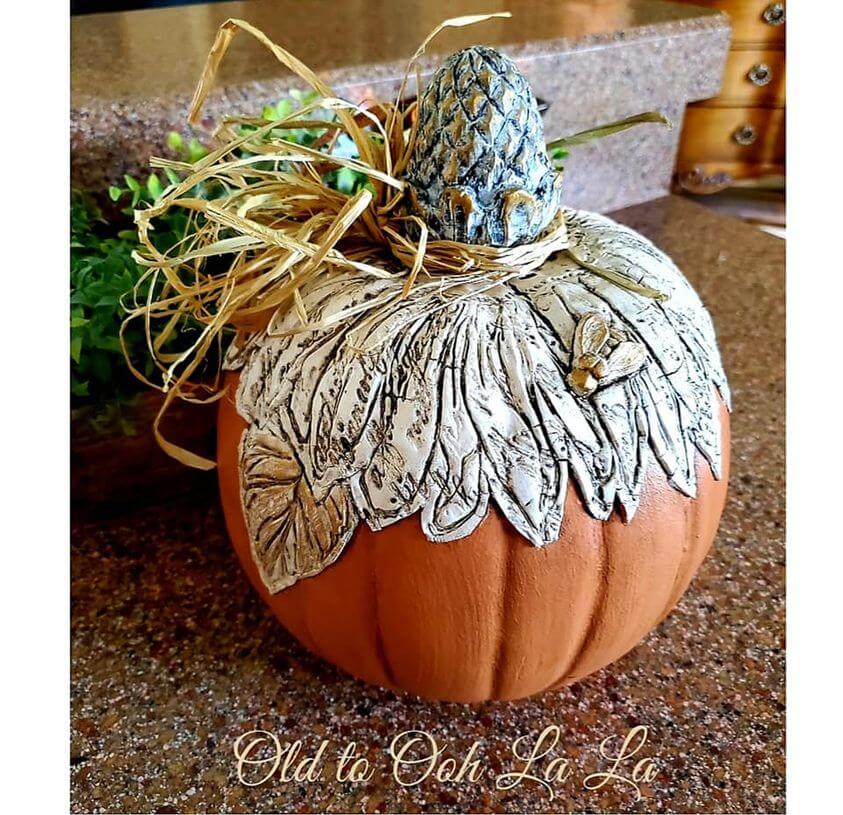
DIY Painted Pumpkin Decor with French Country Flair
DIY painted pumpkin decor might be standard for the Fall season, but you’ve never seen one like this French country farmhouse beauty!
No time now? Pin this for later.

Watch the video tutorial below with IOD stockist Victoria of Old to Ooh La La in Las Vegas, NV, or keep scrolling for a supply list and written directions. (Note: There is some minor background noise in the video because it was sweltering and Victoria needed the A/C on to keep from melting.) 😆
Here’s everything you need for this DIY painted pumpkin decor project
(This post may contain affiliate links.)
- Sunflowers Stamp by IOD
- Kindest Regards Stamp by IOD
- Laurel Mould by IOD (optional: if you want to add the bee)
- Air Dry Clay by IOD
- IOD Brayer or other rolling tool
- Plastic or paper mache pumpkin (the cheapest you can find, about 12 in diameter but you can adjust the project to whatever size you have)
- Plastic wrap
- Cornstarch
- Razor blade
- Titebond Quick and Thick Glue
- Your favorite brand of decor paint in a terra cotta (optional: if you need to tone down the the orange)
- Your favorite brand of decor paint in cream white
- High-quality water-based sealer
- Antiquing gel
- Gold leaf
- Paint brushes
- Lint-free shop cloths
- Water and spray bottle (optional: you can dampen your cloth or the cotton swabs another way)
- Cotton swabs (optional: for filling in cracks in the clay)
- If you’re making a stem, you need a curtain finial, brown and antique white paint, and a hot glue gun
- Raffia
How to DIY Pumpkin Decor – From Cheap Plastic to French Country Decor
Step 1: Paint the pumpkin.
This step is optional and depends on the original color of the pumpkin. If it’s plastic or some other slippery or smooth surface, consider spraying it with a matte sealer first to help the paint adhere.
Step 2: Create a sunflower impression in the clay.
Lay a piece of plastic wrap on your work surface and dust it with cornstarch to prevent sticking. Work the air-dry clay in your hands to warm it up and then shape it into a ‘pancake.’ Lay it on the plastic wrap. Dust your brayer or rolling tool with cornstarch and then roll the clay out like you would a pie crust.
Dust the design side of your stamp with cornstarch. Lay your stamp on the clay and then press it into the clay.
Use one hand to stabilize the stamp so it doesn’t slip. Use your fingers to press in all the design details or use your brayer to roll over the back of the stamp with some pressure.
Using the Kindest Regards Stamp, create a script impression within each petal.


Step 3: Trim the excess air dry clay.
Use your razor blade to carefully cut the excess clay away from around the petals. When you’re done, lift the clay sunflower using the plastic wrap from your project surface. Flip it over into your hand and gently peel the plastic wrap away from the bottom.


Step 4: Glue the clay sunflower to the top of the pumpkin.
Cover the backside of the clay sunflower with glue making sure to go all the way to the edges. Lay it on your pumpkin and gently press to get good contact between the clay, the glue, and the pumpkin.
Depending on your pumpkin, you may need to cut a hole in the center of your sunflower for the pumpkin stem.
If you want to add any additional embellishments such as the bee from the Laurel Mould or stamp impressed leaves, now would be the time to do that.
Let them air dry clay cure for 24 hours.
Step 5: Paint the sunflower and seal the entire piece.
If the cracks in the clay bother you, you can easily repair them. Do this by pushing a little bit of rolled, soft, clay into the crack of the dried clay. Wipe away the excess and use a wet cotton swab to blend and smooth the clay into the design.
Paint your stamp work with cream-colored decor paint, let it dry completely, and then seal the entire pumpkin, including the sunflower embellishment, with a high-quality top coat. Don’t skip sealing otherwise, you’ll be disappointed when you go to antique your piece! Let the top coat dry completely.
Step 6: Give your pumpkin a fabulously shabby, antiqued look.
Antiquing the pumpkin is our favorite part! Using a stiff-bristled brush, apply the antiquing gel into the clay details. You don’t want any white clay showing through. With a damp towel and a pouncing motion, wipe back some of the antiquing gel to reveal the details. Keep folding your cloth so that you’re wiping with a clean, damp swatch.


Step 7: Make a stem (optional).
Paint and dry brush the finial so that it roughly matches your antiqued sunflower. A layer of brown paint dry brushed with antique white over top should do the trick. Apply some antiquing gel and wipe it back to give the stem and pumpkin a cohesive look.
Step 8: Hit the high points with some gold accents.
Using a small paintbrush or your finger, rub on some gold highlights to spot you want to draw the eye to such as the bee.
Step 9: Tie on some raffia to pull the whole French country farmhouse look together!
Tie a double knot so that the raffia stays put and then fluff up the loose ends.
What do you think? Is this a project you’d make for DIY Fall decor?

Here are some other Fall decor ideas you might like.
 ×
×
popular
- How to Apply IOD Athenaeum Gilded Transfer to Colored Glass Bottles
- From Ugly Duckling to Gorgeous | Black Dresser Makeover with IOD Marché des Fleurs
- 5 Creative Ways to Use One Decorative Stamp
- Turn Thrifted Finds into Charming Garden-Inspired Decor with a DIY Jadeite Finish
- Little Lark Paint Inlay Projects: Vintage Teapot & Canvas Wall Art with IOD