How to Make Your Own Vintage Market Sign with Letters & Lemon Drops
Do you love vintage market signs as much as we do? Get ready to love them EVEN MORE when you see how easy it is to make your own perfectly distressed wooden market sign with lemon drops.
If you’re new to DIY home decor, this is a great beginner project because the IOD transfers and decor stamps are easy-peasy to use and the distressed farmhouse style is very forgiving of mistakes.
No time to read now? Pin this project for later.

Here’s what you’ll need to make your own market sign for your kitchen or front porch.
(Disclosure: This post contains affiliate links.)
- An old wooden board or plank measuring approximately 9in x 57in
- Your favorite chalk type paint in antique white
- First Gen IOD Market Transfer – Join the First Gen Pop-up Group to find a stockist
- IOD Lemon Drops Decor Transfer – Find your nearest IOD stockist here
- IOD Craquelure Decor Stamp – Find your nearest IOD stockist here
- IOD Blank Ink Pad – Find your nearest IOD stockist here
- IOD Ink in Tomato and New Grass (mix the two inks and apply to the blank pad to create brown) – Find your nearest IOD stockist here
- Water based polyurethane top coat in flat or matte
- Scissors to cut out the letters and the lemons
- Chip paint brushes
If DIY videos are your thing, you can watch the IOD Sisters below showing you step-by-step how to create your own market sign. Prefer to read? Keep scrolling.
A few of you commented on Sally’s gorgeous Sea Queen inspired t-shirt that she wore in the video. If you’d like to get your own or you want to check out all the other IOD-inspired clothing and accessories, head on over to the new IOD merch shop.
Step-by-Step Instructions for How to Make Your Own Vintage Market Sign with Lemon Drops
How to Make Your Own Vintage Market Sign
-
Step 1
Using your white chalk type paint and a chippy paint brush, whitewash your board making an effort to cover the board inconsistently with the paint.
Leave some of the wood on the edges and ends unpainted and exposed, and try for thinner paint coverage in some areas while going thicker in others.
Step 1: Using your white chalk type paint and a chippy paint brush, whitewash your board making an effort to cover the board inconsistently with the paint.
Leave some of the wood on the edges and ends unpainted and exposed, and try for thinner paint coverage in some areas while going thicker in others.
Don’t worry if you don’t have an old plank. We’ll share with you an easy way to make your own distressed wood board further down in this post.
Step 2: Cut your First Gen IOD Market transfer so that each individual letter is separated.

As you’re cutting, be careful to hold the white waxy paper in place against the transfer to prevent it from accidentally sticking somewhere you don’t want it. Set cut letters aside with white waxy paper in between them.
Step 3: Cut your IOD Lemon Drops transfer. As before, take care to hold the white waxy paper against the transfer and only cut the pieces you want to use.
Since you’ll only use a bit of the Lemon Drops transfer, you can carefully roll up the remaining pieces with the white waxy paper and store in the tube for use on other projects.
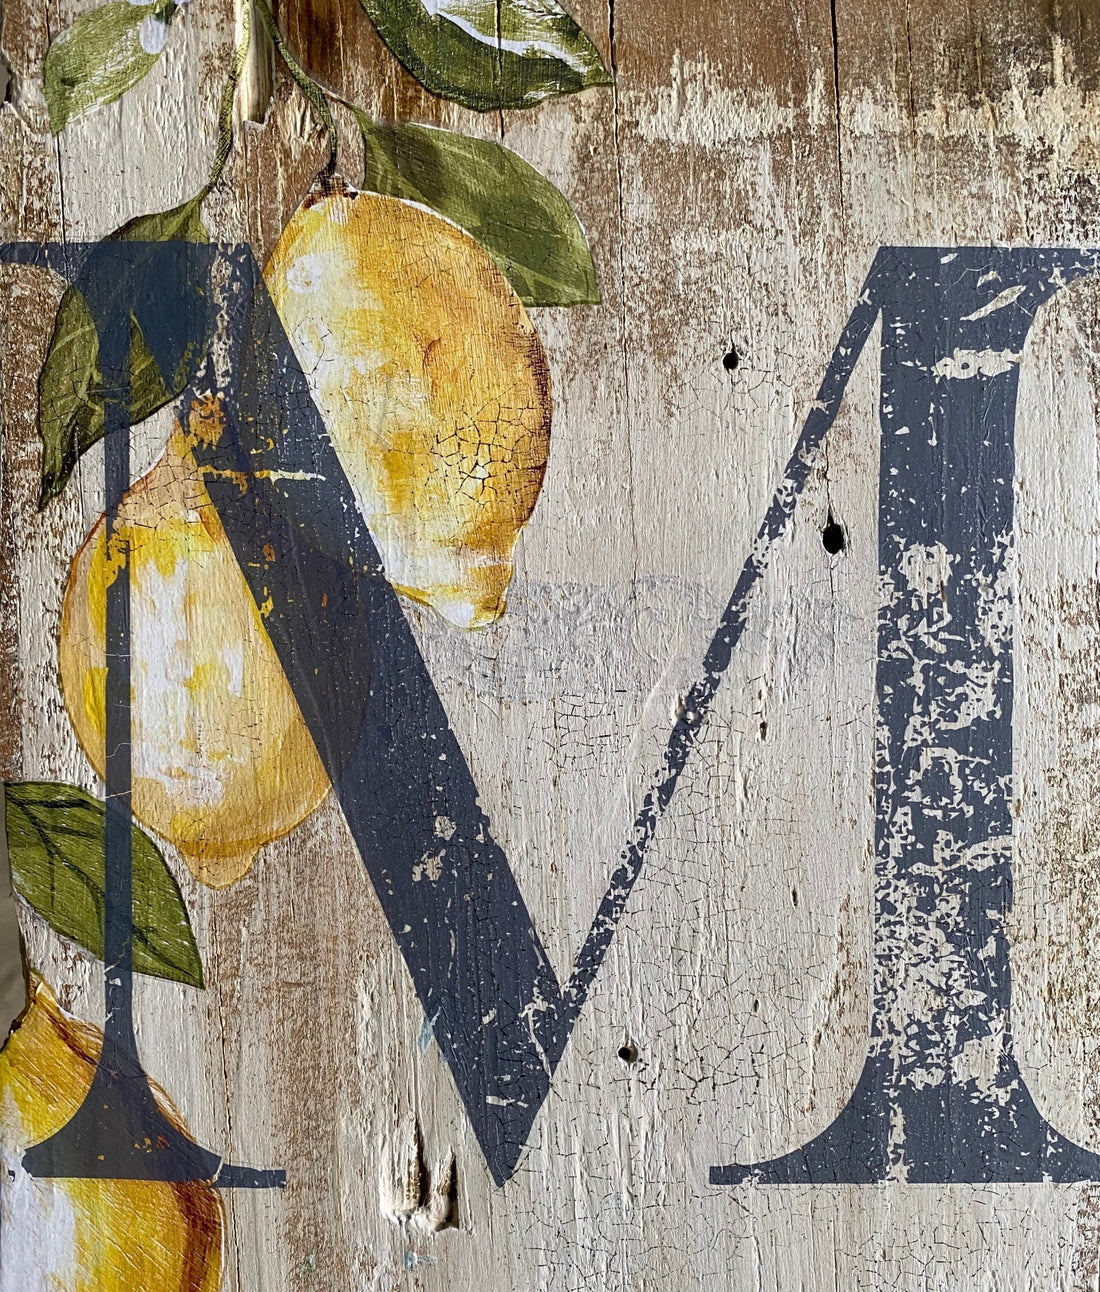
Step 4: Place the pieces of the Lemon Drops transfer along the perimeter of the board where you want them.

Lay the transfer directly on the board and remove the waxy paper once you’re sure you like the placement.
Use the stick provided with the transfer to firmly rub the backside of the transfer sheet. Keep doing this until the image is completely transferred to the board.

Step 5: Gently lift the clear transfer sheet once the design is fully transferred onto the board.
Then use that same piece of transfer sheet to burnish the image by firmly rubbing the entire area in a circular motion. This will ensure your image is fully adhered.

Repeat Steps 4 and 5 until you’ve transferred all the lemon drops you want. Next you’ll transfer your letters.
Step 6: Place the individual letters of the Market transfer where you want them on your wooden board. Be mindful to center the letters and to space them evenly from each other.
Step 7: Once you’re happy with your letter placement, remove the white waxy paper so that the transfer is directly on the board.

Use the stick provided with the transfer to firmly rub the backside of the transfer sheet. Keep doing this until the image is completely transferred to the board.
Note: We recommend removing the waxy paper from each letter just before you’re ready to work on that specific letter. By working on one letter at a time, you’ll avoid accidentally sticking a transfer before you’re ready to commit to the placement.
Step 8: After you transfer each letter, take a moment to burnish the image by firmly rubbing the entire image in a circular motion with the blank transfer sheet.
Step 9: Get out your Craquelure Stamp and place it stamp side up. Press the loaded ink pad onto the stamp to apply the color but use an inconsistent pattern applying it thin, thick and not at all in various parts of the crackled paint design.
Make sure you condition your stamp before the first time you use it. This means scuffing your stamping surface in two directions with a fine grit sandpaper. For more on stamp prep and care, check out this video.
Step 10: Flip over the ink loaded stamp and hover it above the area of your sign where you want to apply it.

Step 11: Decisively lay the stamp down being careful not to shift it once it’s placed (this will cause smudging). Then “tickle” the back of the stamp with your fingertips to apply variable pressure to different parts of the stamp.

Be careful not to shift your stamp when you lift it off your board as this will also cause smudging.
Repeat Steps 9 through 11 until you have the crackled paint look everywhere you want it on your project.

Step 12: Step back and admire your beautiful work! Then let it dry for at least 24 hours.
Step 13: Using a chippy paint brush, apply an even coat of a water based polyurethane top coat in a flat or matte finish all over you sign.
This last step will seal and protect your one-of-a-kind vintage Market sign so you can enjoy it for years to come.
Help! I don’t have an old board lying around to make a sign. What should I do?
Breathe in, breathe out because we’ve got a stamp just for that. (Actually three stamps depending on the look you want!)
But before you pick a stamp, start by buying a new board or piece of plywood at a home supply store like Lowes or Home Depot. You can ask them to cut it to the size you want for this project or you can cut it yourself if you have the tools (just use the appropriate safety gear).
Sand the edges of the new wood so there aren’t any hard angles. This extra step will help give your wood more of a worn look once it’s done.
Now you can get stamping!
Your first option (and the one that will look most similar to the wooden board used in the tutorial) is to use the IOD Distressed Stamp. This stamp creates an aged, vintage look on any surface.
In the video tutorial below by Jerri of The Weathered Shed, you can see the exact steps you need to do to get that beautiful aged look on your project. From using a dark gray base coat of paint to whitewashing to stamping, she demonstrates each step and provides helpful tips.
While Jerri is making over a thrifted table, the techniques she shows you are the same ones you’d use when creating a distressed, vintage look for any project.
Your second option is to use the Chippy Paint Stamp.

Click here for a video tutorial showing you how to use this stamp.
Your third option is to use the Barnwood Plank Stamp.
Click here for a video tutorial showing you how to use the Barnwood Plank Stamp.
You can get all of these stamps from a local or online stockist. To find someone near you click here.
The Market transfer is a First Gen IOD product. What does that mean and why do I need to join a Facebook group to buy it?
When IOD was just starting out, we designed DIY decor products but licensed them to another company to manufacture and sell. We call those products “first generation” (or First Gen) because we’ve since moved on and now manufacture and sell all our own products.
Earlier this year, we received our final shipment of First Gen IOD stamps, transfers, and moulds. They are no longer being made, but we wanted to share this last remaining inventory with you.
Because not every stockist carries them, we set up a pop-up Facebook group to connect you specifically with the stockists that have First Gen products like the Market transfer used in this project.
How can I get the Market Transfer and other First Gen IOD products?
You can join the IOD First Gen Pop-Up Group on Facebook by clicking here.
In the Photos section of the group you can see all the First Gen IOD products which includes transfers, stamps, and moulds.
If you find something you want, just post in the group what you’re looking for and your shipping zip code and the stockists in the group will help fulfill your order.
Remember, these First Gen oldies but goodies are only available from our stockists while supplies last.
So if you want to make your own vintage market sign, don’t delay and join our pop-up party on Facebook.
Now go make something beautiful!
Want to see what else you can do with IOD transfers? Check out these projects:
Dresser Transformation with Transfers
IOD Resist Technique with Transfers
 ×
×
popular
- How to Apply IOD Athenaeum Gilded Transfer to Colored Glass Bottles
- From Ugly Duckling to Gorgeous | Black Dresser Makeover with IOD Marché des Fleurs
- 5 Creative Ways to Use One Decorative Stamp
- Turn Thrifted Finds into Charming Garden-Inspired Decor with a DIY Jadeite Finish
- Little Lark Paint Inlay Projects: Vintage Teapot & Canvas Wall Art with IOD