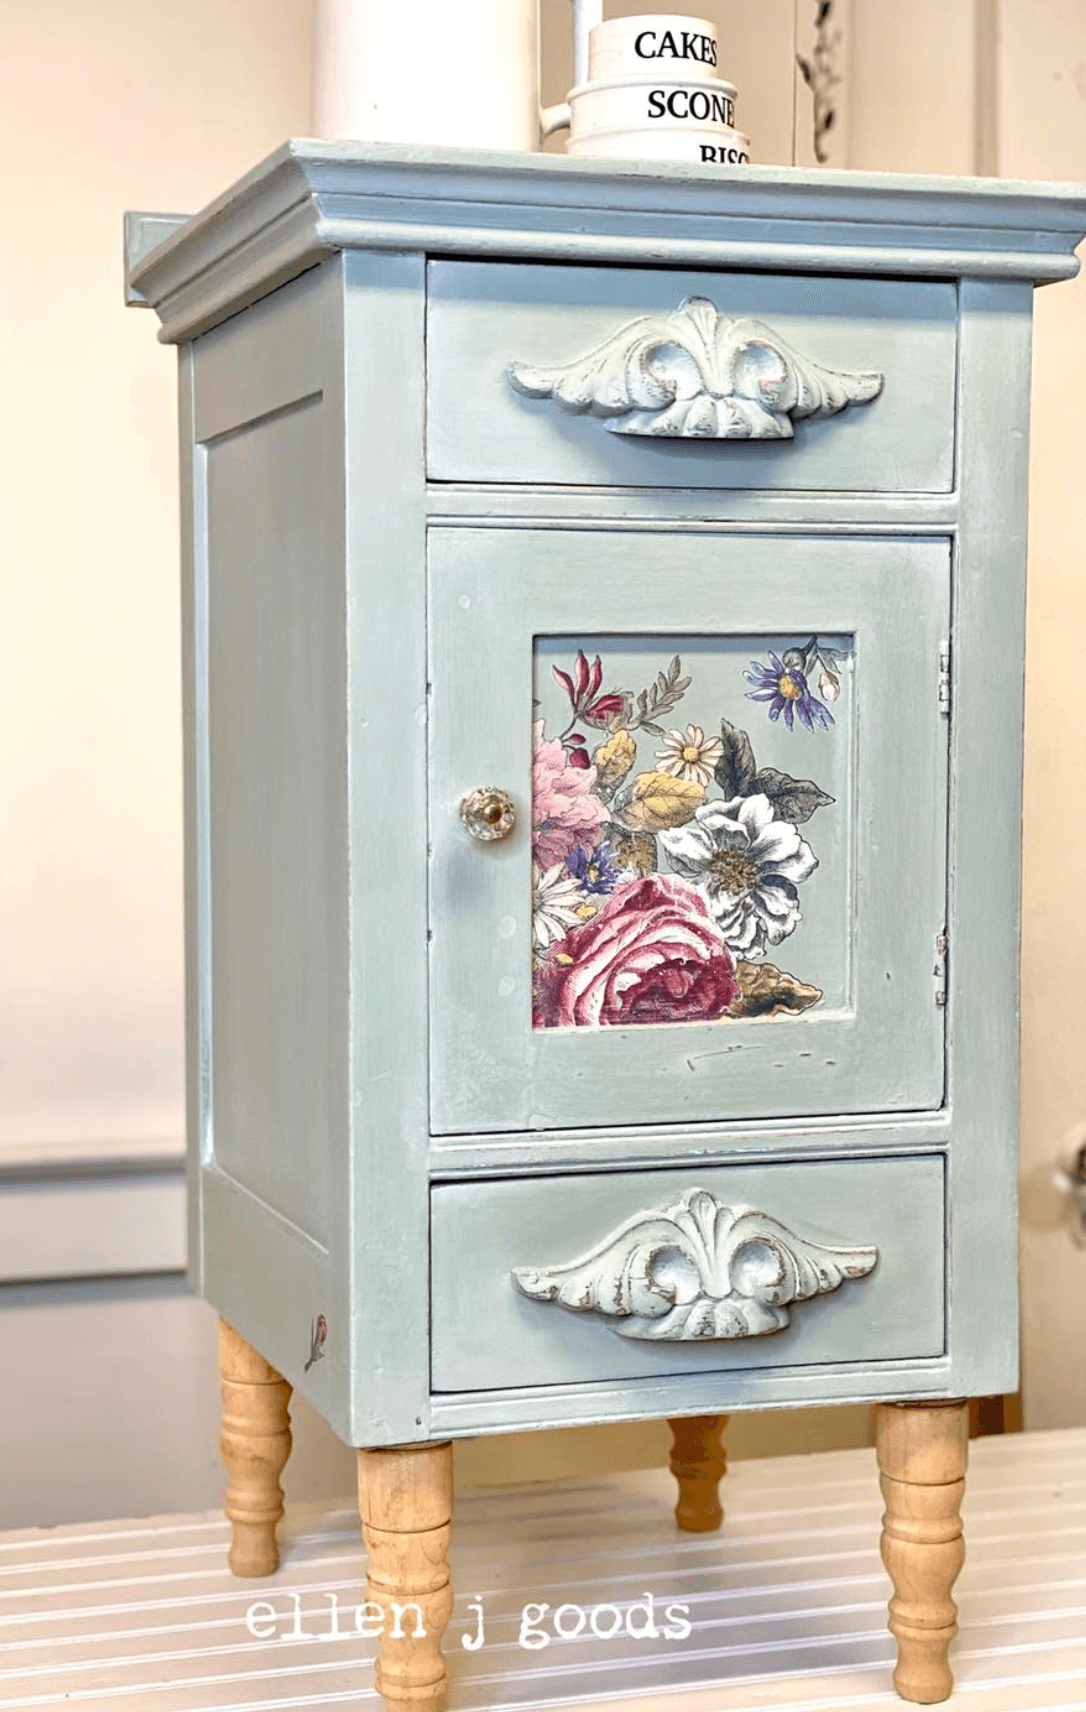
Dreamy Painted Cabinet Makeover Idea
Little cabinets often find themselves sitting curbside adorned with a hastily scribbled FREE sign. Whatever you do, DON’T pass them by – bring those babies home and make them beautiful with this painted cabinet makeover idea by Lynne of ellen j. goods in Medina, NY.
No time now? Pin this project for later.
A new coat of paint, sweet legs, wooden handles, and just a single sheet of the IOD Floral Anthology Transfer are enough for a complete transformation.
Watch Lynne’s video below for some collaboration inspiration or if you prefer, read more about the project below.
And if you love Lynne’s style, subscribe to her YouTube channel here.
Here are the supplies you’ll need for this painted cabinet makeover idea
All IOD products can be purchased from an approved stockist. To find a shop near to you, click here.
(This post contains affiliate links.)
- Curbside cabinet in need of some love
- Floral Anthology Transfer by IOD – Use the store locator to find a retailer near you
- Your favorite brand of milk paint in a vintage blue-green color mixed with a bonding agent (or you can use any high quality chalk type or mineral based paint)
- Fine grit sanding block for distressing
- Hand-held electric sander (if you have old paint you’ll need to sand off)
- Shop cloth and water to clean after sanding
- New or vintage hardware to add to your piece (optional, you can also make your own with IOD)
- Four wooden legs and hardware to attach (these can be store-bought or made from old spindles cut to the desired length)
- White wax or a high-quality water-based matte sealer of your choice
DIY the Perfect Shabby Chic Cabinet with the IOD Floral Anthology Transfer
Lynne found this old piece in her furniture “stash” that was in need of some refreshing. We see these little diamonds in the rough all the time, sitting for free curbside or on the cheap in thrift stores.
Sand smooth, clean, and apply a first coat of paint
To start, Lynne sanded the old paint to make the surface smooth and then gave it a good cleaning.
Lynne used milk paint and to make sure she had a solid surface for her transfer to stick, she mixed in some bonding agent. This ensures a smooth finish that won’t chip once the transfer is applied.
Handles and legs to give it that ‘extra’ umph!
Lynne picked out handles and legs and JR, Lynne’s husband, “handled” the “leg work” of attaching them to the piece. 😆 (If you want to learn how to make some fabulous drawer pulls yourself, check out this tutorial. And we’ve found old spindles cut to size make the perfect DIY furniture legs!)
Brush on a second coat of paint and sand
After applying a second coat of milk paint and letting it fully dry, Lynne sanded her piece to get a nice smooth finish. She spent more time sanding in areas she wanted to look distressed and in areas she wanted the original wood to peek through. Then she gave the piece a good wipe down to remove the dust.
Milk paint can sometimes be a little tricky when it comes to transferring an image because it can get too chalky. This is why mixing in a little bonding agent is essential!
Take time to do a test run with your transfer
Lynne recommends doing a little test transfer to make sure you don’t run into any issues with the image adhering to your paint. No issues here!
Now, you’re ready to transfer!
Lynne only used one sheet of the eight that come with the IOD Floral Anthology Transfer. That means you can make SO. MANY. PROJECTS with just this one transfer!
She cut it apart and tested a few arrangements, keeping the non-stick backing on the transfer. (For more on how to cut, arrange, and mix-and-match transfers on furniture, check out this tutorial.)
Once you know where you want to put your transfer pieces, remove the backing and use the included transfer tool to rub on the image. Lynne carefully lifts the transfer backing as she goes to make sure all the bits are transferred. If you you miss a spot, just lay it back to and keep rubbing.
After applying the transfer, you’ll need to burnish it. Burnishing is just rubbing the transfer with a soft cloth or the transfer backing sheet. The heat created by the friction from rubbing makes the transfer ‘stick’and also makes sure all the edges are securely adhered. (Is this your first time using transfers? Check out this transfer basics tutorial.)
Distress that sweet little painted cabinet!
Want a vintage, cottagecore or shabby chic look? Lightly go over your transfer with a fine grit sanding block. Lynne repeated the entire process, adding transfers to the top of her cabinet.
Seal for a longlasting look
Transfers should be sealed, especially when applied to a high-use item like furniture. Lynne usually uses clear polycrylic but in this case, she went with a layer of white wax over the entire cabinet.
Then she buffed it down to get a soft sheen before calling this little gem done.
Beyond this charming cabinet makeover, Lynne gives us all the feels as she talks about how collaboration and inspiration among IOD stockists Jami of Jami Ray Vintage and Debi of Debi’s Design Diary have made all the difference in her handmade business.
Who do you get your inspiration from? Let us know in the comments below.
And if you like this post, you might also like…


