4 Ways to Repurpose Cabinet Doors into Shabby Chic Home Decor
You’ve seen stacks of them in your neighbor’s dumpster during a kitchen remodel… old cabinet doors. Despite what anyone might tell you – cabinet doors aren’t trash! So dive into that dumpster (carefully! or swing by your local Restore) and get ready to repurpose cabinet doors with these four FABULOUS DIY wall decor ideas!
No time now? Pin this project for later.
-

Faux Copper Letters on DIY Kitchen Sign -

Shabby Chic Decoupaged + Monogrammed Wall Art -

Cottage Style Floral Wall Pocket -

DIY Wooden Tray
Julie, the creative maker behind Julie’s Designs and Signs, is known for her ability to transform a junk pile into high style. And we’re just so excited with how she worked some IOD magic on old kitchen cabinet doors!
She used several of our font stamps and the newly released Alphabellies Stamp 😍 (We aren’t supposed to pick favie products, but… for real! This one is just so darn cute!)
Watch the video below to see how she did all four DIY decor projects or keep scrolling for a supply list and step-by-step instructions.
Pre-Work Prep for Your Repurposed Cabinet Doors
Remove the hardware and fill in the holes
Before you get started, remove any old hardware from the cabinets. (Tip: Don’t toss the hardware because you can use it on another trash-to-treasure project.)Use your IOD Air Dry clay to fill in any holes. After the clay dries for 24 hours, sand down any high spots.
-

Remove hardware -

Fill Holes with IOD Air Dry Clay
Condition the stamps and fill the ink pad
Is this your first time using IOD Stamps and Decor Ink? Check out this basics tutorial.
The first time you use IOD stamps, you need to condition them by lightly sanding them with fine-grit sandpaper in two different directions. This only needs to be done once. It roughs up the surface and gives the ink something to grab on to.
Fill (or refill) your ink pad. Be sure to shake the ink bottle well to thoroughly mix any pigment that might have settled. Then squeeze it onto the pad, using the tip of the bottle to work it in. (Tip: Store your filled ink pads top side down to keep the ink on the surface of the pad.)
Here are the four repurposed cabinet door ideas.
Project 1: DIY Faux Copper Letters with Air Dry Clay and IOD Stamps

Here is everything you’ll need for this project:
All IOD products can be purchased from an approved stockist. To find your local retailer, click here.
(This post contains affiliate links.)
- Old Wood Cabinet Door
- IOD Retro Stamp
- IOD Air Dry Clay
- IOD Thin Mount with Gridlines
- IOD Brayer
- Exacto Knife
- Rustoleum Metalic Finish in Copper
- Your favorite brand of chalk type or mineral-based paint in antique white
- Paint sprayer (or you can just use a paintbrush)
- Your favorite brand of antiquing wax
- Glue (Julie used Gorilla Glue Clear Grip Adhesive but Titebond Quick and Thick would work too!)
Step 1: Create your letters
Roll out the IOD Air dray clay onto your IOD Thin Mount. You don’t want to make it too thin, so your letter isn’t super fragile. Use your brayer to push the stamp into the clay, then remove the excess clay around the edges with an Exacto knife.
Let your letters dry overnight. Once the clay has dried, sand down any rough edges. The clay might crack slightly as it dries. That’s ok- cracks add character!


Step 2: Paint the clay letters and the cabinet door
One coat of Rustoleum Metalic Finish in copper on the letters is all you need. For the door, Julie used a sprayer with chalk-style paint but you can just as well use a paintbrush to apply the paint if you don’t have a sprayer.


Step 3: Antique the letters
After the spray paint is dry, dab some bright blue paint and darker green to the edges of the letters where a natural patina might occur then dab with a paper towel to blend it in.

Brush on the antiquing wax then wipe it off to get a beautiful aged look!
-

Paint On -

Wipe Down
Julie chose not to distress the cabinet door because she wanted a clean look for this piece.
Step 4: Glue down the letters to the cabinet
Julie used Gorilla Glue Clear Grip Adhesive, but Titebond Quick and Thick would work too. Make sure to spread the glue all the way to the edges of the backside of the letters to get full adhesion.
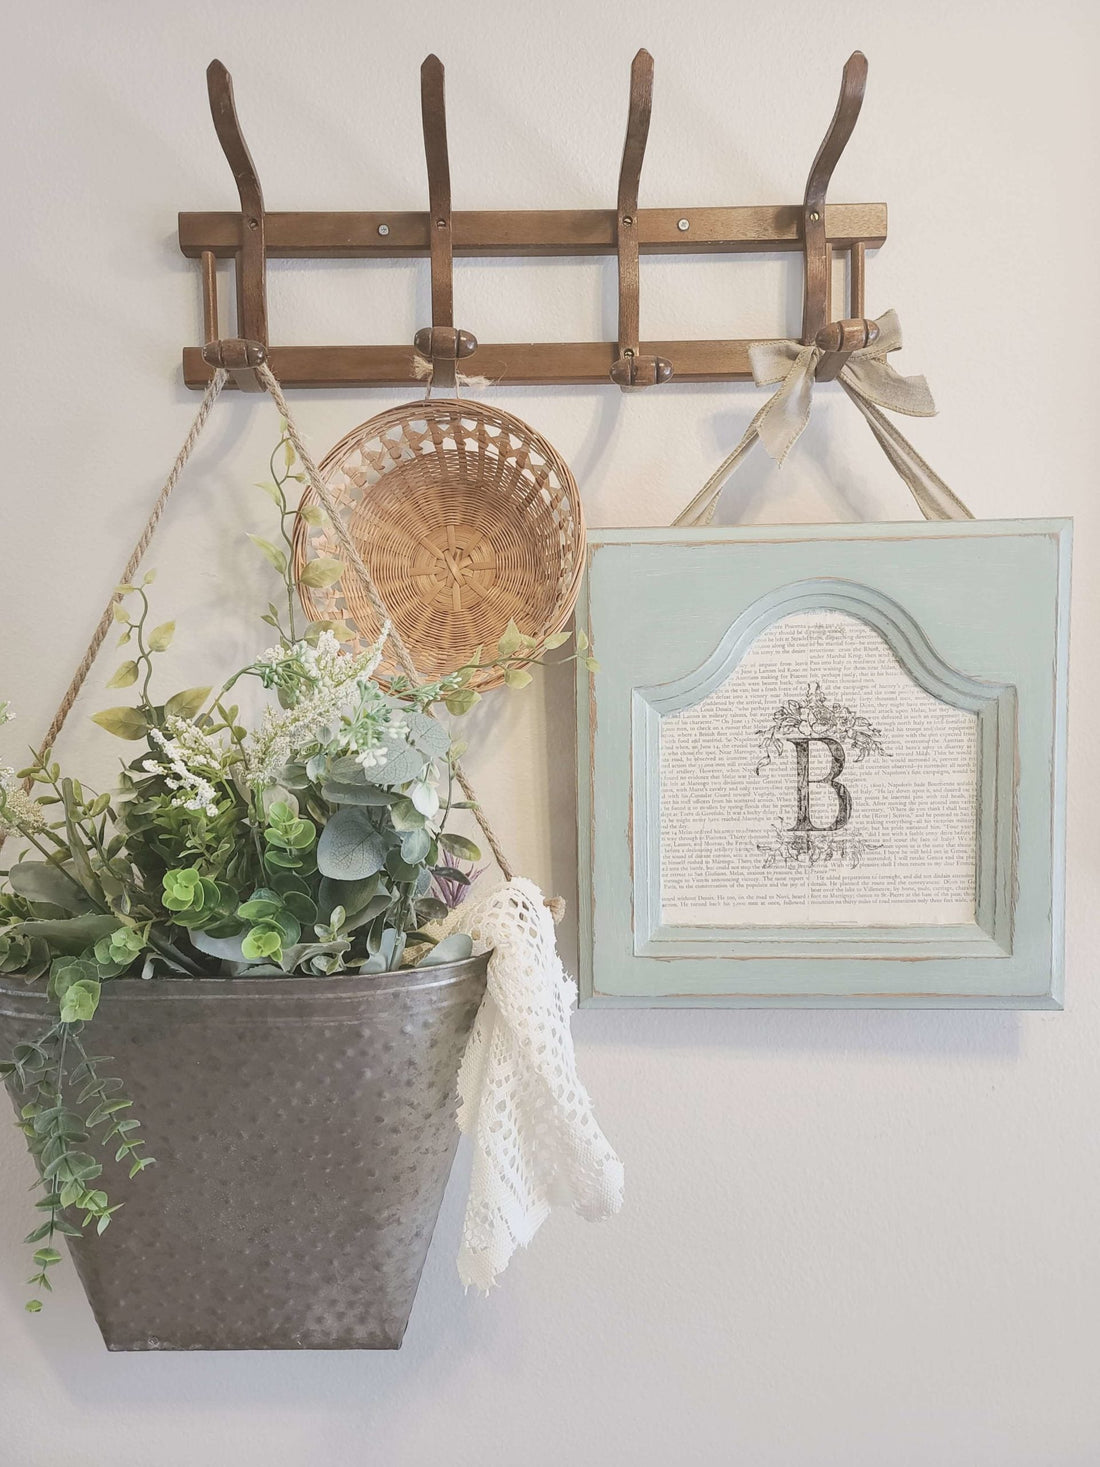
Project 2: Decoupage + monogrammed shabby chic wall art

Here is everything you’ll need for this project:
All IOD products can be purchased from an approved stockist. To find your local retailer, click here.
(This post contains affiliate links.)
- Prepared Old Cabinet Door
- Alphabellies Stamp by IOD
- Typesetting Stamp by IOD
- Thin Mount with gridlines by IOD
- Your favorite brand of chalk style or mineral-based paint in a minty green
- Paintbrush
- Fine-grit sandpaper
- Decoupaging medium in matte (Julie used Modge Podge)
- Old page from a book
- White Wax
- Paper towel
Step 1: Paint the cabinet door and distress
Julie adds color to this cabinet door with two coats of chalk paint. Then she sanded down the edges and corners to give it a distressed look.

Step 2: Decoupage the book paper in the inset
Cover the inset of the cabint with Modge Podge and press the book paper inside, paying particular attention to the edges. Let the Modge Podge dry thoroughly, then cut around the edge of the book paper with an exacto knife and remove the excess paper.


Step 3: White wax over the painted part of the repurposed cabinet door
This makes the piece more cohesive and brings the design together. Brush the wax on, then take a paper towel and wipe it off. Let the wax dry completely. (NOTE: Avoid getting wax on the book page where you plan to stamp the monogram.)

Step 4: Add the Stamped Monogram with Alphabellies Embellishment
Alphabellies stamps can be used on their own or to add some flair to any of the IOD Font sets.
Stamp the image you want to appear on top (in the foreground) first. In this case, Julie wants the “B” in front. Attach the letter to the thin mount, add IOD Black DecorInk by bringing the ink pad to the stamp and patting it. When stamping- hover, commit, and don’t shift. Use one hand to stabilize the stamp while pressing along all the design details of the stamp with your other hand. You want to ensure good contact with the piece. (For more stamping basics, check out this post.)

All IOD Stamps come with a matching mask, a thin piece of flexible plastic cut precisely to the size of each stamp. Use the mask to cover the stamped image that will appear in the front. Lay out the Alphabellies stamp how you’ll want it to appear, then attach it to thin mount.
Ink the Alphabellies Stamp, hover, commit and don’t shift over the mask covered letter. Lift straight up, remove the mask and see why we are so smitten!
-

The B is covered with a mask -

Stamp over the mask
Project 3: Do It Yourself Vintage Flower Pocket

Here is everything you’ll need for this project:
All IOD products can be purchased from an approved stockist. To find your local retailer, click here.
(This post contains affiliate links.)
- Prepared Old Cabinet Door
- Alphabellies Stamp by IOD
- Typesetting Stamp by IOD
- Swoosh Stamp by IOD
- Thin Mount by IOD
- Chalk Paint
- Paint Brush
- Sand Paper
- Drop Cloth cut large enough to create a pocket
- Stapler
Step 1: Paint the cabinet door and lightly distress
Julie went back to an antique white for this project. Go with what suites your style!
Step 2: Stamp the drop cloth pocket
Measure the front of your cabinet so you know how much room you have for stamp placement. Next, lay your stamps including the Alphabelies out to get a visual of how you want the finished project to look. Mount the Alphabellies Stamps and an anchor stamp, in this case the “o” in place on the IOD Thin Mount.


Bring the IOD Ink pad to the stamps and pat on the ink. The stamp should be nice and juicy since you are stamping on fabric. Hover, commit, and don’t shift! Press down with one hand, ensure good contact with the other, then switch. Lift the stamps straight up.
Cover the Alphabellies stamped image with the matching mask. Lay out the remaining letters, mount to IOD Thin mount and repeat the process above.
-

Alphabellies Stamp is covered with a plastic stamp mask
Julie did this process a section at a time at a time to ensure proper placement. Take it slow at first until you get used to the stamping and masking. It’s all about the reps!


A stamped image on the front pocket (Farmhouse, Butterflies, Peonies, Chrysanthemum or Grapes?) would also look super cute!
Step 3: Mount the pocket
Wrap the drop cloth around the bottom of the cabinet and staple it to the back. Julie used a hand held stapler.

Project 4: Make Your Own Cottagecore Style Serving Tray

All IOD products can be purchased from an approved stockist. To find your local retailer, click here.
(This post contains affiliate links.)
- Prepared cabinet door
- Tray Handles and hardware to attach them (Julie re-purposed old spindles)
- Retro Stamp by IOD
- Thin mount with gridlines by IOD
- Chalk Paint
- Artists Brush
- Baby Wipe
- Brad Nailer (to attached handles, optional)
Step 1: Mount handles to the cabinet door
Julie customizes tray handles to make them unique. For this project, she cut down 2 spindles, attached a block of wood to each side with a brad nailer. She painted both white, then affixed the handles to the piece, with screws coming from the bottom.

Step 2: Stamp on Letters
Lay out the stamps and attach them to your thin mount. Ink your stamps by bringing the ink pad to the stamp and patting on the ink. Stamp your word down- commit, don’t shift, lift straight up. Julie made a tiny oopsie with the order of her letters but fixed it right up!


Leave your letters on the thin mount- you’ll use them again in this project. Use a baby wipe to wipe the stamps clean while on the thin mount.
Step 3: Use chalk paint to color in the letters
The Retro Stamp works double duty as a stamp and like a stencil! (Almost all IOD Stamps are this versatile!) Use an artist brush to fill in the letters with chalk paint. Julie used the same chalk paint as she did on her handles. Apply 2 coats.
If you want a more weathered and worn look, use a fine grit sandpaper to sand over the dry chalk paint. Wipe any dust off with a baby wipe.
-

Sand Down -

Wipe Dust
Step 4: Repeat Step 2
Load up your Retro Stamp letters with ink and go over your letters again to outline them. Since you left them on the Thin Mount from Step 2, they will line up perfectly!

Which project was your favorite? Let us know in the comments.
You might also enjoy these making these DIY home decor projects. Click on the caption go go to the post.


 ×
×

DIY Christmas: Create Stunning Fairy Ornam...
Pin this article to save for later Looking for the perfect touch of elegance to adorn your tree or a wonderful handcrafted gift this season? This elegant Christmas fairy ornament is sure to delight, and...

DIY Terracotta Bauble Ornaments with IOD M...
Pin this article to save for later We have a fun one for you today! We made these lovely terracotta bauble ornaments that are going to be perfect for a vintage touch on your Christmas...