DIY Beach Decor: Coastal Wall Art Collection
Need some DIY beach decor ideas? We’re bringing you breezy, relaxed vibes with this coastal art collection. (And we *may* have snuck in some bling along the edges to give it a little extra glam!)
This DIY home decor project is perfect for easy beach bathroom decor or a beach themed living room on a budget.
No time now? Pin this post for later.

Watch the video below or keep on scrolling for a complete supply list and step-by-step instructions.
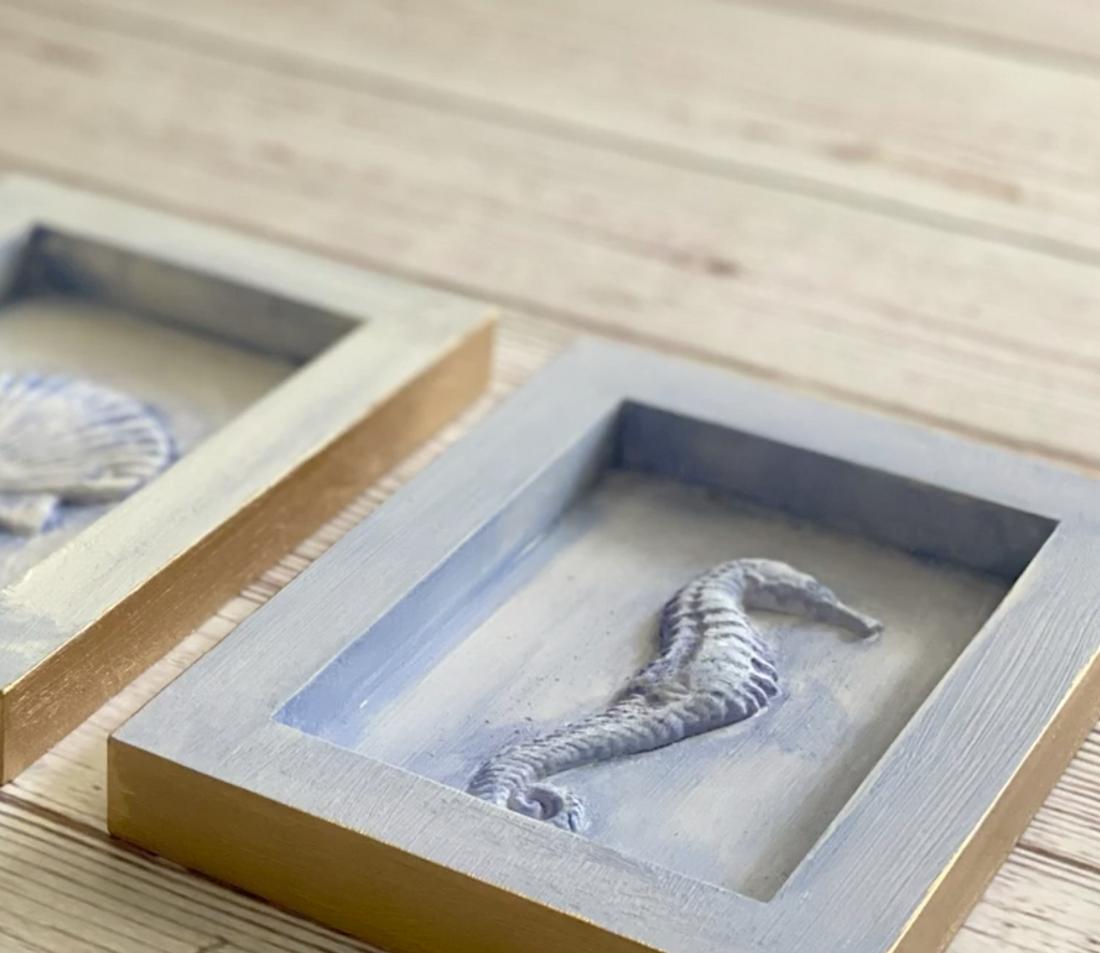
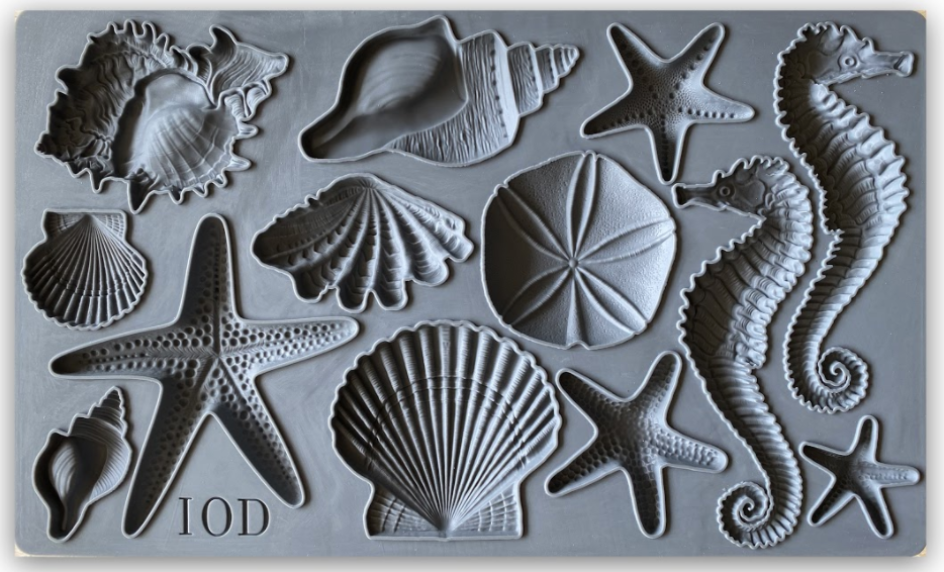
We’re using the new IOD Wood Gallery Blanks and the Sea Shells Mould – silly Sally’s pick, of course!
Here’s a peek at all the casting designs you get with this food-safe, heat resistant silicone mould.
Beyond beach cottage decor, you can use these moulds to make furniture onlays for a coastal dresser makeover or as beach decor embellishments for upcycled home accessories. (Wouldn’t these moulds be just fabulous on a lamp base?)
In addition to DIY home decor, IOD moulds are also great for soap making, DIY jewelry, cake decorating, baking and more!
Here’s everything you need for this Beach Decor DIY project.
All IOD products can be purchased from an approved stockist. To find a shop local to you, click here. To find an online store, click here.
(This post contains affiliate links.)
- Three 5” x 7” Wood Gallery Blanks by IOD
- Sea Shells Mould by IOD
- Air Dry Clay by IOD
- Putty spatula (optional: you can use your fingers as well)
- Cornstarch
- Titebond Quick & Thick Glue
- Paint brush, your IOD stockist can recommend a favorite
- Lint-free shop cloth
- White chalk or mineral based paint
- Blue glaze, mix 1 part paint to 5 parts water
- Cup of water
- Liquid Leaf (optional: For edge of frame)
- Small paint brush (optional: For use with Liquid Leaf)
- Fine grit sanding block (optional: For distressing)
- High quality water-based polyurethane sealer with a matte finish
Note: Before you get started, if this is your first time using IOD moulds and air dry clay check out this beginner moulds tutorial for all the basics.
Step 1: Prep the Sea Shells mould.
Dust a little bit of cornstarch into the mould cavity. Then tap out any excess powder by flipping the mould over on your work surface.

This will make it easier for the seahorse and shell castings to release from the mould. This reduces any distortion from pulling on the wet clay casting and also helps it retain all the intricate details.
Step 2: Make the beach theme castings.
Approximate how much clay you need to fill each mould cavity and pull that amount off the block of clay (better to err on the side of too much, though).
We made a sea horse and two sea shells but you can choose whatever you like. Now, take a second to put away any unused air dry clay back in a sealable bag while making sure to squeeze out extra air before closing. This will keep it from getting hard and drying out.
Using your thumbs, push the air dry clay into the mould. Press it in really well so that all the details are captured.

Remove excess clay by scraping the back at a low angle with a spatula. The spatula should be pressed against the raised micro rim of the mould so you get a smooth, flat back and a clean edge on the casting. (You can also just use your fingers for the step if you prefer.)

Flip the mould over and fold it back to release the casting onto your work surface.

Step 3: Glue the casting back side down inside the shadow box side of the gallery blank.
Flip the gallery blank so the framed shadow box side is facing up.
Apply the glue to the back side of the casting. Make sure the entire surface is coated with glue – going all the way to the edges of the casting.

Then place it where you want on the gallery blank. Seat the casting by gently pressing it down, especially along the edges to ensure good contact.

Wipe away any excess glue that squished out with your finger or a clean, dry paint brush.

As the clay dries you may have some minor cracking, which is normal for air dry clay. If this bothers you, you can fill the spots in with more air dry clay or paint. Personally, we love the cracks because it gives pieces character and handmade authenticity.

You can let the clay fully dry and then paint, or you can paint your wall decor before the casting is fully cured – just be careful not to press too hard with the paint brush as you might distort the details.
Step 4: Paint your DIY beach decor with white chalk or mineral based paint.
Using your favorite chalk or mineral type paint, apply an even coat of paint to your project.

You can be a little creative with your stroke pattern, using a cross hatch or other texturing technique, if you like.
Allow the white paint to completely dry before moving on to the next step.
Step 5: Mix and apply the blue glaze to make the details POP!
Decide how dark or light you want your glaze to be as this will inform your ratio of paint to water. We mixed one part paint to five parts water because we wanted a lighter, ocean mist effect but you can add more paint if you want to go darker.

Before brushing on the glaze, get a crumpled, wet-but-not-dripping-wet shop cloth ready so you can wipe off the glaze before it dries.
Liberally brush on the glaze all over the project – especially in the corners and let it pool in the casting details.

Immediately use your damp shop cloth to wipe, dapple, and blot the glaze. Work at this until you’re happy with the shading and texture, but not too much as you don’t want to reactivate the white paint.

Let your project dry.
Step 6: Add some bling to the outer edge of the frame with gold paint.
As you might already know, we just LOVE stinky gold paint and it adds just the right amount of drama and glamour to any project.

Allow time for it to dry.
Step 7: Distress and seal.
If you want a more vintage beach look, use a fine grit sanding block to distress along the front and edge of the frame to reveal some of the wood underneath. Wipe away any dust and then seal with a thin layer of high-quality water-based polyurethane sealer in matte
You can make all three pieces of coastal wall art at the same time. Or, if you prefer, you can DIY each piece separately by repeating the steps above to make your coastal art collection.
For more DIY beach decor, check out this post: Sand & Sea: DIY Wooden Beach Sign
In addition to the Sea Shells Mould, IOD also carries two other DIY beach decor products.


Do you just love beach house decor and coastal interior decoration? Let us know in the comments below.
 ×
×
popular
- How to Apply IOD Athenaeum Gilded Transfer to Colored Glass Bottles
- From Ugly Duckling to Gorgeous | Black Dresser Makeover with IOD Marché des Fleurs
- 5 Creative Ways to Use One Decorative Stamp
- Turn Thrifted Finds into Charming Garden-Inspired Decor with a DIY Jadeite Finish
- Little Lark Paint Inlay Projects: Vintage Teapot & Canvas Wall Art with IOD