DIY Faux Metal Letters on a Repurposed Drawer Front
This tutorial is going to be a 3-for-1 –> THREE creative ideas all in ONE “audacious” project! First, a better way to make New Year’s resolutions. Second, what to do with a dresser that’s beyond saving. And finally, how to DIY faux metal letters with the new IOD Retro Stamp!
You’ll never have to worry about not having the right metal letters again! Now let’s get to it…
No time now? Click here to pin this post for later.
Do you make, keep, and break New Years’ Resolutions? Yep, definitely a thing…the breaking part that is 😆!
Well, instead of making a New Year’s resolution, IOD stockist Royce Hunt-Bell, from Roycycled Treasures in Safford, AZ, chooses words of affirmation. She picks ones that will guide, lead, or push her to improve throughout the year. How cool is that?
She puts the words where she can see them as often as possible. Everywhere from wearable art to DIY wall decor placed around her shop and house.

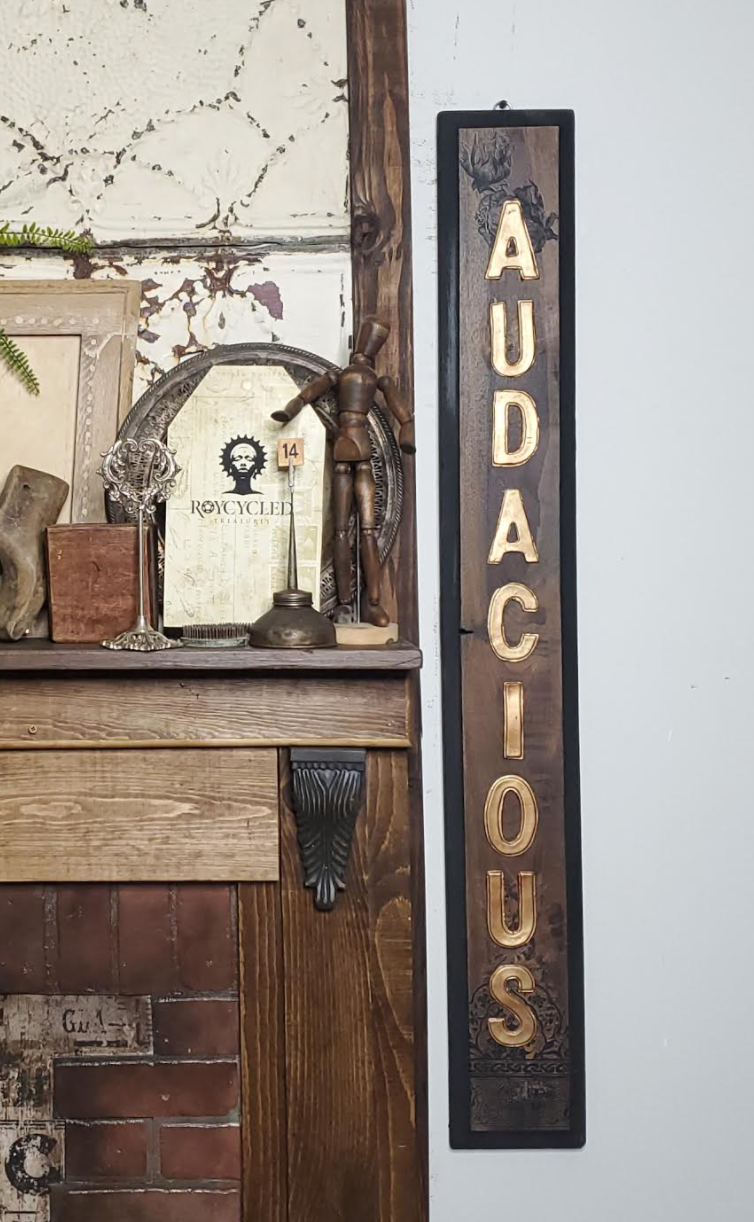
One of her words this year is, you guessed it, “AUDACIOUS” —> as in having the courage to push out of your comfort zone and be bold.
To remind herself of her word, Royce decided to repurpose a drawer front from an old walnut dresser that was beyond refurbishing. She dismantled the dresser to reuse the wood and set aside the drawer fronts to use to make DIY wall art.
Since she didn’t have all the metal letters she needed on hand, she decided to IOD some letters. Using the IOD Retro Stamp and IOD Air Dry Clay, she can make whatever beautiful faux metal letters she wants!
Watch in the video below how Royce creates her “Audacious” sign. Keep scrolling for a supply list and instructions.
If you want to know when you can catch another one of Royce’s shows on IOD TV, check out this post to see the current Live video tutorial schedule.
Here’s everything you need to DIY faux metal letters into inspiration wall art
All IOD products can be purchased from an approved stockist. To find a shop local to you, click here. To find an online store, click here.
(This post contains affiliate links.)
- Retro Stamp by IOD
- Air Dry Clay by IOD
- Astoria Transfer by IOD
- Old dresser drawer front or wood board
- Waterbased Sealer for topcoat
- Paint brush to apply sealer
- Tite Bond Quick and Thick glue
- Metallic paint (your local stockist can recommend their favorite)
- Small paint brush (for metallic paint)
- Cornstarch
- Old make-up brush
- Acrylic roller with O-rings on the ends
- Clay sculpting tools
- Silcone work mat
- Optional for antiquing the letters: clear wax, dark wax, wax brush and lint-free cloth OR, if color washing, a cup, water, black paint, small paint brush and lint free cloth
Step-By-Step Instructions
Step 1: Apply a thin coat of a water-based polyurethane sealer to old drawer front.
Since Royce is going to be using an IOD Transfer on the wood sign, she starts out prepping her piece by sealing it with a water-based sealer. Check with your IOD Stockist to get a product recommendation.
Royce strongly recommends taking this step so that the transfer will adhere well to the surface of the wood. The IOD Transfers are made to work best on a smooth, dry surface, so you’ll want to make sure the piece is completely dry before applying the transfer.
Step 2: Rub on the IOD transfer.
Cut apart the bit of transfer you’d like to use. Royce chose a few flowers from the Astoria Foliage Transfer to add a bit of femininity, but you can choose whatever suits your style.
Use the tool provided to rub the image only to wood.

More pro-tips for using IOD Transfers from Royce:
- Use extra care to keep the transfer attached to the facing sheet. She uses tape to keep the pieces together after she’s cut something out of a transfer. The transfer is on a sticky backing and it can accidentally stick to another surface – including itself.
- When you’re cutting out certain pieces of the transfer, keep in mind that the way you cut it will impact the next piece you want to use from the transfer. Cut carefully and mindfully.
- After applying a transfer, burnish it by rubbing it all over with the grid-lined transfer backing over to make sure it adheres to the surface well.
Royce adds just a little of the Astoria Transfer to bring some femininity to her piece. Her preferred style is an industrial look – “steam punkish” it’s been called. So the combination of wood and black is her go-to look.
She places the transfer pieces at the top and bottom of the wood sign and to create balance she offsets them.

Now she’s ready to create her letters!
Step 3: Roll out the IOD Air Dry Clay.
First, prep your area by using a large silicone work mat, if available. Just as when you work with cookie dough, dust lightly with cornstarch to prevent the clay from sticking.
Pull off a piece of the Air Dry clay and begin to work it a bit, kneading it with your hands to make it soft and pliable.
Lay it on the silicone mat. Then, use a small rolling pin to roll out a consistent ⅛” thickness slab of clay. Royce put O-rings on the ends of her roller as a guide.

Now it’s time to start stamping out the letters!
Step 4: Plan your letter layout.
The letters in the Retro stamp are fairly large, so before going any further, Royce plans out how they will fit onto her sign. Since her word “Audacious” requires two A’s and two U’s, and the stamp only comes with one of each letter, she uses other letters with similar size and shape orientation to ‘fill in.”
For an extra A, she uses an upside down V and for the second U, she uses the J. She lays the individual letter stamps onto the board to do what she calls a ‘dry mount’, making sure of her spacing.
Step 5: Stamp the clay to make DIY faux metal letters.
Royce recommends you cut out each letter leaving the rigid backing attached as a mount. You can later store the individual letters in a zippered pouch for organization.
If you haven’t used the IOD Stamps before, make sure to check out this post to learn how to prep and condition them for first-time use.
Now it’s time to stamp out the letters. Royce gives each letter a light dusting with cornstarch before placing them onto the rolled clay. Then she pushes the stamp straight down into the clay.

Pressing with her fingers, instead of using the rolling pin across the back of the stamp, gives a clean sharp edge to the letters.

After removing the stamp, she cuts the individual pieces out using a clay sculpting tool. As she finishes, she sets each letter aside.

Here’s where she stops her process to clean up a bit. She returns each individual letter stamp to the zipper pouch and seals up the unused Air Dry Clay by putting it into a ziplock bag, adding a wet paper towel to keep it soft and moist.
Step 6: Glue the letters on the old drawer front.
Since Royce dry mounted the letters when planning her design, she knows approximately where each one will go.
First, she checks the edges of the letters to make sure they are cleanly cut. If the clay is still soft, she can clean up loose bits with the clay sculpting tool. If it’s already dry, she will use an emery board to lightly sand the edges smooth.
Apply the Tite Bond Quick Dry glue to the back of each letter making sure to get all the way to the edge. Lay them on the board and gently press down to make sure there is good contact (but be careful not to press so hard as to distort the letter).

Let the glue dry and the clay cure overnight, if possible.
Step 7: Paint the letters with metallic paint.
Once the glue has dried and the clay is completely dry, the next step is to paint the letters with metallic paint to create the look of old brass letters.
Allow the paint to dry completely.
If the metallic paint is too shiny, glaze it with a color wash using 1 part black paint to 6 parts water. Check out this post for more on how to color wash.
Alternatively, you could apply a clear wax to the letters and then brush on a dark wax over it. Wipe away the dark wax with a lint until you get a sheen you like.
Step 8: Finish with another coat of a clear, water-based sealer.
The IOD Retro Stamp letters can look so many different ways depending on how you finish them. Here’s a few other project ideas with this
What’s your word of the year? Let us know in the comments below and go get stamping!
 ×
×
popular
- How to Apply IOD Athenaeum Gilded Transfer to Colored Glass Bottles
- From Ugly Duckling to Gorgeous | Black Dresser Makeover with IOD Marché des Fleurs
- 5 Creative Ways to Use One Decorative Stamp
- Turn Thrifted Finds into Charming Garden-Inspired Decor with a DIY Jadeite Finish
- Little Lark Paint Inlay Projects: Vintage Teapot & Canvas Wall Art with IOD