IOD Design Team: DIY Resin Christmas Ornaments
IOD Design Team member, Lexi Grenzer, is dropping all kinds of tips and tricks for crafting with resin while making these gorgeous vintage DIY resin Christmas ornaments.
No time now? Pin this project for later.

Before we jump in, meet Lexi
You may recognize the name — Lexi is the artist behind our limited edition Woodland Christmas Transfer.

She’s a self-trained mixed media artist who started with jewelry design and has expanded her portfolio to include original works of watercolor and oil paint, soaps, washi tape and more.
Lexi’s art focus is largely nature inspired, and it’s no surprise that birds are so frequently featured in her work – they are her favorite after all! (Did you see the beautiful blue jay and cardinals she made for us?!?!)
Learn more about Lexi by checking out her website (she offers art classes!) and follow her on Instagram.
How to DIY Resin Christmas Ornaments
Lexi created a detailed video tutorial you can watch below. Or, if you prefer to read, keep scrolling for a supply list and step-by-step instructions.
Here’s everything you need for this DIY holiday decor project
All IOD products can be purchased from an approved stockist. To find a shop local to you, click here. To find an online store, click here.
(This post contains affiliate links.)
- Floral Swags Stamp by IOD
- Kindest Regards Stamp by IOD
- Woodland Christmas Transfer by IOD
- Holly Jolly Stamp by IOD
- Ink pad and Inks by IOD (your stockist can recommend which colors you need to mix for a sepia tone or you can buy a pad of brown permanent ink)
- Quick cure resin
- Clear resin
- Large resin measuring cup
- Wide stir sticks
- Nitrile gloves
- Round silicone soap molds
- Fine grit standing block
- Deli paper
- Heat tool
- Matte white glue
- Brush for glue
- Glass glitter
- Fine brush for glue for glass glitter
- Hand drill with 3/16th inch bit
- Ribbon
Note: Before you get started, if this is your first time using IOD stamps please check out this beginner stamps tutorial. It will give you all the basics including how to condition your stamps before first use.
Protect and prep your work area… When setting up for this project, Lexi recommends taping down a trash bag to work over or you can use a silpat sheet dedicated to crafts.
First, make the resin ornament blanks
Step 1: Mix the quick cure resin according to the package directions.
Place the large measuring cup on a level surface so as you pour you can clearly and accurately measure.
Lexi used 3 oz of liquid A and 3 oz of liquid B. This left her enough room to fold the resin mixture to combine it instead of stirring as folding reduces the appearance of air bubbles in the resin.
With this quantity of resin, Lexi was able to make 6 resin ornament blanks.
Mix thoroughly. You’ll feel the resin warming up through the measuring cup as the chemical reaction occurs.
Step 2: Pour the resin into the molds and cure.
Pour an even, thin layer of the resin into each cavity of the silicone soap mold. Each one should be approximately 1 oz of the resin mixture.

Wait for the resin to be fully cured – about 10-15 minutes. It should be completely white and rigid with no flexibility at all. Once they’re cured, you can easily pop them out of the molds.
Remove the sheen from the resin by sanding it with a fine grit sanding block. This will create a matte appearance and also provide a grip for when you glue the deli paper down.
Next, create and adhere your Christmas designs on the ornaments
Step 1: Using the deli paper, plan and stamp your holiday designs.
For all three DIY resin Christmas ornaments, the basic stamping steps will be the same.
Lay the deli paper so that matte side is facing up. Load the stamp with ink by patting the ink pad on the raised stamp surface. Heat set the ink with the heat tool for about 20 seconds being careful not to get too close. Heat setting will keep your ink from bleeding and smudging when glue it onto the resin blank.
For the bird ornament… stamp the bird first. Then cover the impression with a paper mask, which will protect it from the next layer of script stamp. (To learn more about making masks and the masking technique, check out this tutorial.)

On the bird and holly sprig ornaments, Lexi uses a discontinued IOD script stamp to get a vintage, handmade look. You can use the new Kindest Regards Stamp, which will give you the same script effect.

Repeat the stamping steps for the remaining two ornaments – using the snowflakes from the Holly Jolly Stamp and Kindest Regards for the holly sprig ornament.
Step 2: Glue the stamped papers on the DIY resin Christmas ornaments.
Brush on a thin layer of matte glue on the resin blank. Then smooth the stamped deli paper onto the surface.
Gently brush another thin layer of glue on top of the paper and use your fingers to gently smooth out the stamped paper. Push out any bubbles or creases.

Allow the glue to fully dry.
Step 3: Remove the excess paper from the ornament.
Take your sanding block and rub it away from the ornament toward the outer edge. This will cut the paper to perfection and create a smooth, finished look.
Now you can set the bird ornament aside while you keep working on the snowflake and holly sprig ornaments.
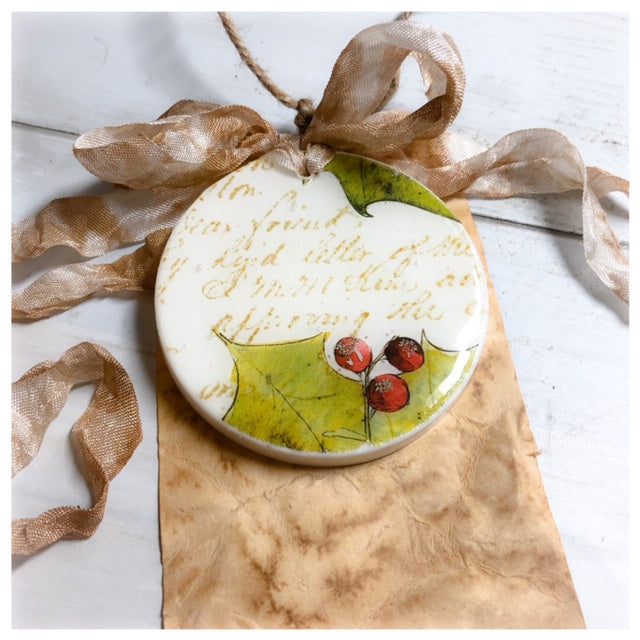
Rub on the holly sprigs from the Christmas transfer
Step 1: Cut and arrange the holly sprigs over the script stamp.
Keeping the non-stick backing on, cut and layout your transfer bits until you have a composition you like.
Lexi talks you through her thought process on arranging and layering but you can also check out this post which gives some good pointers and tips on combining and arranging transfers.
Step 2: Using the transfer tool, rub on the images.
Lexi uses just a little bit of the Woodland Christmas holly leaves and berries.

Set this ornament aside while you finish the snowflake ornament.
Add some sparkle to your snowflakes!
Glitter REALLY pops under resin, so you don’t want to skip this step.
With a fine brush, dab the matte glue where you want some highlights and sparkle. Sprinkle the glass glitter over the glue before it dries and shake off any excess.

Lexi recommends doing this over a piece of deli paper so you can tap the excess off onto the paper and put the unused glitter back in the container.
Seal your designs with a layer of clear resin
Lexi recommends doing this step in the evening because the clear resin will take about 10-12 hours to cure.
Step 1: Mix the resin by following the directions on the packaging.
Resin tip from Lexi: When measuring, always start with the thicker of the two liquids, which with clear resin, is A. Set the measuring cup on a flat surface and give it a moment since the thicker consistency causes it to level out more slowly.
For these DIY resin Christmas ornaments, you going to use 1 oz of each A and B liquids. Fold to mix and read the packaging for how long to mix for. Lexi mentioned for her brand, it’s about 5 minutes, but each type or brand of resin could be different.
Step 2: Leave the resin for 5 minutes to “de-gas.”
This allows the air bubbles to rise to the surface which makes them easier to pop.
While you’re waiting for the mixture to de-gas, Lexi recommends having another mold ready so you don’t waste a drop of extra resin. If you want to do that, you can get the mold she uses here.
Step 3: Coat the top of the ornament with the clear resin.
Using your stir stick as a tool, flood a bit of the resin over the top of the ornament and pull it to the edges. This only needs to be a thin layer.

For the snowflake ornament, you want to more gently glide the stick over the glitter so as not to disturb the glitter.
This top coat of resin will magnify the transfer colors and designs – making them more crisp, vivid, and sparkly.
Allow to cure undisturbed for 10-12 hours.
Finish your DIY resin Christmas ornaments with a ribbon
You can choose whatever you like to hang your ornament. Lexi created a faux ‘antique’ silk ribbon using a coffee wash and scrunch technique, but you can use twine or hooks if you prefer.

Starting on the back side of the ornament, drill a 3/16″ in hole at the top of the ornaments. Lexi uses a hand drill, but you can use an electric drill and customize the hole size to suit whatever you plan on threading through.

You can also personalize the resin ornaments on the back by inscribing a message.
Did you make this project? Let us know in the comments below or share a picture with us on social media. We’d love to see!
Here are some other DIY Christmas decor ideas you might like!


 ×
×
popular
- How to Decorate Thrifted Tins with IOD Marche Des Fleurs Transfers
- Framed in Beauty | How to Create Vintage-Inspired Floral Wall Art With IOD
- 3 Creative Craft Projects to Try with the IOD Summer Collection
- HOW TO MAKEOVER A VINTAGE STORAGE CADDY WITH IOD STAMPS, MOULDS & TRANSFERS
- How to Build a Bouquet with the IOD Marche de Fleurs Transfer | Iron Orchid Designs