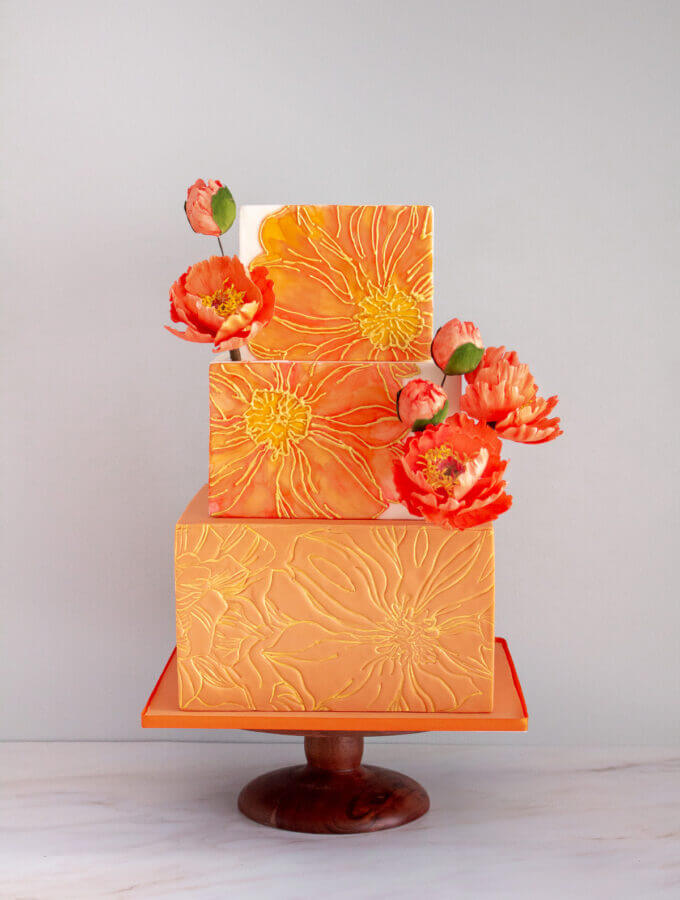
Watercolor Cake: An Easy Technique for Beginner Cake Decorating
Have you been dreaming of a watercolor cake for your next special occasion but can’t paint to save your life? You’re in the right place because we’ve got a step-by-step tutorial for you by the deliciously talented
Ashley Barbey of The Little Vintage Baking Company.
No time now? Pin this for later.

Ashley is an accomplished sugar artist who’s been featured in American Cake Decorating magazine. If you’ve seen any of her cake tutorials or you follow her on Instagram, you know that she loves using IOD products in many of her confectionary masterpieces.


STAMPS AND CAKE DECORATING
You can stamp outlines, or create impressions with stamps and can employ a wide variety of techniques. This easy watercolor flowers cake features techniques like watercolor painting, royal icing detail, impressing fondant, and more that is easy, quick to decorate, and perfect for all skill levels. If you’re like Ashley and you have shaky hands, or can’t paint freehand, then this tutorial is just for you!
Iron Orchid Designs Stamps used in this Watercolor Cake
Ashley used the Peonies Stamp, but the Sunflowers, Chrysanthemums, Branches & Vines, and Grapes Stamps would also work well with this technique.

-

Sheet 1 of the IOD Peonies Stamp -

Sheet two of the IOD Peonies Stamp
To get this stamp or any other Iron Orchid Designs product, please find a retailer near you by using our store locator.
THE TOP TIER
Stamp impress the fondant
Ashley used square tiers for this cake and paneled them. It’s much easier to stamp impress fondant before it is on the cake. This allows you to make an even impression and lessens the risk of stamping too hard and ripping the fondant. IOD Stamps are a favorite of Ashley’s because they’re durable, food-safe, and super high quality.
Start by rolling out white fondant to the size needed. Dust a bit of sugar to match on the stamp to act as a release agent (so the stamp doesn’t stick to the fondant). Then. with firm, even pressure push the stamp design into the fondant. Take care not to go too hard – you don’t want to push the stamp completely through. Now your ready to “watercolor.”
Make your “watercolors”
The best thing about making a watercolor cake is that there is no right or wrong way to do it. Ashley used gel food color mixed it with a bit of Everclear alcohol. For the petals, she used
Americolor orange and electric pink (which are the same colors used for the coral fondant for the bottom tier of the cake). She used Americolor gold (yellow) for the center of the peonies. (These are Ashley’s affiliate links.)
To make your ‘watercolor’, mix the food color with Everclear alcohol to get a thin, liquid-y paint. The goal is to add watercolor to your cake gradually, which means you want to aim for a more watery, not too pigmented “paint.”
Watercolor the fondant
Alternate between the pink and orange colors on the flower petals, layering them on top of each other until you’re happy with the look. For best results, leave some parts of the watercolor flowers light and some darker. Variation looks beautiful for this style of cake design!
For the center of the flowers, brush on the gold/yellow “watercolor,” and blend it with a bit of orange where it meets the petals.
-

Create a stamp impression in the fondant -

Paint the cake -

How pretty!
Add a Royal Icing Outline
To really emphasize the stamped detail, Ashley outlined the stamp lines with royal icing. Don’t try to make the lines perfect. Keep them a bit messy and ragged-looking. This makes them look a bit more realistic rather than sharp and perfect piping. This technique is perfect for non-pipers or inexperienced pipers.
After the royal icing dries, use a soft gold luster dust mixed with Everclear alcohol to paint over the lines. Again, if the paint is uneven or messy, don’t stress because it fits this style of cake perfectly.

THE BOTTOM TIER
Stamped Impressions in Fondant
To make the coral color fondant, Ashley used Americolor orange and electric pink in a 2:1 ratio. She dusted sugar on the peonies stamp to match as a release agent. Firmly impress the tier with the stamp, but not too hard that the stamp pushes through the fondant. To define the lines and design, she used a soft gold luster dust mixed with Everclear alcohol to paint in the impressed lines.


Now all that’s left to do is affix the fondant to the cake and assemble the tiers.

What do you think of this tutorial – do you want to see more sugar arts inspiration? Let us know in the comments below. If you love making your sweet treats beautiful, please join our Sugar Arts Facebook Group.
If you enjoyed this post, you might also like…
 ×
×
popular
- How to Make a 3D Swan Figurine with the IOD Swans Mould
- Thrifted Stool + Lamp Makeover with the IOD Fern Fables Transfer
- How to Apply IOD Athenaeum Gilded Transfer to Colored Glass Bottles
- From Ugly Duckling to Gorgeous | Black Dresser Makeover with IOD Marché des Fleurs
- 5 Creative Ways to Use One Decorative Stamp