IOD Gallery Episode 5
Can you guys believe this Gallery Wall Series?? We are having a blast seeing all of the wall pieces you guys are making as you follow along! We’ve got a new episode for you!! Do NOT feel overwhelmed, the beauty of online tutorials is that they will be ready when you are. We want these to be a wonderful blessing to you all as you beautify your spaces. Thank you for sharing all of the love and encouragement about this series, we’re SO GLAD you are loving it as much as we are!
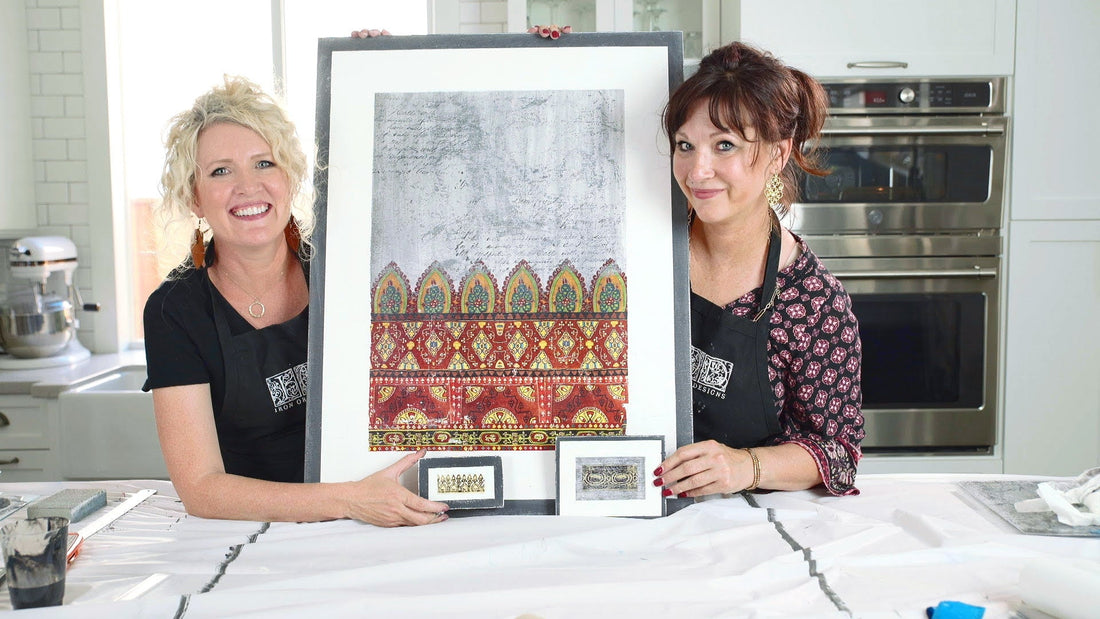
Here are some stills of this project and scroll down for the link to find your IOD Stockist!


To start at the beginning of the IOD Gallery Wall Series and get the plywood cut plan for the complete wall, please see this post. Or, if you want to WATCH the complete Gallery Wall Series, click here.
This post contains a few affiliate links to help you find the products we use. You’re not charged extra to use any of the links, but the few dollars we make will be used toward creating more IOD video tutorials.
Here is a list of all the products you will need to get started:
Bohemian Border Piece:
23.5″ x 30″ sande smooth plywood board
Cream paint
3″ painters tape
Pencil
Ruler
Square ruler
Boxcutter
Charcoal grey paint
Light grey wash from paint (using the same charcoal paint, add water to create a wash!)
Small chinsel brush
IOD Distress Decor Stamp
IOD Kindest Regards Decor Stamp
IOD Bohemian Borders Decor Transfer FIND YOUR STOCKIST HERE
Clear wax
Wax brush
Small hammer
Prim and Trim Pieces:
5” x 6.5” and 5” x 3” sande smooth plywood boards
1” & 2″ painters tape
Pencil
Ruler
Dark grey paint
Light grey wash from paint (using the same charcoal paint, add water to create a wash!)
Small chinsel brush
IOD Prim and Trim Décor Transfer FIND YOUR STOCKIST HERE
Clear wax
Wax brush
Small hammer
Begin with your 23.5″ x 30″ section of the sande smooth plywood board, and be sure to sand the edges with coarse sandpaper. Paint the front and sides of the plywood pieces with your cream paint. Use a pencil and ruler to mark 1” in from the edges of the large board all the way around. Place your 3” painters tape on the inside of this line, and use a boxcutter and corner ruler to trim the edges of the tape for nice, clean corner angles!
On your 5” x 6.5” plywood piece, use a ruler to mark ½” all the way around from the sides and apply your 1” painters tape to the inside of this line. Use the boxcutter and corner ruler again to trim the edges of the tape.
Take your 5” x 3” plywood piece for the tiniest Prim and Trim piece, and place a strip of 2” tape directly in the center. You’ll notice there is about ½” on either side of the tape. Use a ruler to measure ½” from the ends of the plywood and trim the ends of the tape.
On all three pieces, paint outside of the tape and on the sides of the plywood with a dark charcoal paint to create a frame, and be sure that the tape is flat so the lines are sharp!
Now comes the transfer… Using our gridlines as a guide, cut the Bohemian Border transfer to perfectly fit within the tape. Align the transfer with the bottom section of the board above the masking tape. (Note: we recommend letting the paint dry for at least 24 hours before applying the transfer!) Using the provided applicator, apply your transfer to the board. Make sure all pieces of the transfer are pressed to the board with clean hands, and burnish it with a dry shop cloth.
While we’re in transfer mode, let’s get started on the Prim and Trim pieces! Select the transfer section you would like to use for the larger plywood piece, and cut the transfer to fit within the masking tape. On the smallest board, remove the tape completely and use the transfer’s gridlines to measure a transfer section that fits within the grey frame. Apply the transfer section to the boards, use clean, dry hands to press any lifting sections down, and burnish with a dry shop cloth.
Now that the transfers are applied, we are going to use a light grey wash in the cream sections of the pieces! (Tip: use a damp shop cloth to wipe down the cream colored sections above the transfers before you add your wash). Brush the wash on brusquely, and use the damp shop cloth to wipe or blot it off right away.
Once the wash on the Bohemian Border piece is dried, use our IOD Distressed Décor Stamp to apply a subtle texture to the piece. After applying the distressed stamp, use your charcoal grey paint with our IOD Kindest Regards Décor Stamp for even more interest above the Bohemian Border transfer!
Almost complete! Using a sanding square, gently distress the pieces for a vintage feel. Pull the tape off, and seal the pieces with a clear wax coat. Using a small hammer, apply a simple picture hanger to the back of your pieces and hang them on your growing gallery wall!
Here are all the other IOD Gallery Wall tutorials in this series:
 ×
×
popular
- How to Apply IOD Athenaeum Gilded Transfer to Colored Glass Bottles
- From Ugly Duckling to Gorgeous | Black Dresser Makeover with IOD Marché des Fleurs
- 5 Creative Ways to Use One Decorative Stamp
- Turn Thrifted Finds into Charming Garden-Inspired Decor with a DIY Jadeite Finish
- Little Lark Paint Inlay Projects: Vintage Teapot & Canvas Wall Art with IOD